JPC - IoT Code for Discord bot workshop
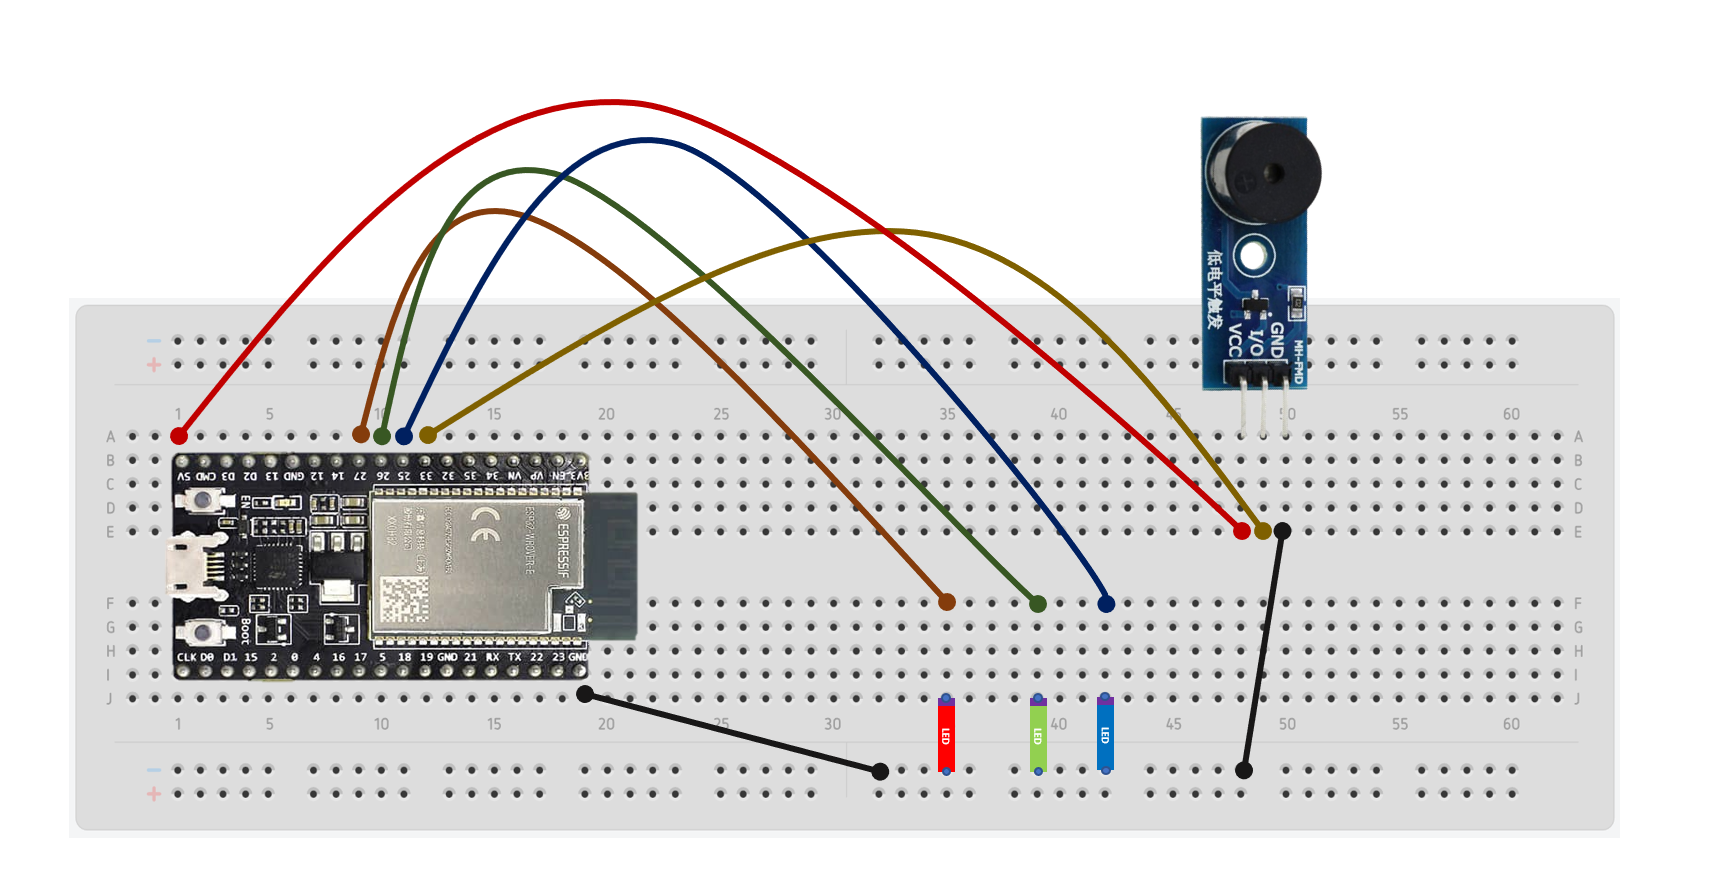
ให้ต่อวงจรในรูปแบบนี้
Personal Hotspot
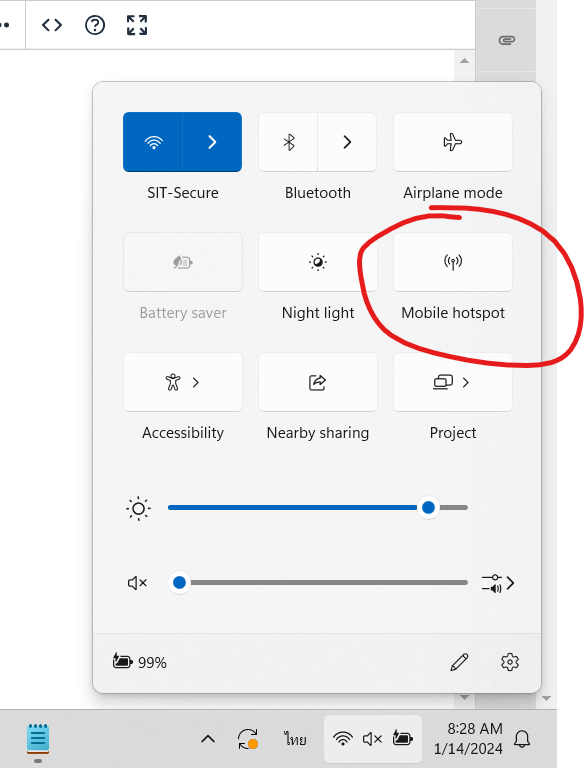
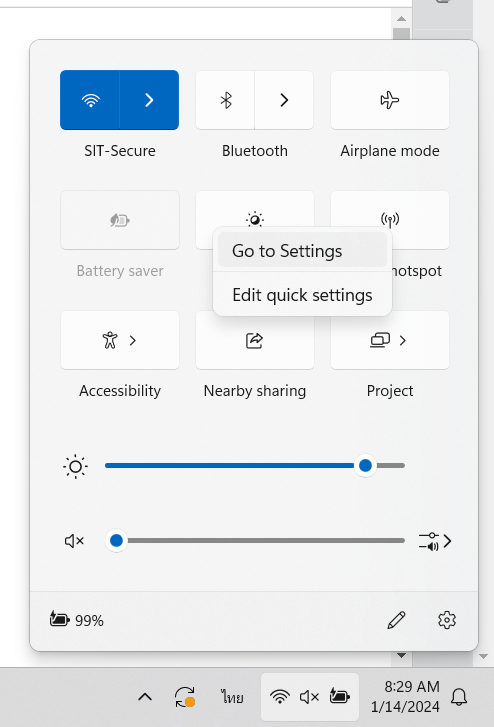
ในเวิร์คชอปนี้ เราจะใช้ Hotspot แยกของแต่ละกลุ่ม โดยแต่ละกลุ่มสามารถเลือก 1 เครื่องในการแชร์ฮอตสปอร์ตให้กับ ESP32 board การแชร์ฮอตสปอร์ตจากคอมพิวเตอร์ สามารถทำได้โดยเปิด Control Plane แล้วกดคลิ๊กขวาที่ Mobile Hotspot > Go to Settings
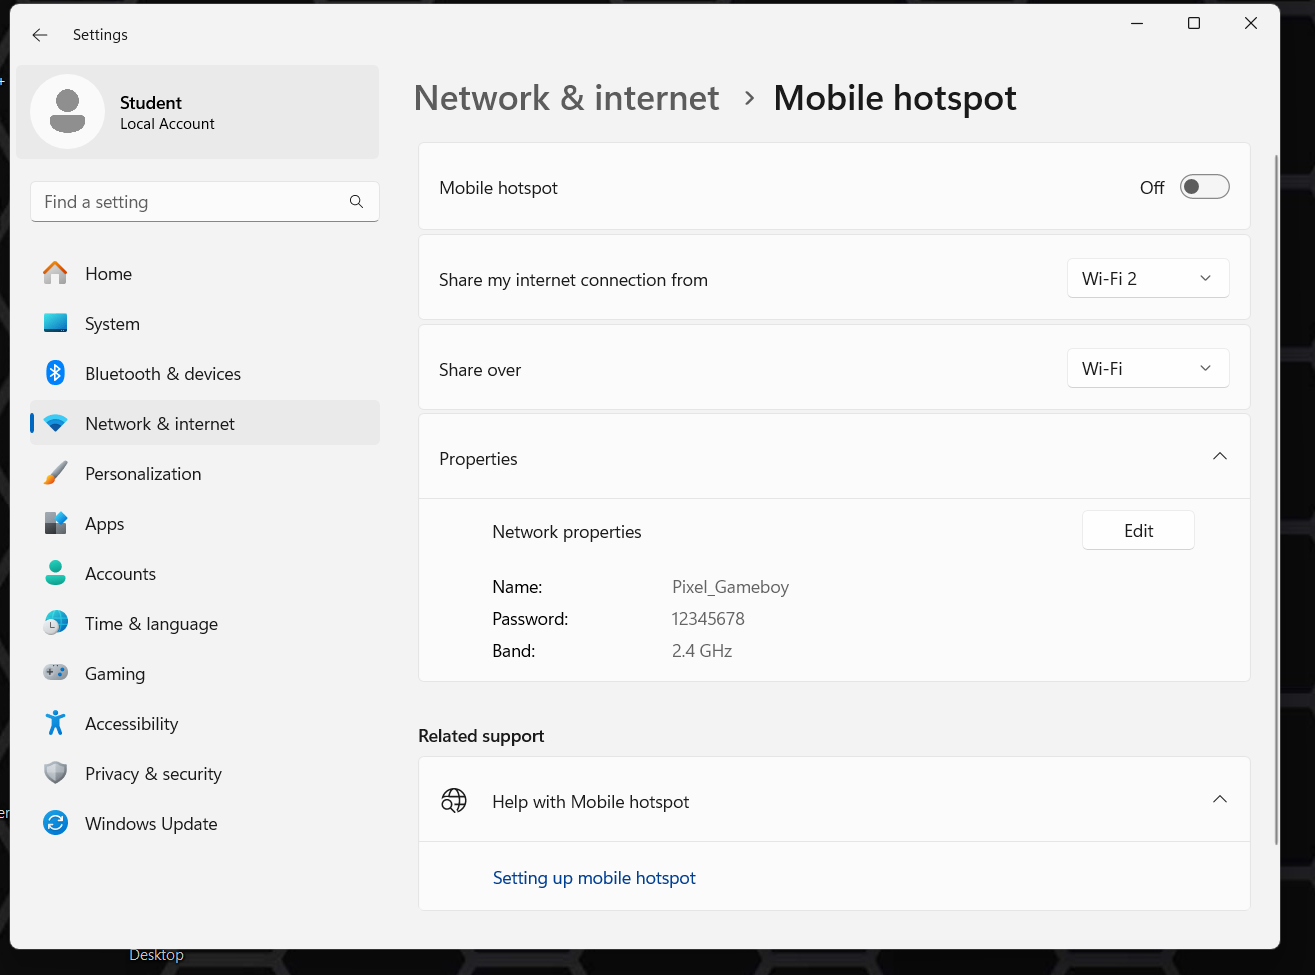
จากนั้นตั้งชื่อเป็นกลุ่ม โดยที่ใช้ underscore แทนเว้นวรรค เช่น Pixel Gameboy เป็น Pixel_Gameboy และการตั้งค่าอื่นๆดังนี้:
เมื่อนำ Wi-Fi SSID และ Password ไปใส่ในโค๊ตแล้วบอร์ดเชื่อมต่อเข้ามาได้ถูกต้อง เราจะเห็น connected devices และ IP อยู่ในหน้านี้
Code
#include <HTTPClient.h>
#include <WiFi.h>
#include <WebServer.h>

// ชื่อ Wifi และ Password ที่จะเชื่อมต่อ
const char* WIFI_STA_NAME = "CSC2G";
const char* WIFI_STA_PASS = "mixkohome50";

// IP Address
char IP_ADDRESS[15];
// Note: Your IP Address: 8.8.8.8

// เอาไว้เพื่อปิดไม่ให้แสดงค่า IP เฉย ๆ
bool disablePrint = false;

// GPIO 27, 26, 25, 33
int LED_RED = 27;
int LED_GREEN = 26;
int LED_BLUE = 25;
int BUZZ_SPEAKER = 33;

// GPIO 2
int LED_WIFI_STATUS = 2;

// ตั้งค่า Port ของ web server
WebServer server(80);

void setup() {
  // ตั้งค่าความเร็วระหว่างการส่งข้อมูลระหว่าง Microcontroller กับคอมของเรา
  Serial.begin(1000000);

  // ตั้งค่า pin ของ LED แสดงสถานะ Wifi เป็นการส่งข้อมูล
  pinMode(LED_WIFI_STATUS, OUTPUT);

  // เชื่อมต่อ Wfi
  WiFi.mode(WIFI_STA);
  WiFi.begin(WIFI_STA_NAME, WIFI_STA_PASS);

  // Loop ไปจนกว่าจะสามารถเชื่อมต่อ Wifi ได้
  while (WiFi.status() != WL_CONNECTED) {
    Serial.println("Connecting...");
    delay(500);
    digitalWrite(LED_WIFI_STATUS, LOW);
  }

  // เก็บเลข IP ลงตัวแปร
  for (int i = 0; i < sizeof(IP_ADDRESS); ++i) {
    IP_ADDRESS[i] = WiFi.localIP().toString().charAt(i);
  }

  digitalWrite(LED_WIFI_STATUS, HIGH);
  pinMode(LED_RED,OUTPUT);
  pinMode(LED_GREEN,OUTPUT);
  pinMode(LED_BLUE,OUTPUT);
  pinMode(BUZZ_SPEAKER, OUTPUT);

  // ตั้งค่า path ให้กับ server ของเรา
  server.on("/", handleRoot);
  server.on("/on", HTTP_GET, ledOn);
  server.on("/off", ledOff);
  server.on("/play", playBuzzSpeaker);
  server.begin();
}

void loop() {
  if (!disablePrint) {
    delay(500);
    printWifiInfo();
  }

  // เปิดให้ esp32 สามารถรับ request ได้
  server.handleClient();
}

void printWifiInfo() {
  // print IP_ADDRESS
  Serial.print("Your IP Address is: ");
  for (int i = 0; i < sizeof(IP_ADDRESS); ++i) {
    Serial.print(IP_ADDRESS[i]);
  }
  Serial.println();
}

void handleRoot() {
  disablePrint = true;
  digitalWrite(LED_RED,HIGH);
  digitalWrite(LED_GREEN,HIGH);
  digitalWrite(LED_BLUE,HIGH);
  // ส่งค่ากลับ
  // 200 คือ ไม่มีข้อผิดพลาด
  server.send(200, "text/plain", "Hello from ESP32!");
}

void ledOn() {
  disablePrint = true;

  // Get the number of arguments in the request
  int args = server.args();

  // Loop through each argument and print its name and value
  for (int i = 0; i < args; i++) {
    if (server.argName(i) == "red") {
       digitalWrite(LED_RED, server.arg(i) == "1" ? HIGH : LOW);
    }

    if (server.argName(i) == "green") {
      digitalWrite(LED_GREEN, server.arg(i) == "1" ? HIGH : LOW);
    }

    if (server.argName(i) == "blue") {
      digitalWrite(LED_BLUE, server.arg(i) == "1" ? HIGH : LOW);
    }
  }

  server.send(200, "text/plain", "The light is on!");
}

void ledOff() {
  disablePrint = true;

  digitalWrite(LED_RED,LOW);
  digitalWrite(LED_GREEN,LOW);
  digitalWrite(LED_BLUE,LOW);

  Serial.println("The lights are off!");
  server.send(200, "text/plain", "The light is off");
}

void playBuzzSpeaker() {
  disablePrint = true;

  int frequency;
  double duration;

  // Get the number of arguments in the request
  int args = server.args();

  // Loop through each argument and print its name and value
  for (int i = 0; i < args; i++) {
    if (server.argName(i) == "hz") {
       frequency = server.arg(i).toInt();
    }

    if (server.argName(i) == "duration") {
      duration = server.arg(i).toDouble();
    }

    // เล่นเสียงตาม frequency ที่กำหนด
    tone(BUZZ_SPEAKER, frequency);

    // เล่นเสียงภายในเวลาที่กำหนด
    delay(duration * 1000);

    // หยุดเล่น
    tone(BUZZ_SPEAKER, 0);

  }

  server.send(200, "text/plain", "The speaker is playing!");
}
GitHub: https://github.com/SITJPC/jpc16-iot/blob/main/jpc16-discord-bot-iot/jpc16-discord-bot-iot.ino
วิธีการยิง API
เปิดไฟ LED
(GET) /on
ส่งมาพร้อม query parameters ตามนี้
- red (bit)
- green (bit)
- blue (bit)
ตัวอย่าง:
http://192.168.2.39/on?red=0&blue=1&green=1
ผลลัพธ์
- red = เปิด
- green = ปิด
- blue = เปิด
ปิดไฟ LED
(GET) /off
ตัวอย่าง:
http://192.168.2.39/off
ผลลัพธ์: ไฟปิดทุกสี
เล่นเสียง
(GET) /play
ส่งมาพร้อม query parameters ตามนี้
- hz (number)
- duration (double)
ตัวอย่าง:
http://192.168.2.39/play?hz=1000&duration=3
ผลลัพธ์: ลำโพงจะเล่นเสียงที่ความถี่ 1000 hz เป็นเวลา 3 วินาที


No Comments