Week2 : DB connection & CRUD
1. What is the Backend?
Backend development (often called the “server-side” development), is the creation of everything that goes on behind the scenes of a website or application that the user can’t see.
The backend normally consists of an application, server and database. As you interact with a site by entering information, this information is stored in a database that resides on a server. Results are then returned to you to be displayed on the site as frontend code.
2. Why not just connect the Frontend directly to the Database???????
- If you connect your database directly from the frontend, you are exposing all your database credentials to the browser, and anyone can look up the code in the console and take it.
- When your database is exposed, anyone can query the data from your databse, just by running a database query in browser console, which exposes other users data too.
- it is not secure at all for managing data or making an algorithm at the frontend.
3. What is API?
API stands for Application Programming Interface. that is the mechanism that enable two software components to communicate with each other using a set of definitions and protocols. For example Frontend and Backend are mostly using REST APIs to communicate with each other.

4. What is REST APIs?

A RESTful API is an architectural style for an application program interface (API) that uses HTTP requests to access the data using HTTP protocol to communicate between Frontend and Backend.
Let's see the example
- Go to the Instagram on website. https://www.instagram.com/
- Go to any profile you want.

- Press
Ctrl (or Command) + Shift + I or F12to open DevTools, the chooseNetworktab and filterFetch/XHR data

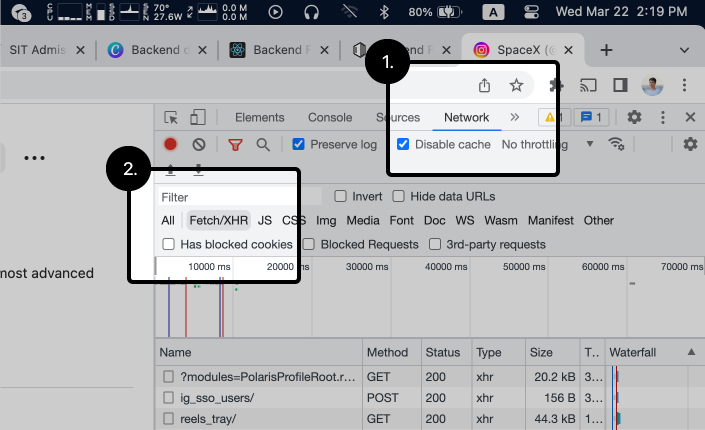
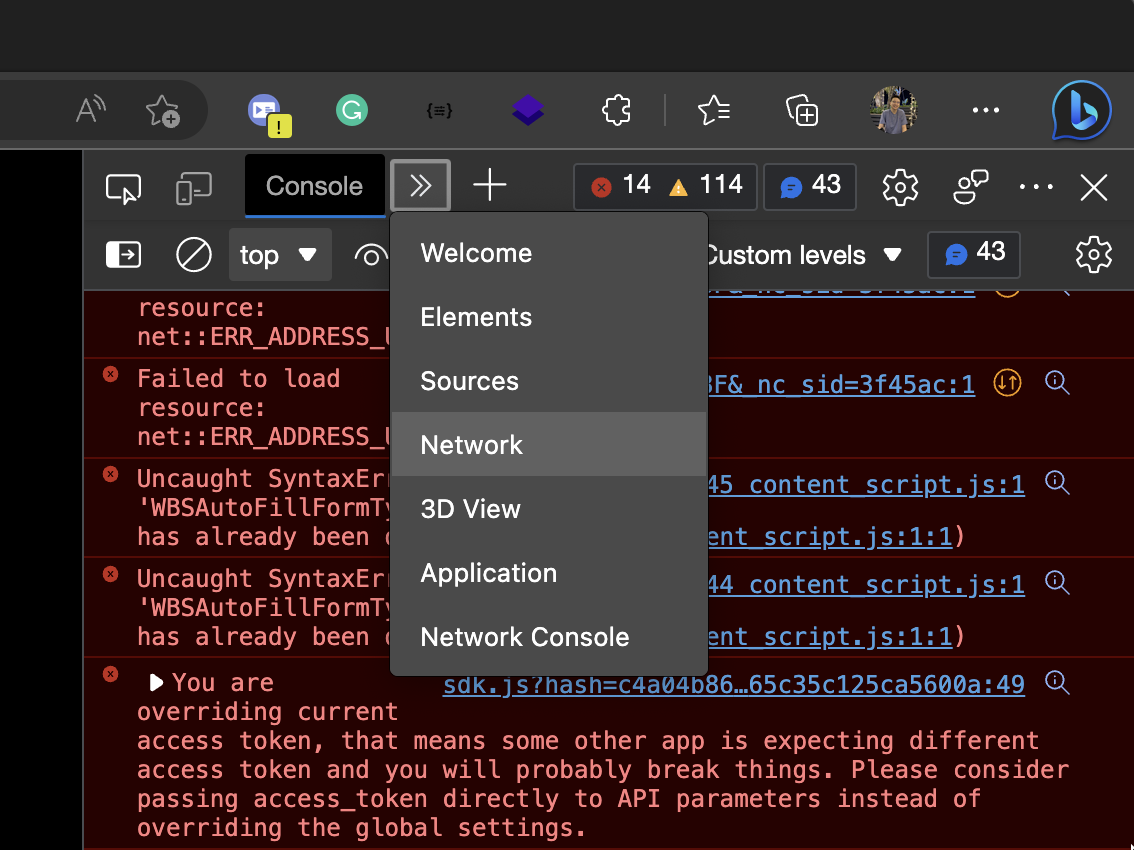
- For some students that are using Microsoft Edge - Click the right arrow and choose
Network
- Refresh the page.
- After you have refreshed the page, you will see that a lot of
requeststhat sent to the Intragram server.
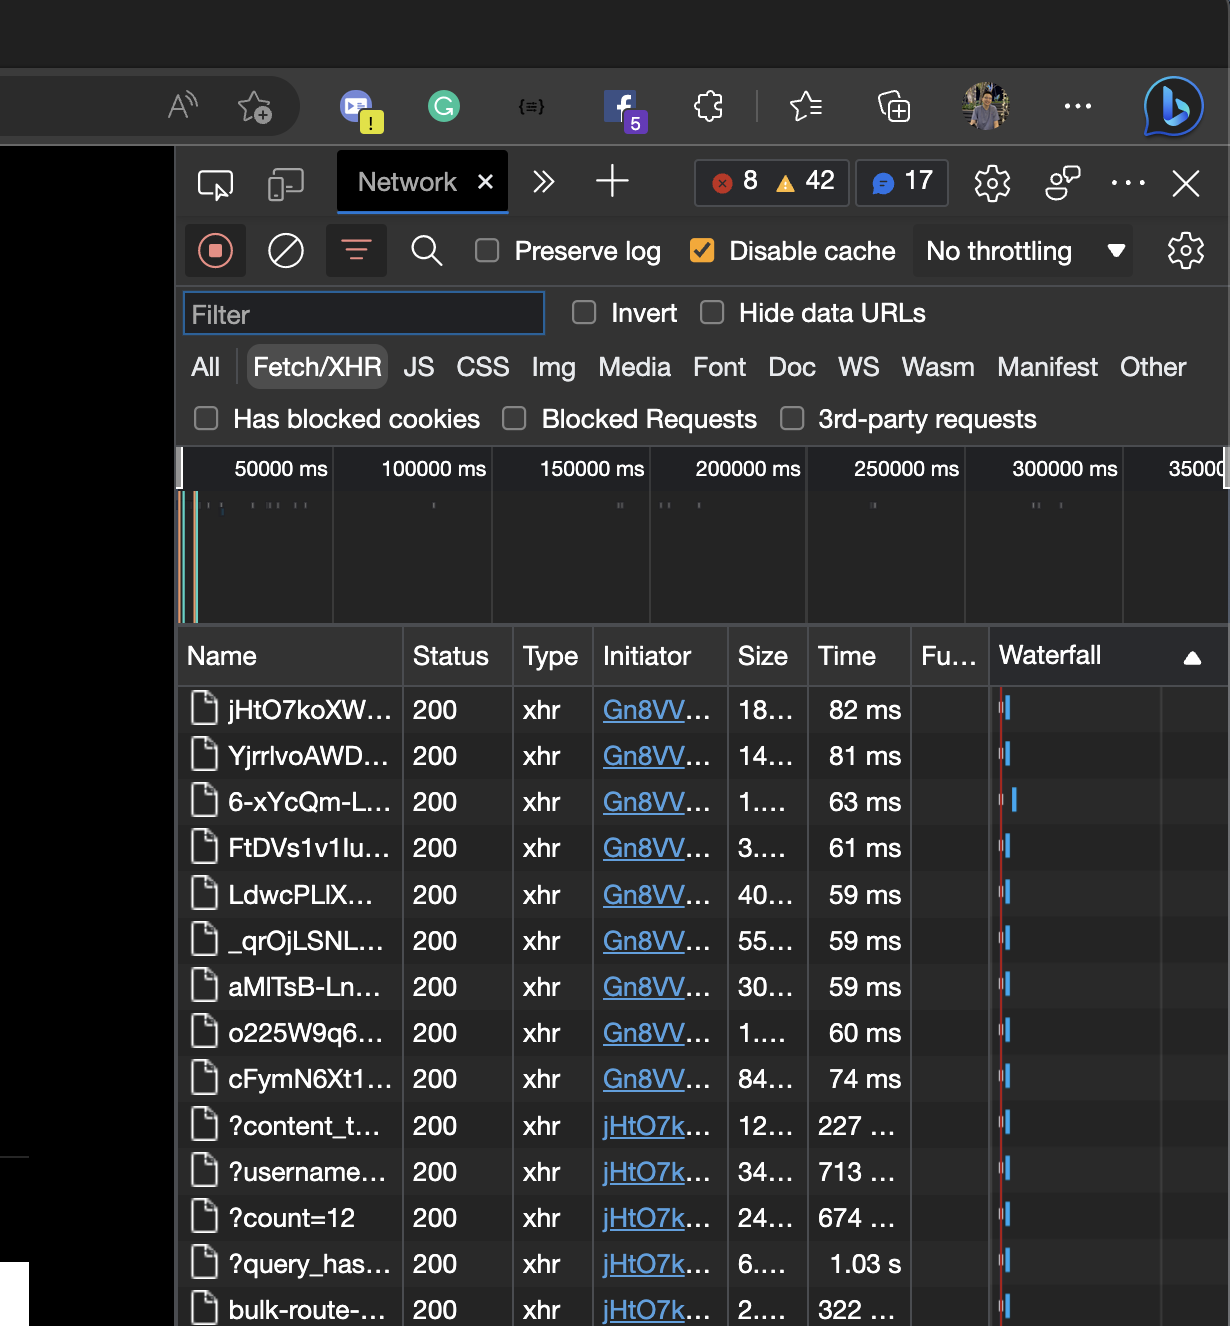
- Click the row name that leading with
?username=...and click theHeaders
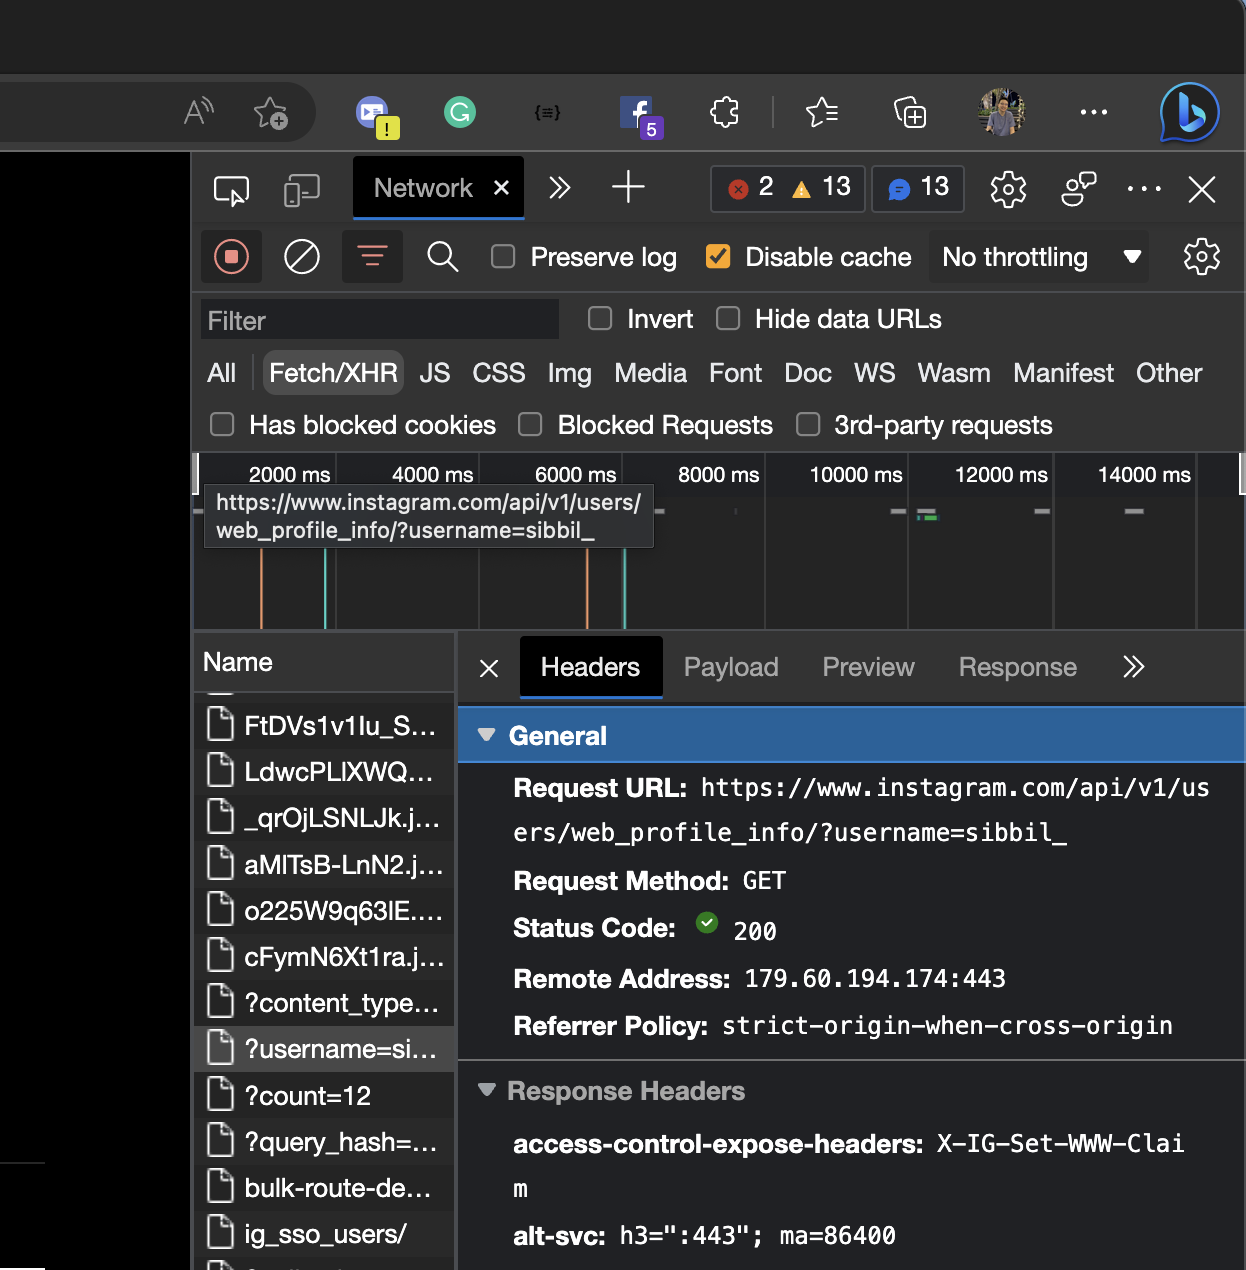
Let's see the details in the Headers -> General
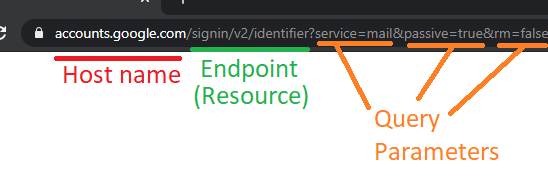
- The Request URL is the link that you sent to request the data from the Instragram server
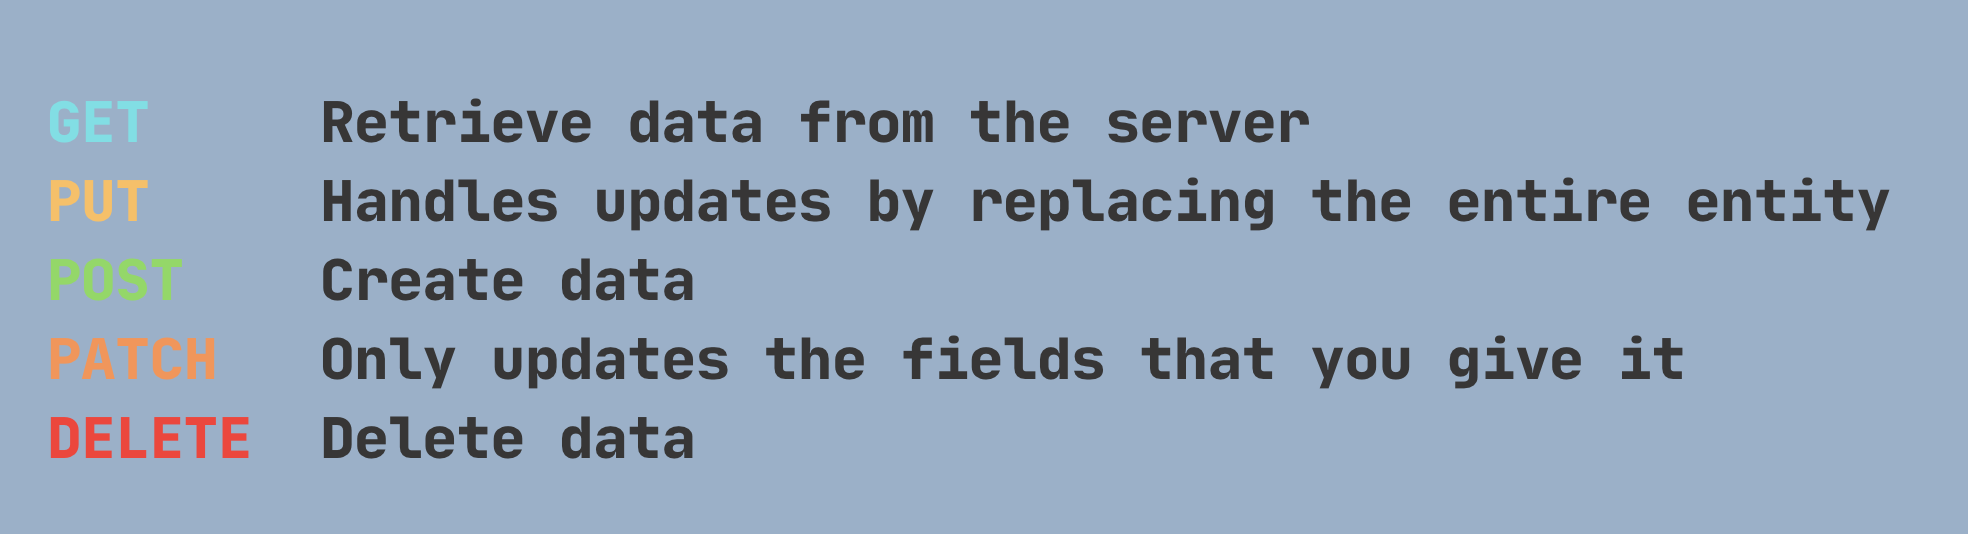
- The Request Method is the method that Identify the action to be performed for a given resource from the Instragram server, For this class we will focus on 5 HTTP methods (you will see the example later).
- GET - Retrieve data from the server
- PUT - Handles updates by replacing the entire entity
- POST - Create data
- PATCH - Only updates the fields that you give it
- DELETE - Delete data
- The Status Code is the HTTP response status codes indicate whether a specific HTTP request has been successfully completed. Responses that we focused in this class are grouped in three classes:
- Successful responses (200 – 299) ✅
- Client error responses (400 – 499) ❌
- Server error responses (500 – 599) ❌
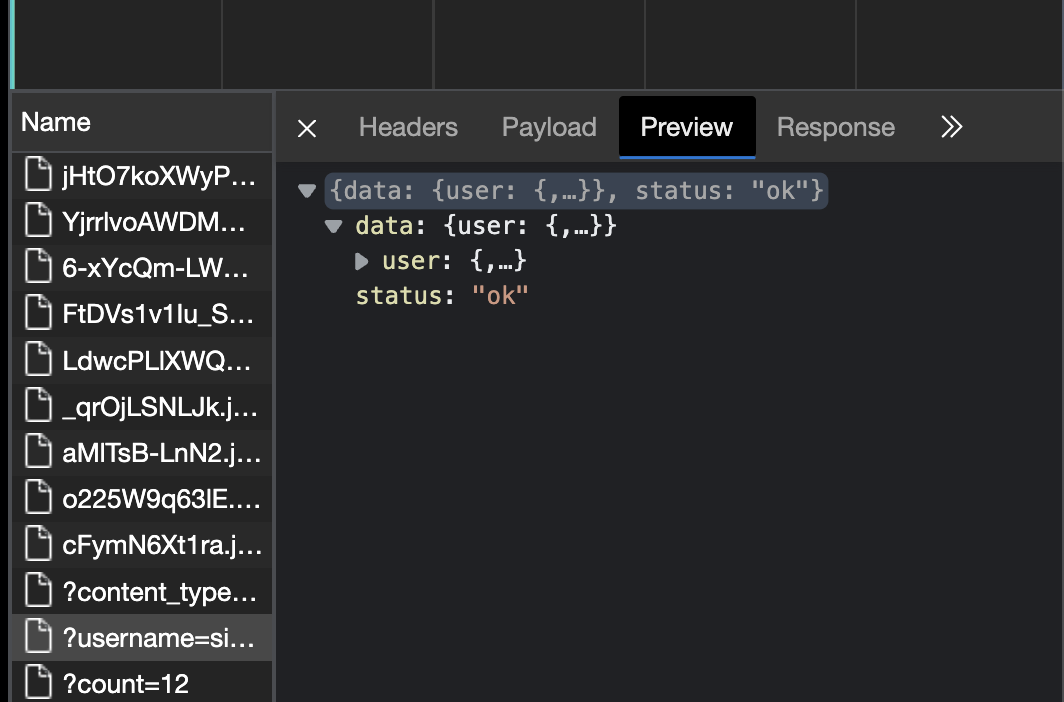
- The Preview and Response are the response from the Instragram server that mostly uses JSON format.
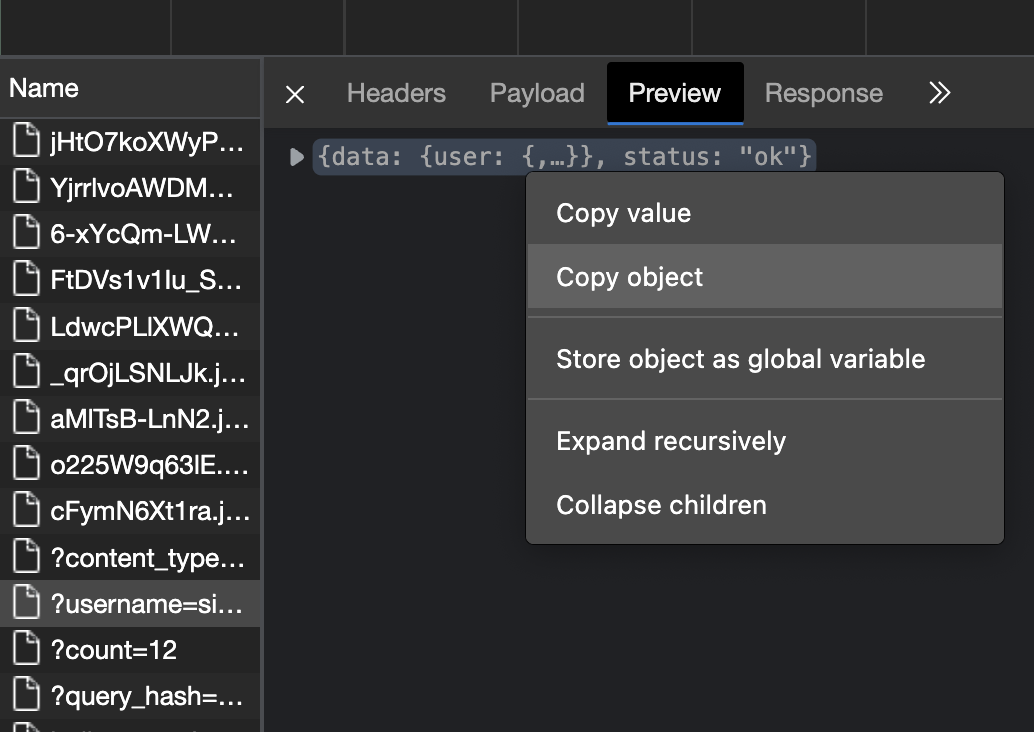
- Right click at the data response at the first line and click copy object.
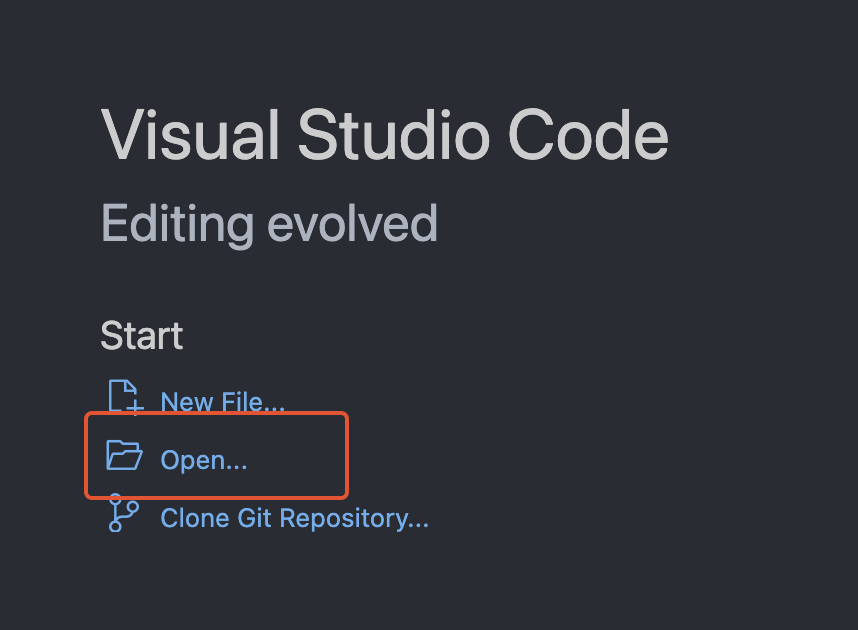
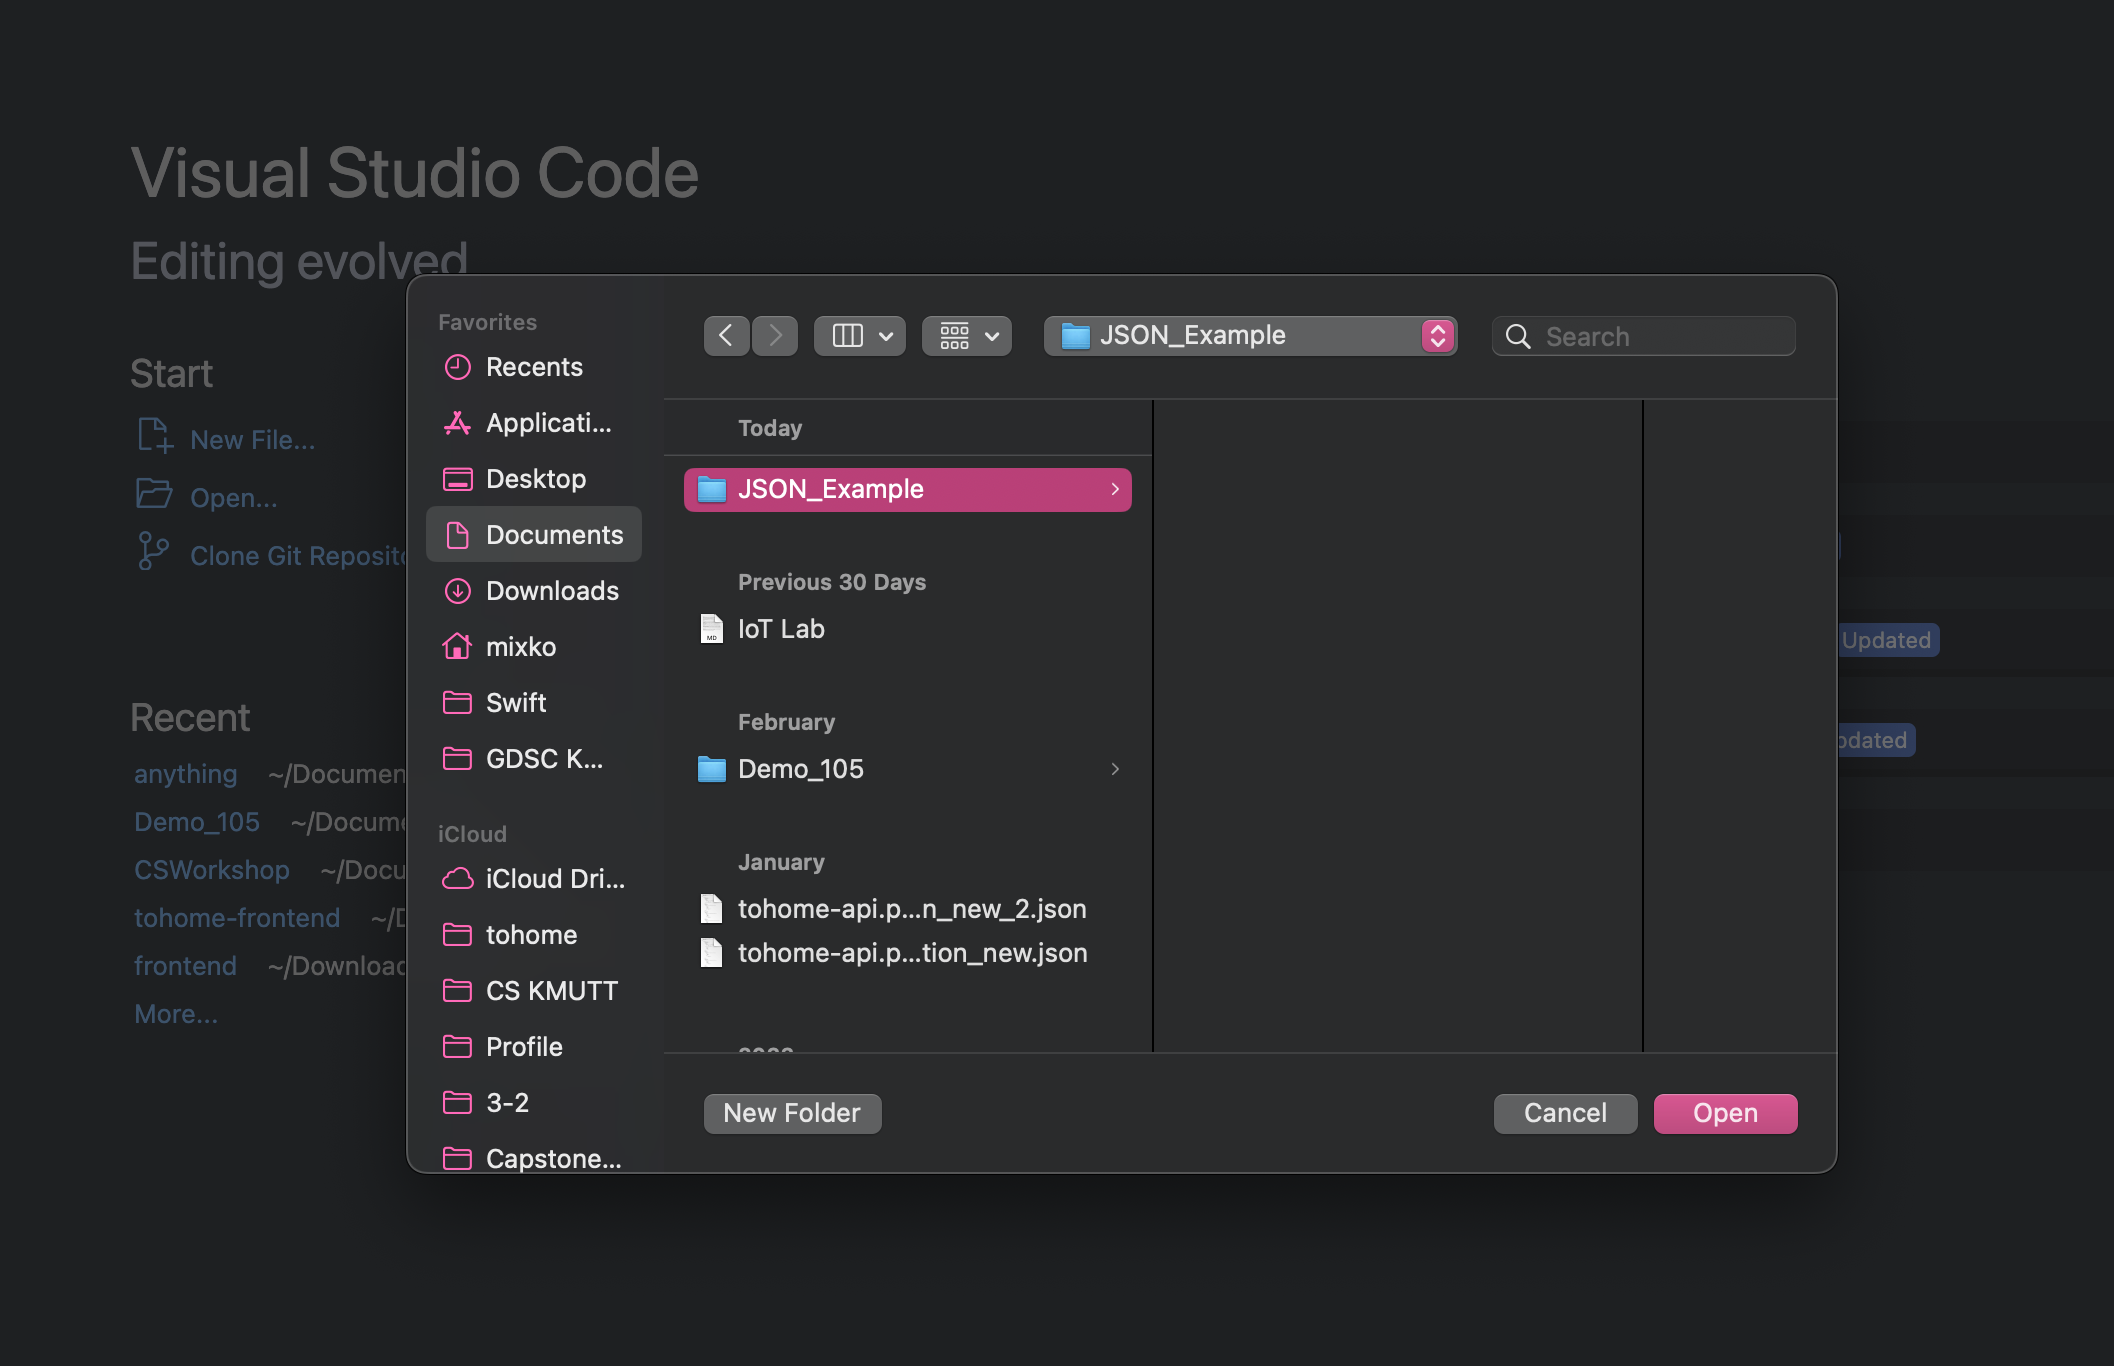
- Go to the Visual Studio Code and Click
openand create a folder and clickopen
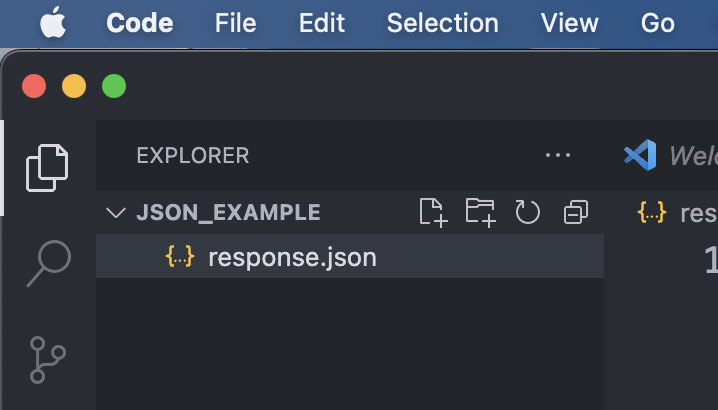
- Create a
response.jsonfile
- Paste the data that you have copied from the webstie.
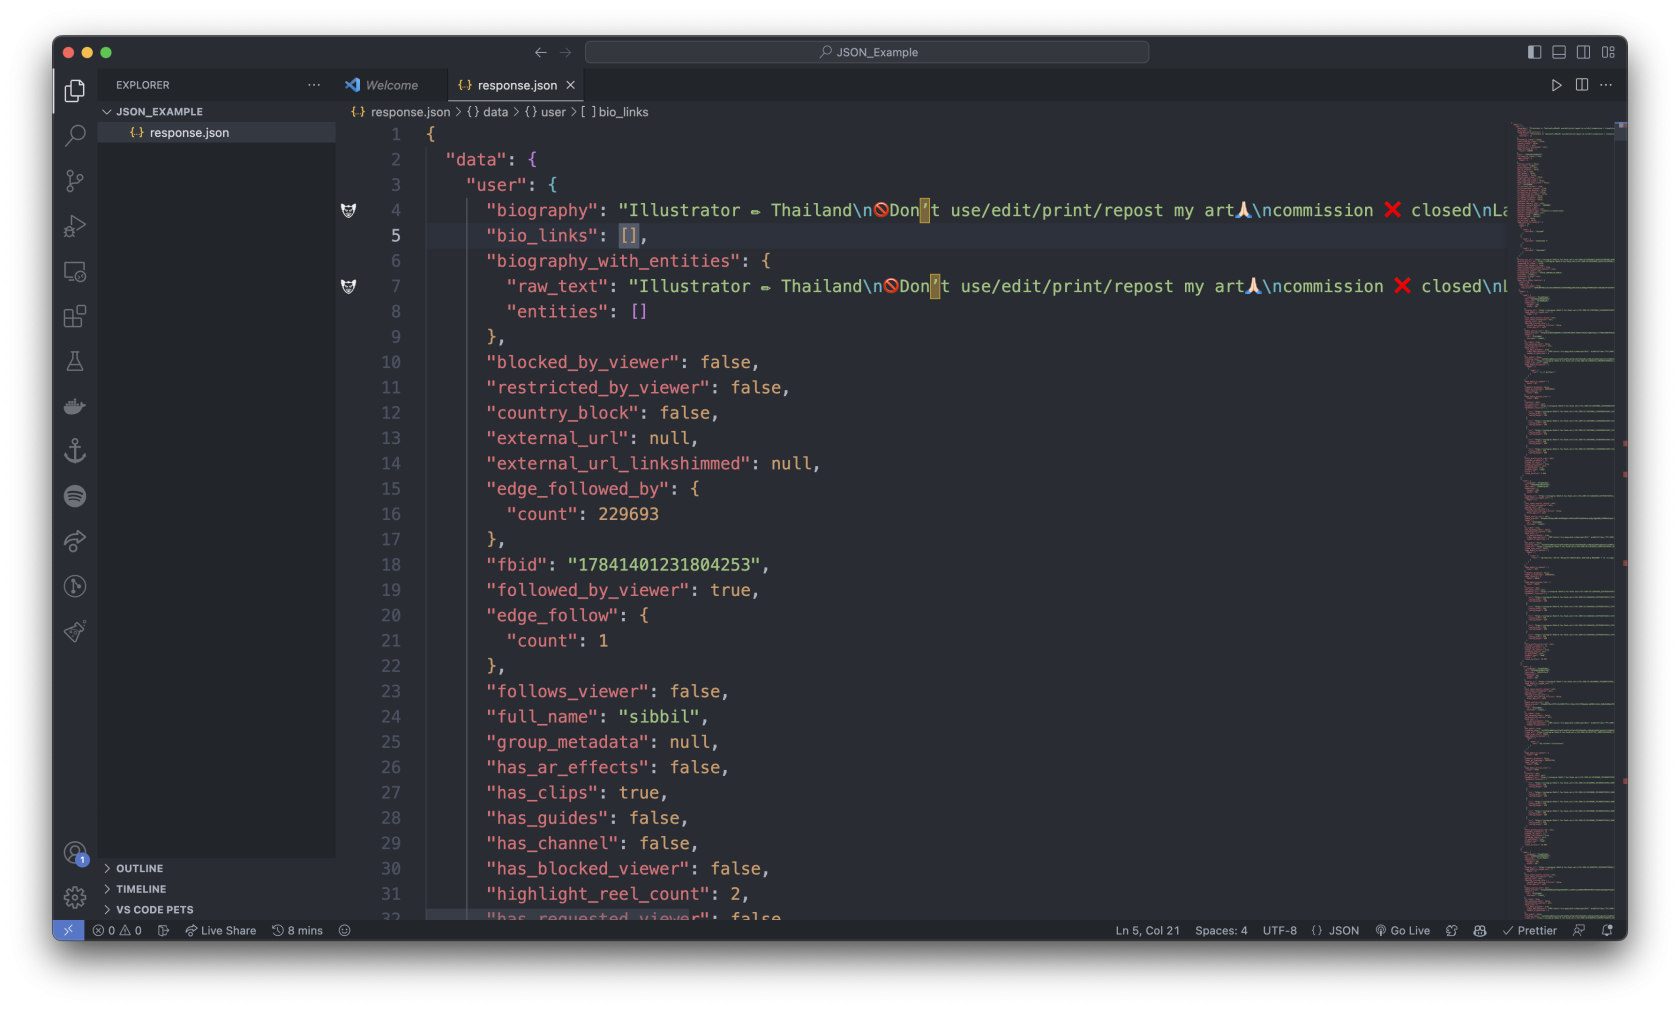
- This is the data response from instragram that uses to display in the website. 👆🏻
5. What is JSON?
JavaScript Object Notation (JSON) is a standard text-based format for representing structured data based on JavaScript object syntax. It is commonly used for transmitting data in web applications (e.g., sending some data from the server to the client, so it can be displayed on a web page)
How to access the data from JSON?
Let's see the example ...
- In the Visual Studio Code, create an
index.jsfile

- Copy this code to your
index.jsfile
const simpleJsonData = {
  squadName: "Super hero squad",
  homeTown: "Metro City",
  formed: 2016,
  secretBase: "Super tower",
  active: true,
  permissions: {
    accessData: false,
    fly: true,
  },
  members: [
    {
      name: "Molecule Man",
      age: 29,
      secretIdentity: "Dan Jukes",
      powers: ["Radiation resistance", "Turning tiny", "Radiation blast"],
    },
    {
      name: "Madame Uppercut",
      age: 39,
      secretIdentity: "Jane Wilson",
      powers: [
        "Million tonne punch",
        "Damage resistance",
        "Superhuman reflexes",
      ],
    },
    {
      name: "Eternal Flame",
      age: 1000000,
      secretIdentity: "Unknown",
      powers: [
        "Immortality",
        "Heat Immunity",
        "Inferno",
        "Teleportation",
        "Interdimensional travel",
      ],
    },
  ],
};
If we loaded this string into a JavaScript program and parsed it into a variable called simpleJsonData for example, we could then access the data inside it using the same dot/bracket notation we looked at in the JavaScript object basics article. For example:
simpleJsonData.squadName // "Super hero squad" -> This one is more simple
// or
simpleJsonData["squadName"] // "Super hero squad"
Try to run from the VS Code
const simpleJsonData = {
squadName: "Super hero squad",
homeTown: "Metro City",
...
};
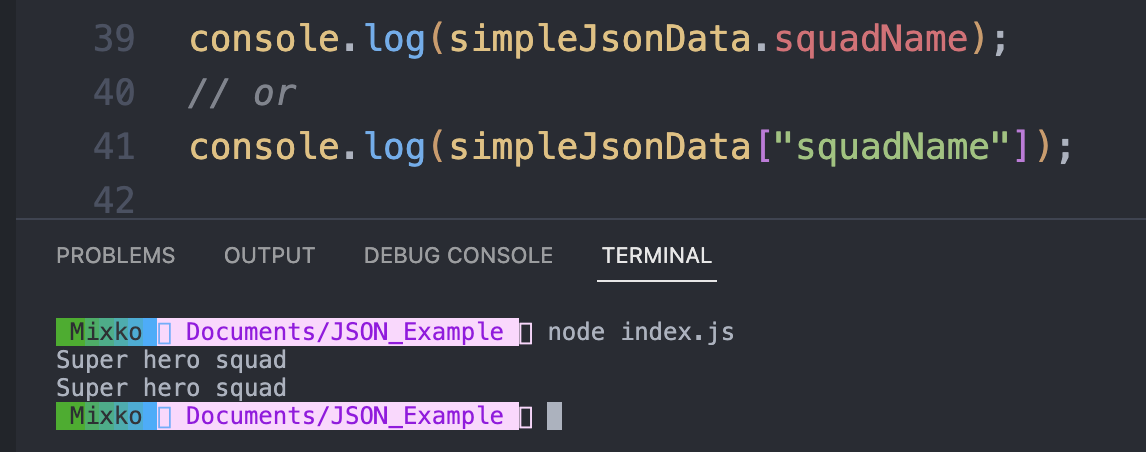
console.log(simpleJsonData.squadName);
console.log(simpleJsonData["squadName"]);
- Create a terminal
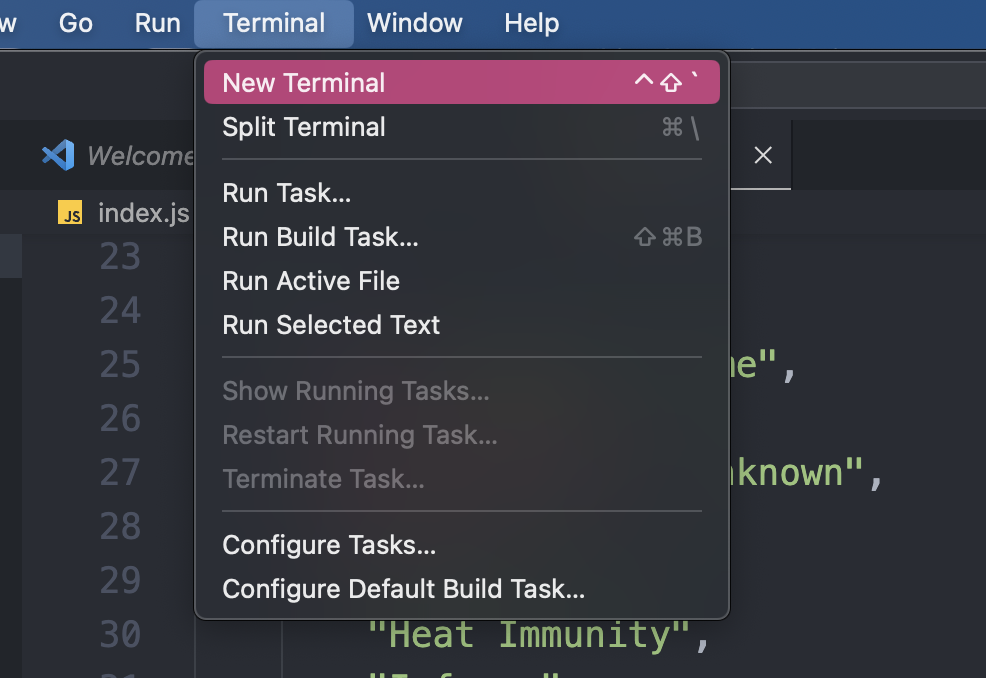
- Run the code
node index.jsthat will run theindex.jsfile that usin NodeJS - You will see the the output the terminal that show the value of the
squadName
try more ...
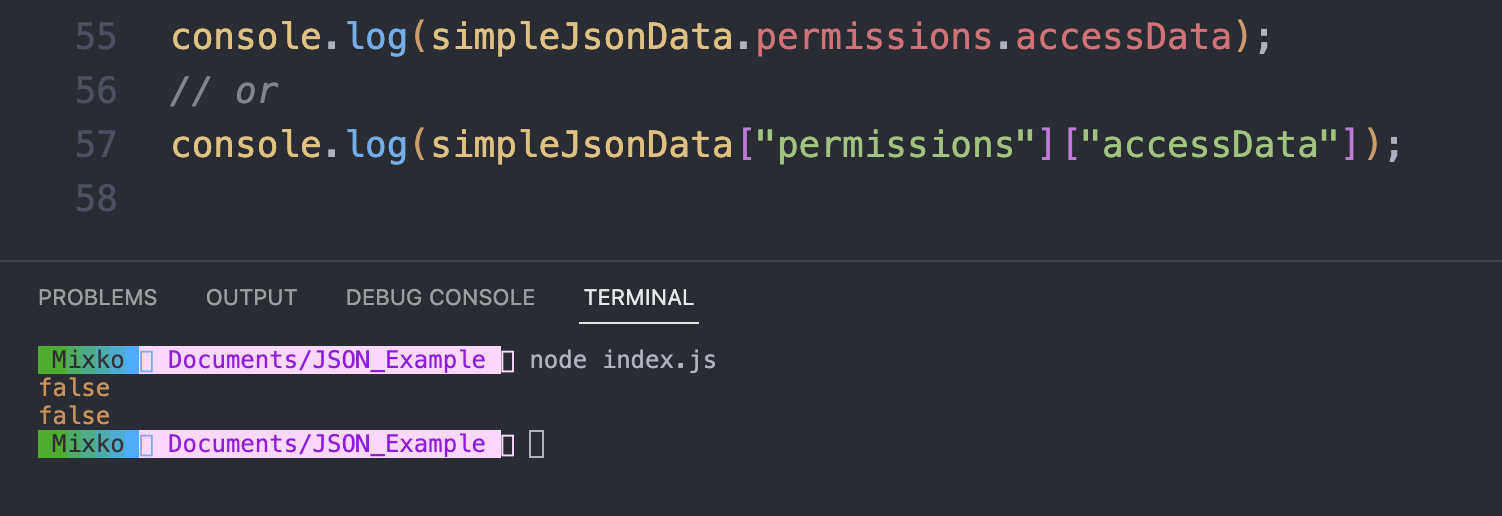
simpleJsonData.permissions.accessData
// or
simpleJsonData["permissions"]["accessData"]

// Same output
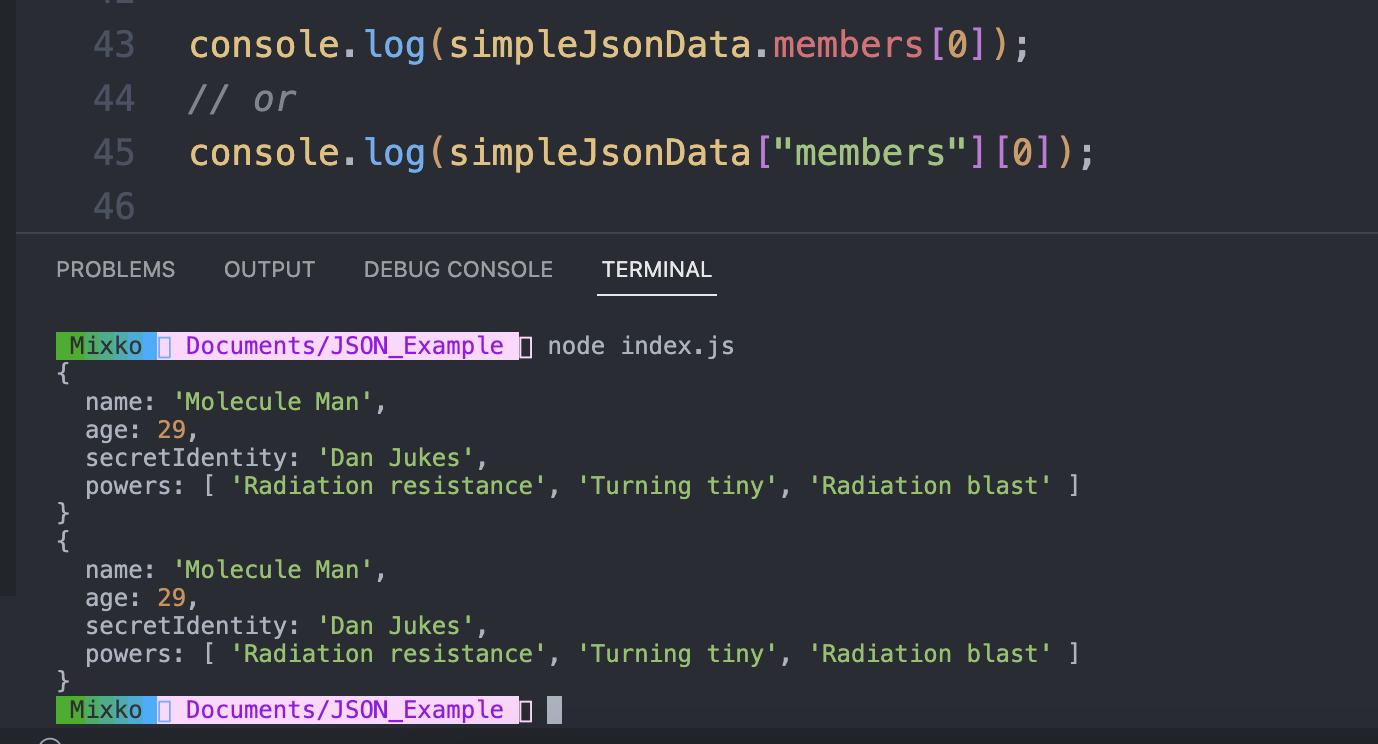
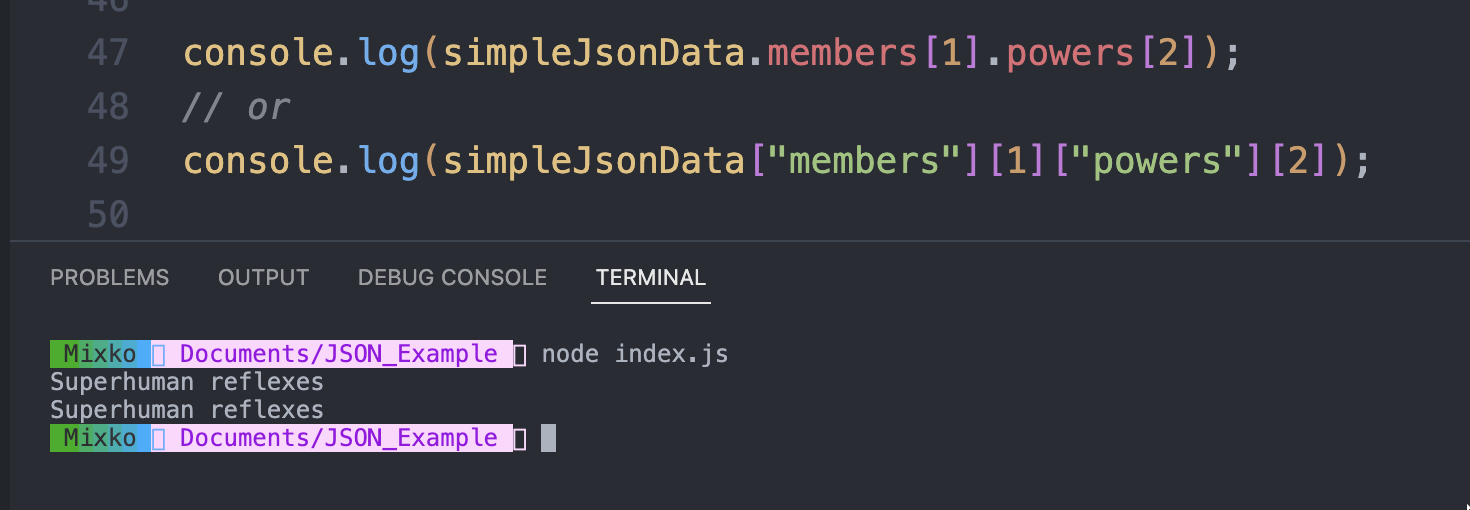
To access data further down the hierarchy, you have to chain the required property names and array indexes together. For example, to access the third superpower of the second hero listed in the members list, you'd do this:
simpleJsonData.members[0]
// or
simpleJsonData["members"][0]

// Same output
simpleJsonData.members[1].powers[2]
// or
simpleJsonData['members'][1]['powers'][2]
// Same output
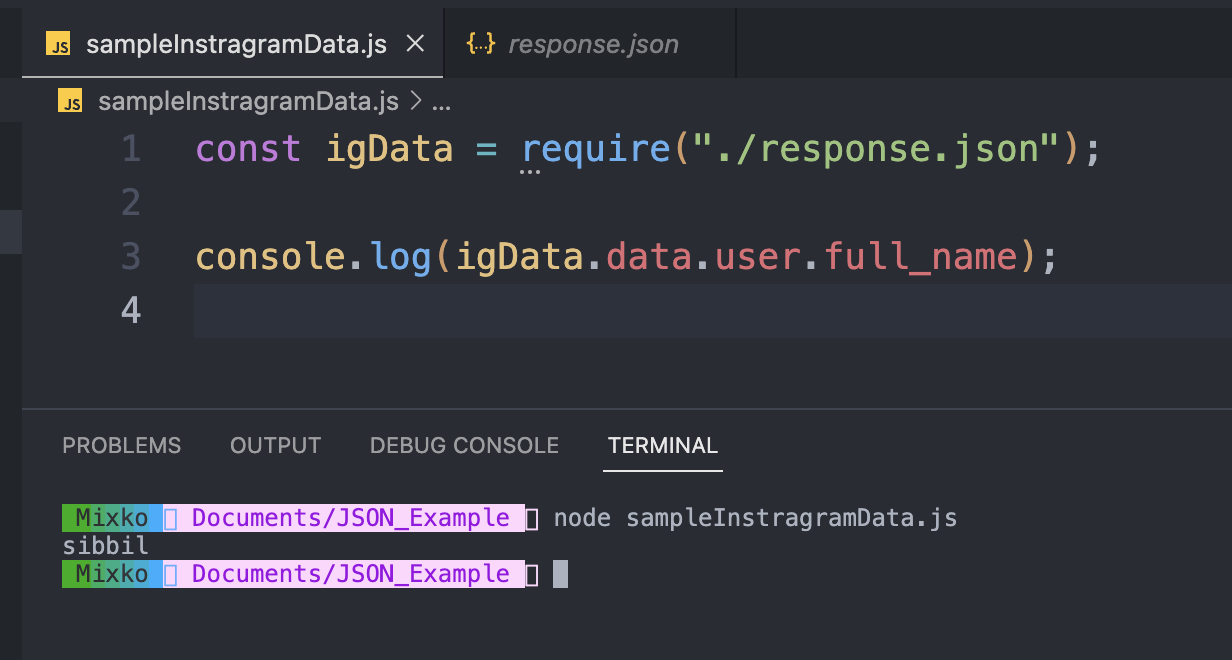
Let's try to import the response.json file that you copied from the Instragram.
- Create a
simpleInstragramData.jsfile
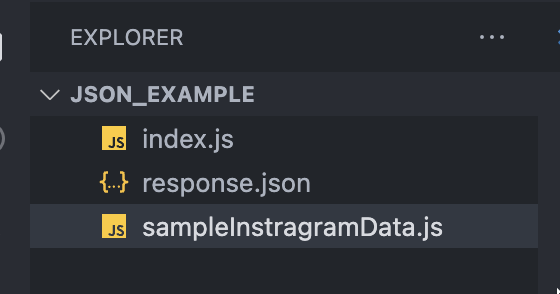
- import the
response.jsontosampleInstragramData.jsfile
const igData = require("./response.json");

- Try to show some data from
response.json
--- End of the example ---
6. ExpressJS
Express JS is a Node.js framework designed to build API's that facilitate communication through HTTP requests and responses. One of the remarkable things about Express is that it gives developers complete control over the requests and responses that are associated with each of its app’s methods.
Let's start writing code and initializing the JavaScript project.
- Go to the Visual Studio Code and Click
openand create a folder and clickopen
- Create a
New Terminal
-
Run
npm initin your terminal for initializing your JavaScript project -
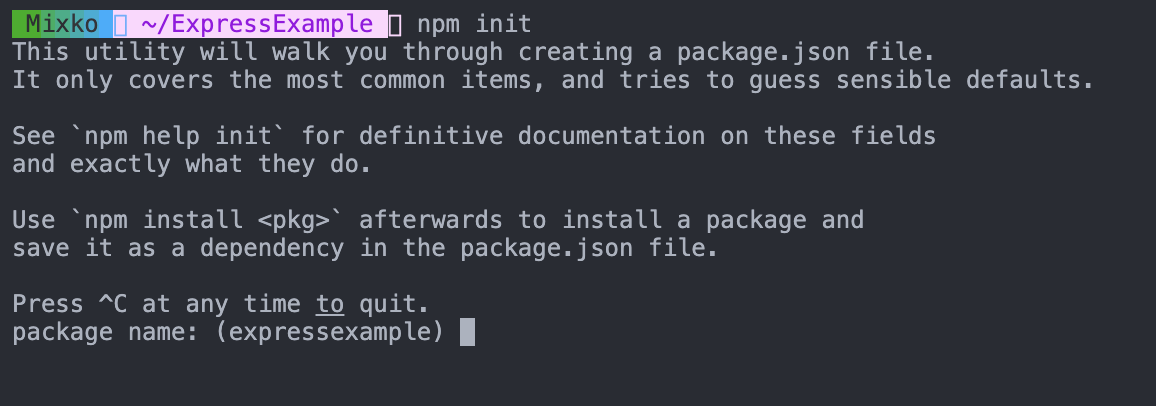
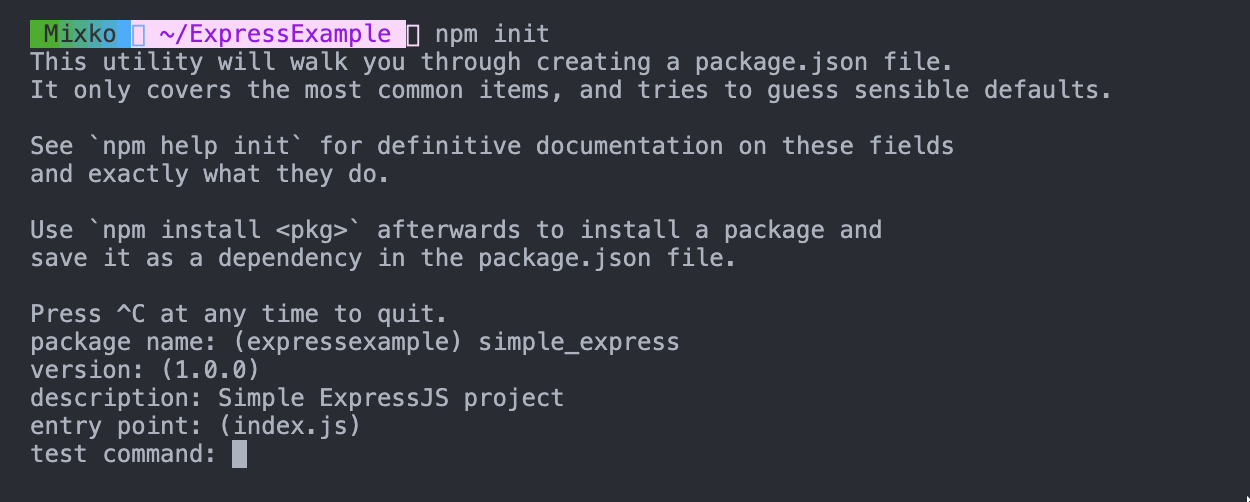
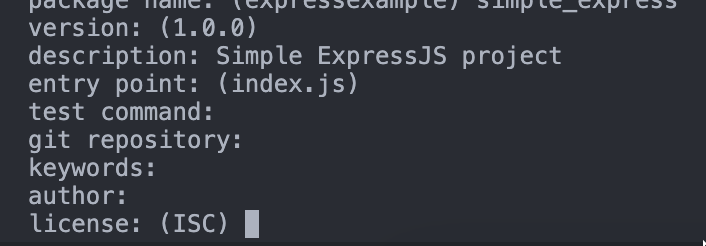
After you run the
npm initcommand, it will ask you about thepackage namewhich is the name of your project. (if you don't want to name your project you just pressenterto skip, and it will name the project as a name that you see in the parenthesis) 👇🏻
package namecan only contain URL-friendly characters and name can no longer contain capital letters.
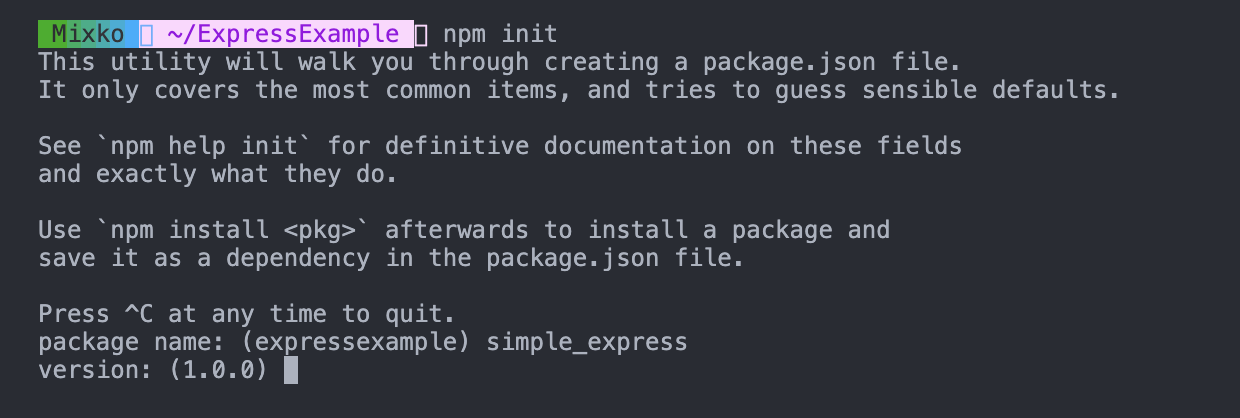
- In the
version, you can specify the version of the project, If you don't want to specify the version, you just pressEnterto skip this, it will set version 1.0.0 as default. 👇🏻
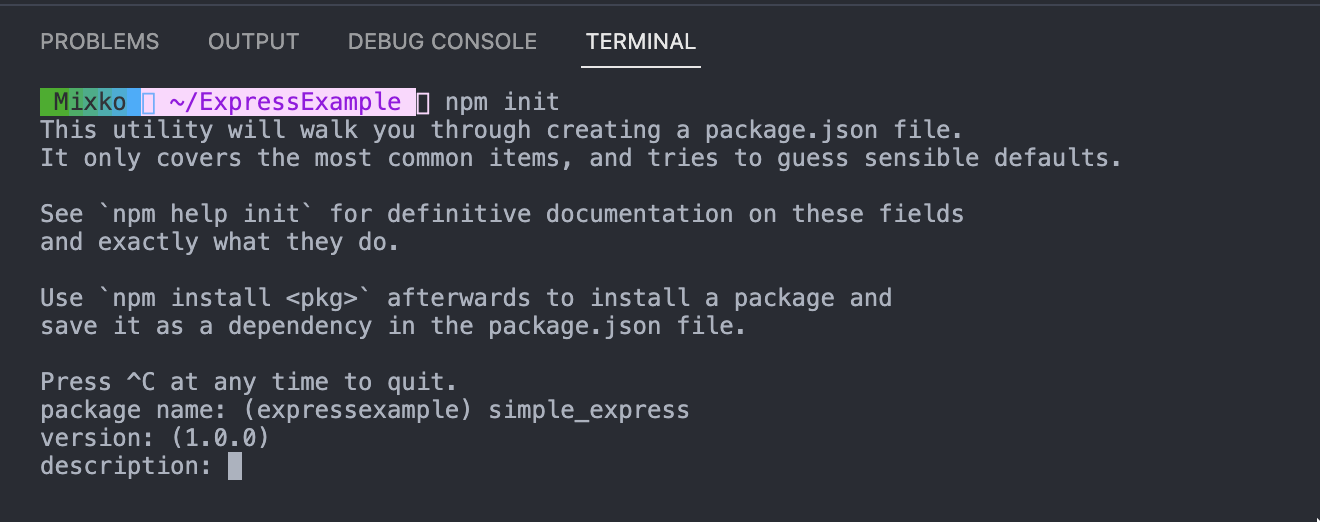
- The
descriptionis just a description of your project, If you don't want to add a description, you just pressEnterto skip this. 👇🏻
- The
entry pointis the file from which execution starts. It depends on project configuration and run time environment of the technology we are using.
- Examples : For a node.js project
index.jsis used initializes the app and glues everything together.
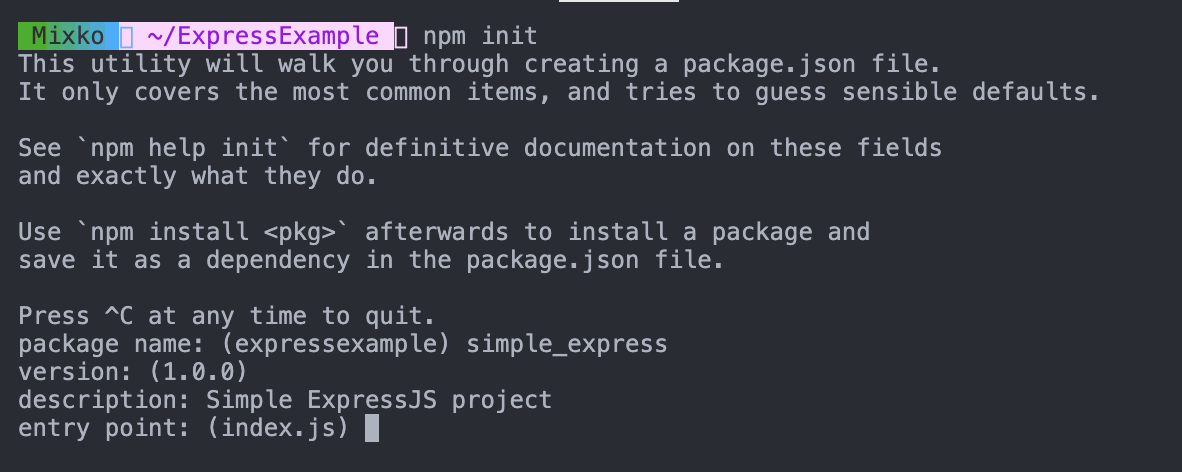
- For the entry point we will use
index.jsfile as a main file, pressEnterto skip this, and use theindex.jsas a default. 👆🏻
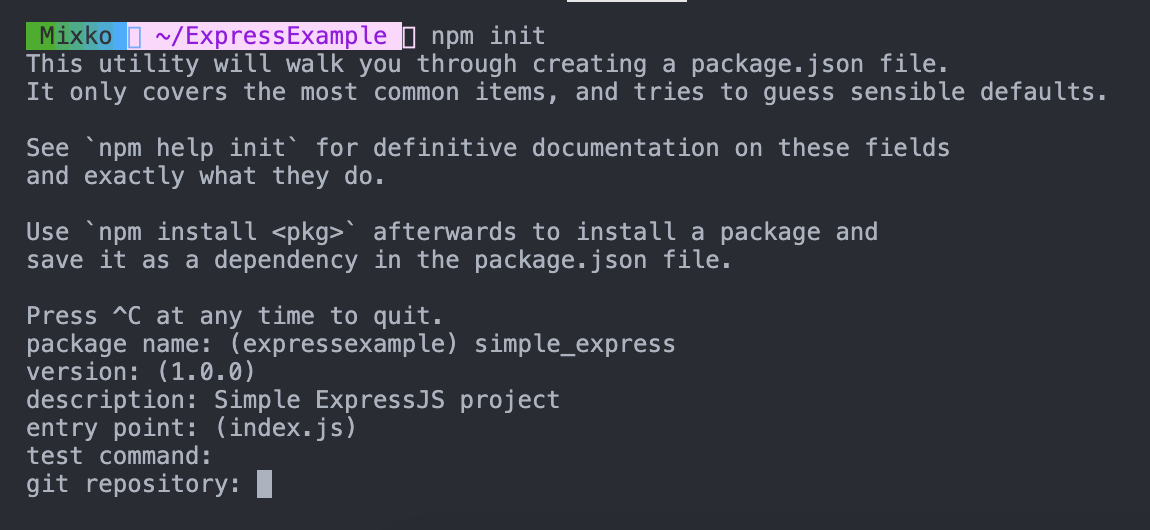
- Skip the
test command👇🏻
- For the
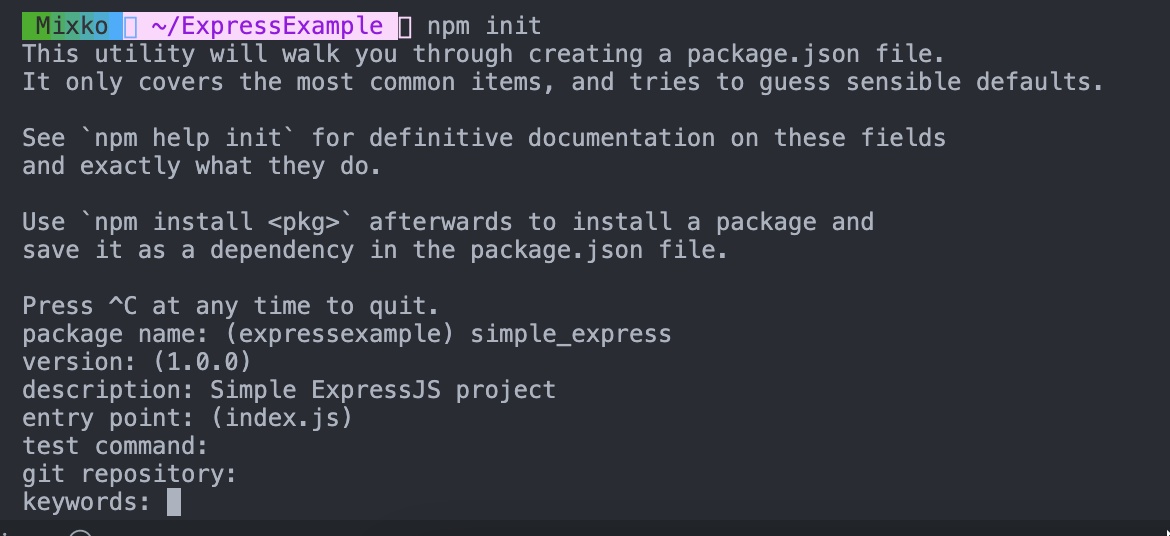
git repository, you just leave it blank.
- For the
keywords, you just leave it blank.
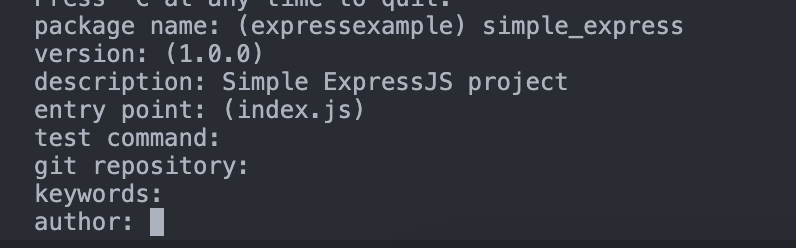
- The
licence, you just leave it blank, the default will be an ISC licence.
- After that, it will show the data in the package.json file that shows the information of the project that you have filled in the command line.
- Press
Enterto create a JavaScript project.
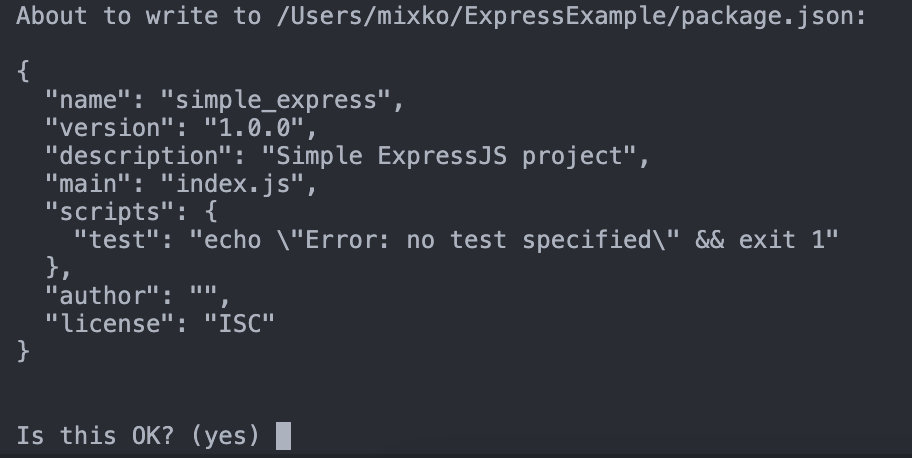
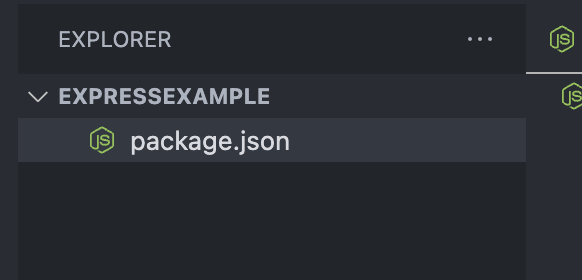
- After that, you will see the
package.jsonfile that has been created after you create a JavaScript project.
What is the package.json?
The package.json file contains descriptive and functional metadata about a project, such as a name, version, and dependencies. The file provides the npm package manager with various information to help identify the project and handle dependencies.
{
  "name": "simple_express",
  "version": "1.0.0",
  "description": "Simple ExpressJS project",
  "main": "index.js",
  "scripts": {
    "test": "echo \"Error: no test specified\" && exit 1"
  },
  "author": "",
  "license": "ISC"
}
Let's write a simple hello world API using ExpressJS
- Install the
ExpressJSframework to your project, by enter the command linenpm install express
-
After you installed the express framework to your projec, you will see the
package.jsonhas been updated, its add thedependenciesobject to the file. -
dependenciesis the object that contains version of the module of yourframework,librarythat you use in your project. 👇🏻
{
  "name": "simple_express",
  "version": "1.0.0",
  "description": "Simple ExpressJS project",
  "main": "index.js",
  "scripts": {
    "test": "echo \"Error: no test specified\" && exit 1"
  },
  "author": "",
  "license": "ISC",
  "dependencies": {
    "express": "^4.18.2"
  }
}
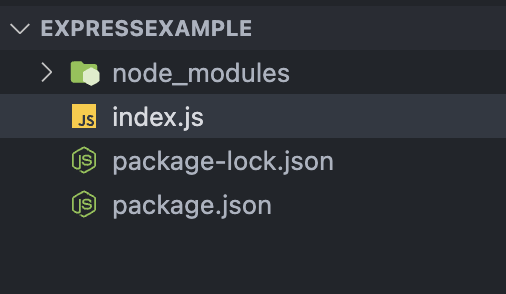
-
And you will see the
package-lock.jsonandnode_modulesfolder that created in your project. -
package-lock.jsonis a lockfile that holds information on the dependencies or packages installed for a node.js project, including their exact version numbers. -
node_modulesfolder is the folder that contains the files from yourframeworks,librariesthat you installed to your project. 👇🏻

- Create
index.jsfile
- Write the following code
const express = require("express");
const app = express();
const port = 3000;

app.get("/", (req, res) => {
  res.send("Hello World!");
});

app.listen(port, () => {
  console.log(`Example app listening on port ${port}`);
});
How does this code work?
- This line is you are importing
expressframework to your project usingrequire("express")and assigning it to the express variable. 👇🏻
const express = require("express");
- This line of code that creates an instance of an Express application in Node.js. 👇🏻
const app = express();
- The
portis the specific port to run on your local network.
const port = 3000;
appis an instance of the Express application, which is created using theexpress()function.- The
.get()method is a function provided by the app object, which sets up a route for HTTP GET (HTTP Methods) requests to a specific URL. In this case, the URL is the root URL of the web application, represented by the forward slash/. - The second argument to the
.get()method is a callback function, which will be called when the server receives a GET request for the specified URL. The callback function takes two arguments,reqandres, which represent therequestandresponseobjects for the current HTTP request. res.send("Hello World!");is the code that send theresponseto the client, In this code you send a text"Hello World!"to the client.👇🏻
app.get("/", (req, res) => {
  res.send("Hello World!");
});
-
The
.listen()method is a function provided by the app object, which starts the server and listens for incoming HTTP requests on a specifiedportnumber. The port variable is the number of the port on which the server listens. -
Once the server is started and listening, it will begin to receive incoming HTTP requests and handle them according to the routes and middleware defined in the Express application.
app.listen(port, () => {
  console.log(`Example app listening on port ${port}`);
});
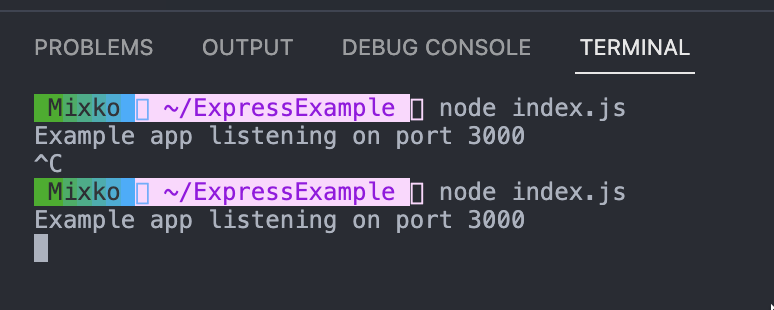
- Run your application,
node index.js
- You will see that the application is running on port 3000 and waiting for incoming HTTP requests. 👇🏻

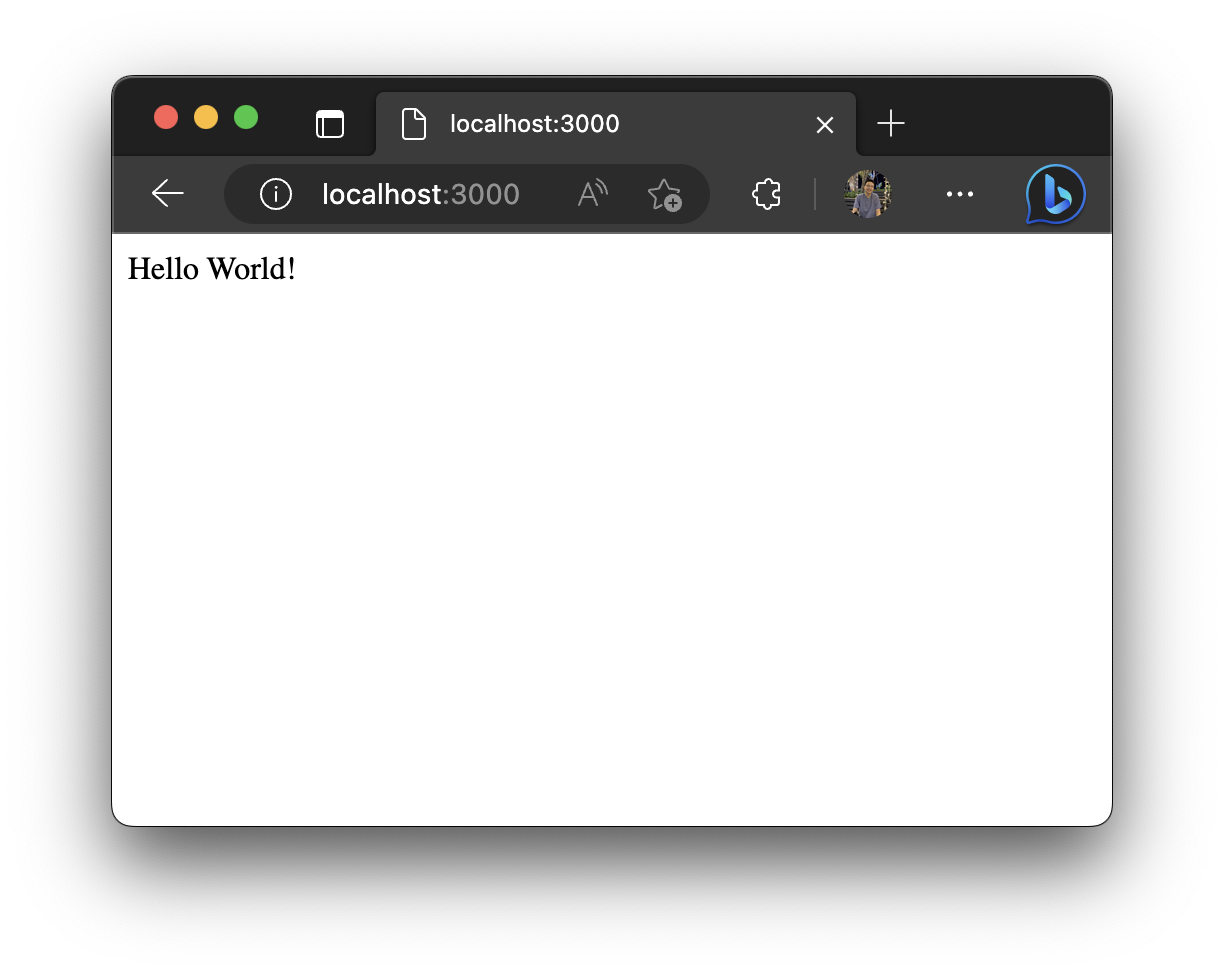
- Go to the website and go to
localhost:<your port> - You will see the text "Hello World!" that is shown below.
- Add more code
- This code is the code that send the
responseasJSONformat to the client. 👇🏻
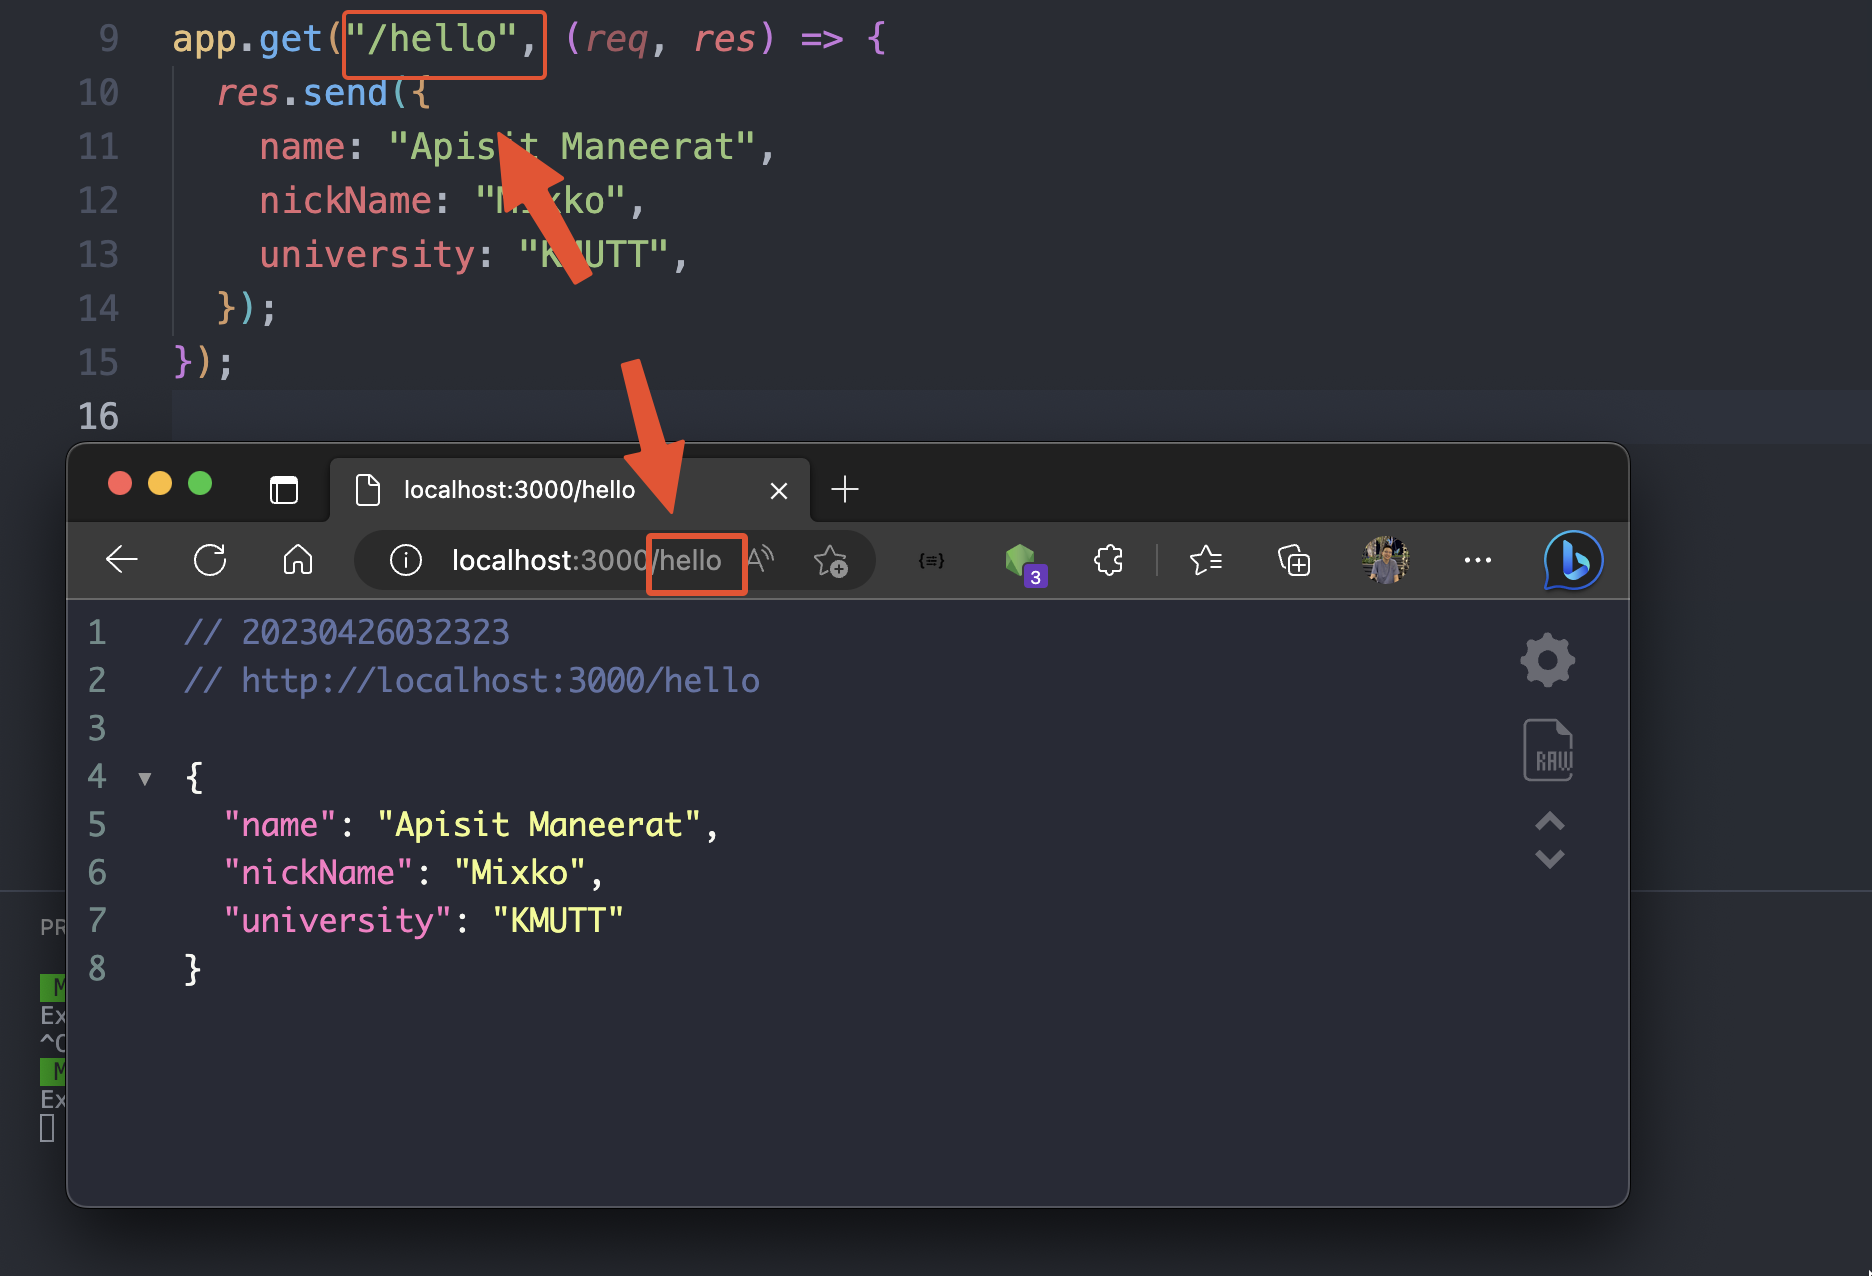
app.get("/hello", (req, res) => {
  res.send({
    name: "Apisit Maneerat",
    nickName: "Mixko",
    university: "KMUTT",
  });
});
- Restart your application
- Windows -> Press
Ctrl+C - Mac -> Press
command+C - And run it again.
- Go to the path
/helllo
- You will see the
JSON responsefrom your backend application. - Install this extension to see your JSON more beautiful 👇🏻
The JSON Viewer extension https://chrome.google.com/webstore/detail/json-viewer/gbmdgpbipfallnflgajpaliibnhdgobh -> The most beautiful and customizable JSON/JSONP highlighter
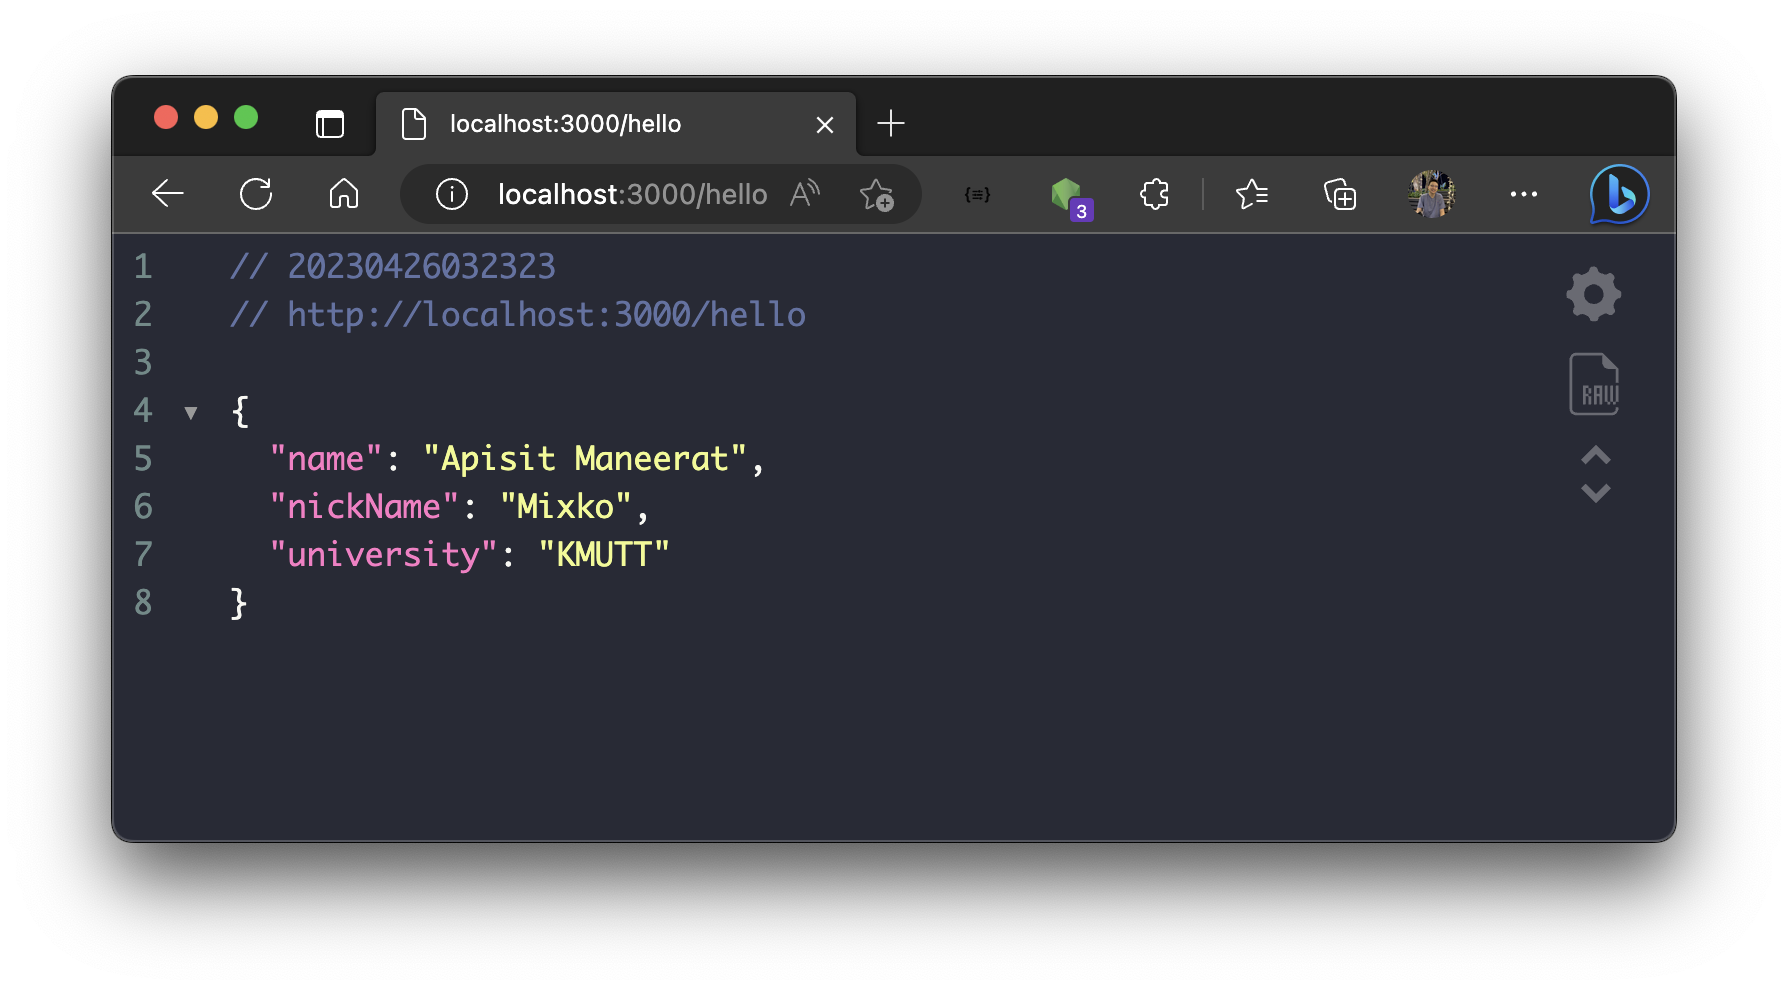
- You will see that if that path is the same, the backend application will send the data correctly.
** This is the finalized code for this example 👇🏻
const express = require("express");
const app = express();
const port = 3000;

app.get("/", (req, res) => {
  res.send("Hello World!");
});

app.get("/hello", (req, res) => {
  res.send({
    name: "Apisit Maneerat",
    nickName: "Mixko",
    university: "KMUTT",
  });
});

app.listen(port, () => {
  console.log(`Example app listening on port ${port}`);
});
-- End of this example --
7. ExpressJS with MySQL project example
!!! For this example, we will do in the previous example project from the step 6 👆🏻
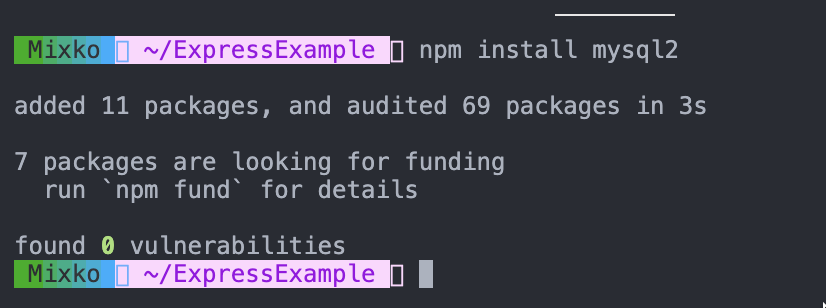
- Install the
mysqllibrary to your project, by enter the command linenpm install mysql2
- Import the
mysqllibrary to your project.
const mysql = require("mysql2");
- Add the following code
- This is the
database configurationof your database.
const connection = mysql.createConnection({
  host: "tutorialdb.pspgun.com",
  port: "13308",
  user: "",
  password: "",
  database: "csc-105",
});
- Connect to the
database
- This line of code is using the
connectionvariable from above to connect to the database using.connect()method.
connection.connect((err) => {
  if (err) {
    console.log(err);
  } else {
    console.log("Database is connected");
  }
});
The code
const express = require("express");
const app = express();
const mysql = require("mysql2");
const port = 3000;

const connection = mysql.createConnection({
  host: "server2.mixkoap.com",
  port: "6105",
  user: "user",
  password: "password",
  database: "csc105-workshop",
});

// Connect to database
connection.connect((err) => {
  if (err) {
    console.log(err);
  } else {
    console.log("Database is connected");
  }
});

app.listen(port, () => {
  console.log(`Example app listening on port ${port}`);
});
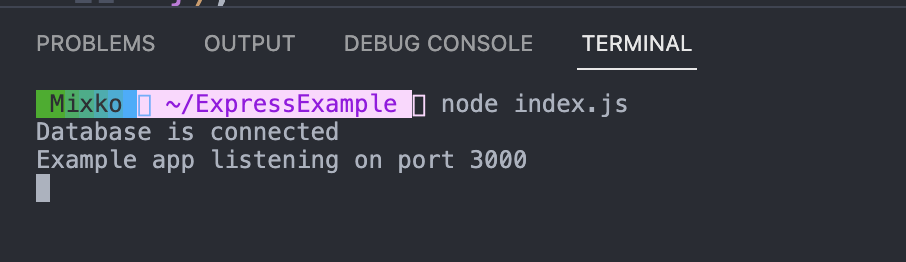
- Restart the applcation
- If your database connection is invalid, it will show you an error. ❌👇🏻

- If your database connection is valid, your application will run correctly. ✅👇🏻
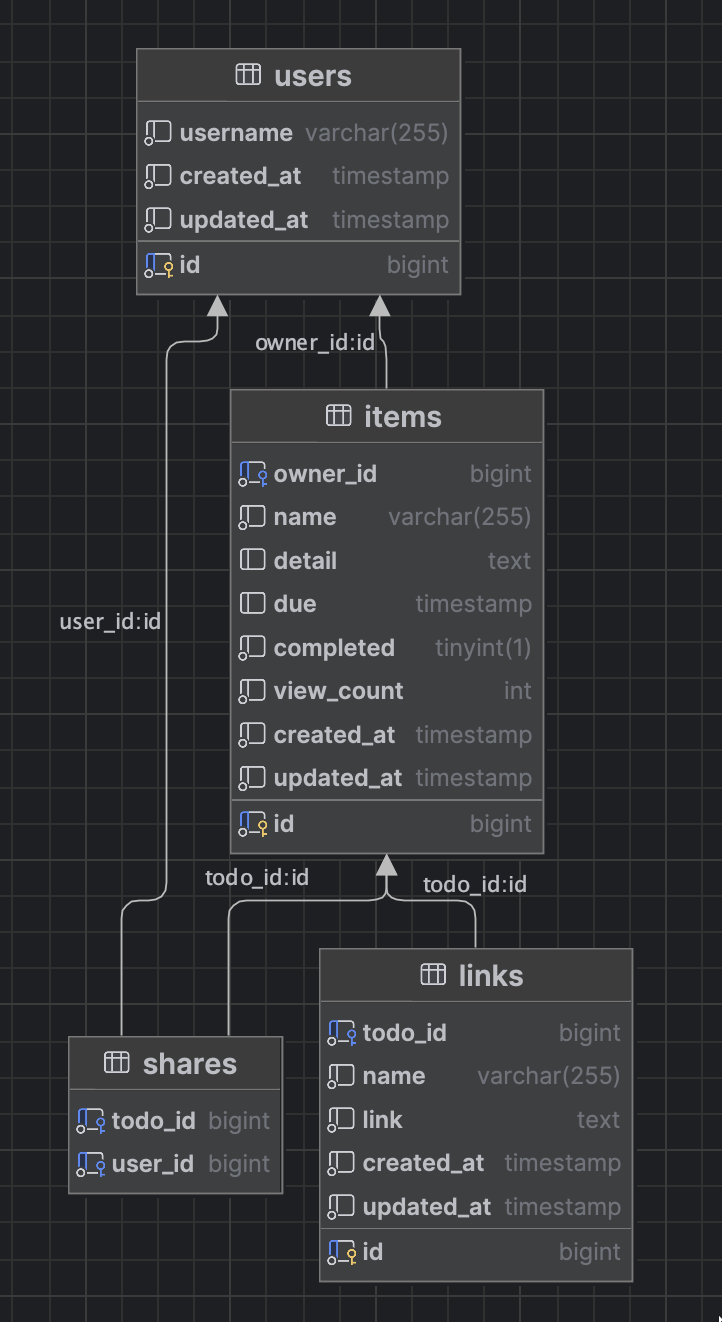
Let's write the endpoint that query todo-list data from the database and response to the user.
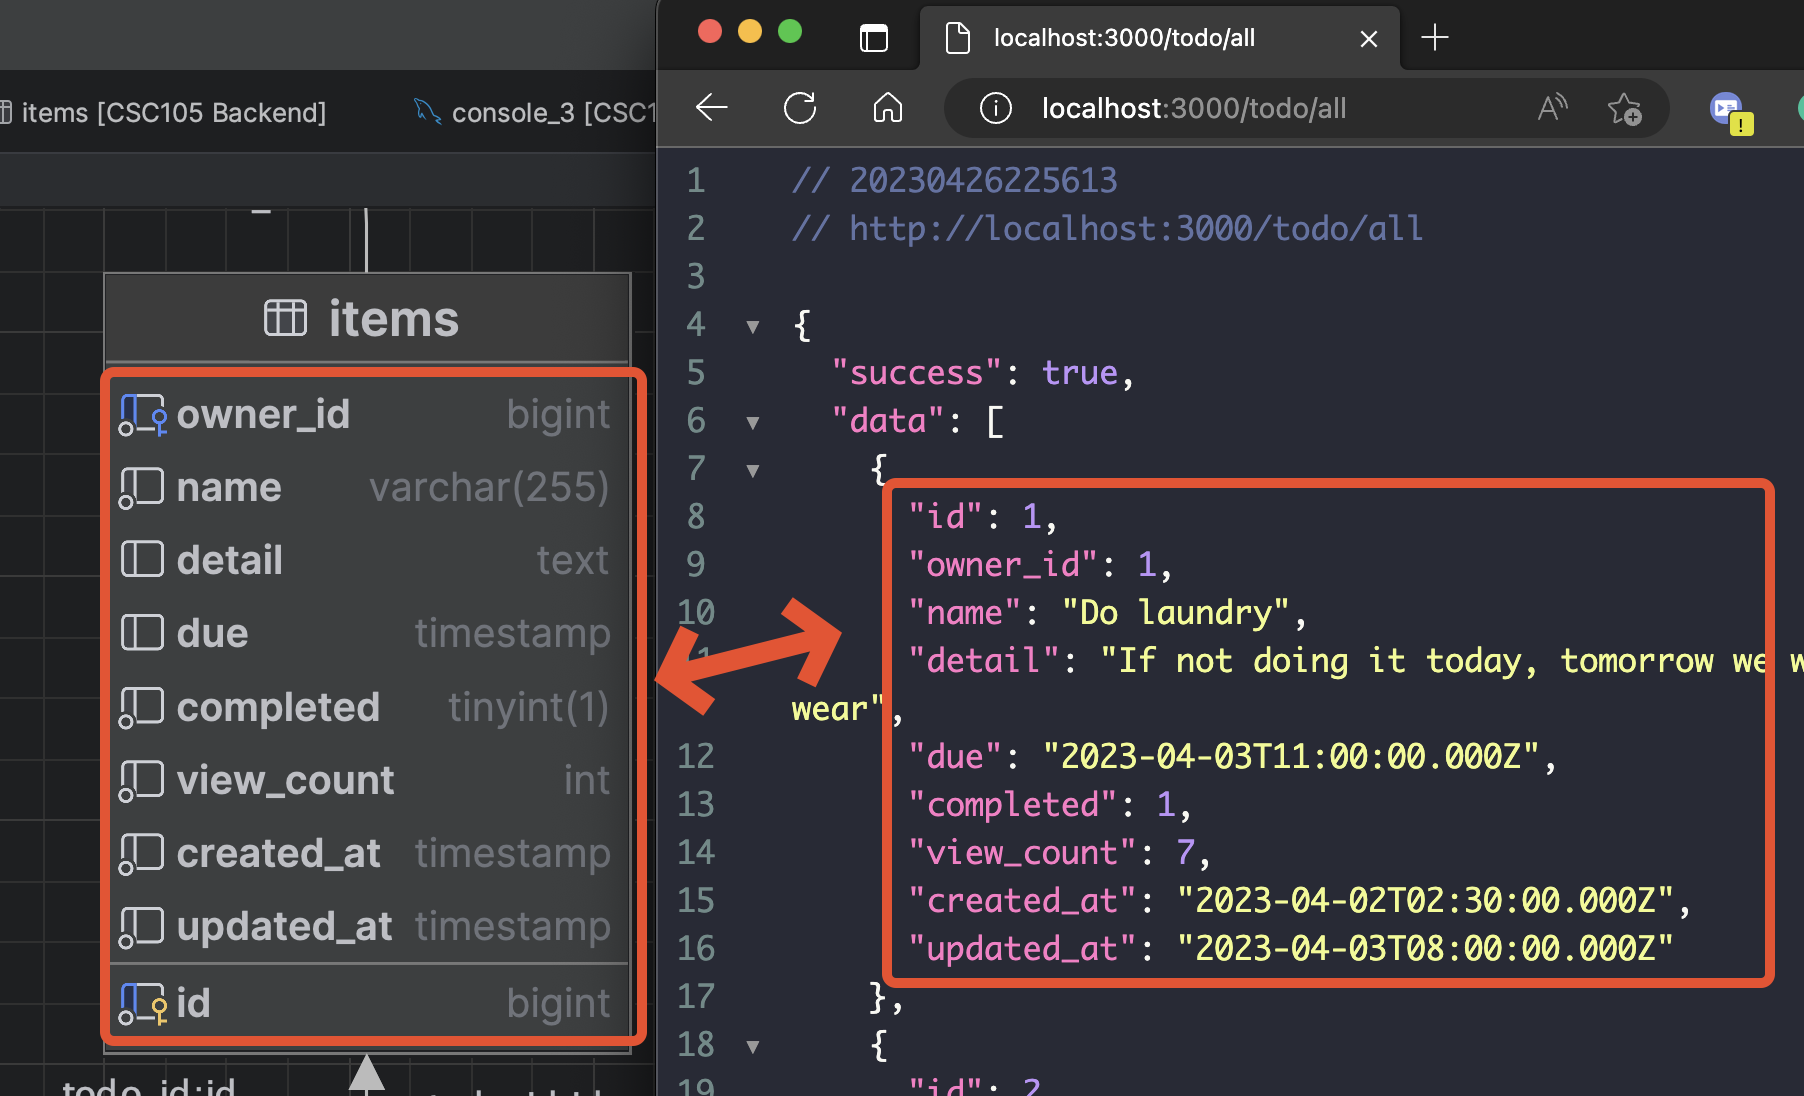
- This the schema of
sampledatabase 👇🏻
Example of GET method
- Let's create a first endpont query all todo-list from the database.
- In the path
/todo/all, it will query from all data fromitemstable. - We will use the
.query()method to insert your SQL query. - The second argument to the
.query()method is a callback function(err, rows), which will be called when the MySQL send the response. The callback function takes two arguments,errandrows, which represent theerrorof the database androwsobjects for response data from MySQL database. Ifwe found an error, we will response the error message to the client.else, we will returnrowwhich is data from theitemstable from the database. 👇🏻
app.get("/todo/all", (req, res) => {
  connection.query("SELECT * FROM items", (err, rows) => {
    // Check if cannot find the data in the database then return the error
    if (err) {
      res.json({
        success: false,
        data: null,
        error: err.message,
      });
    } else {
      // Return data to the client if success
      return res.json({
        success: true,
        data: rows,
        error: null,
      });
    }
  });
});
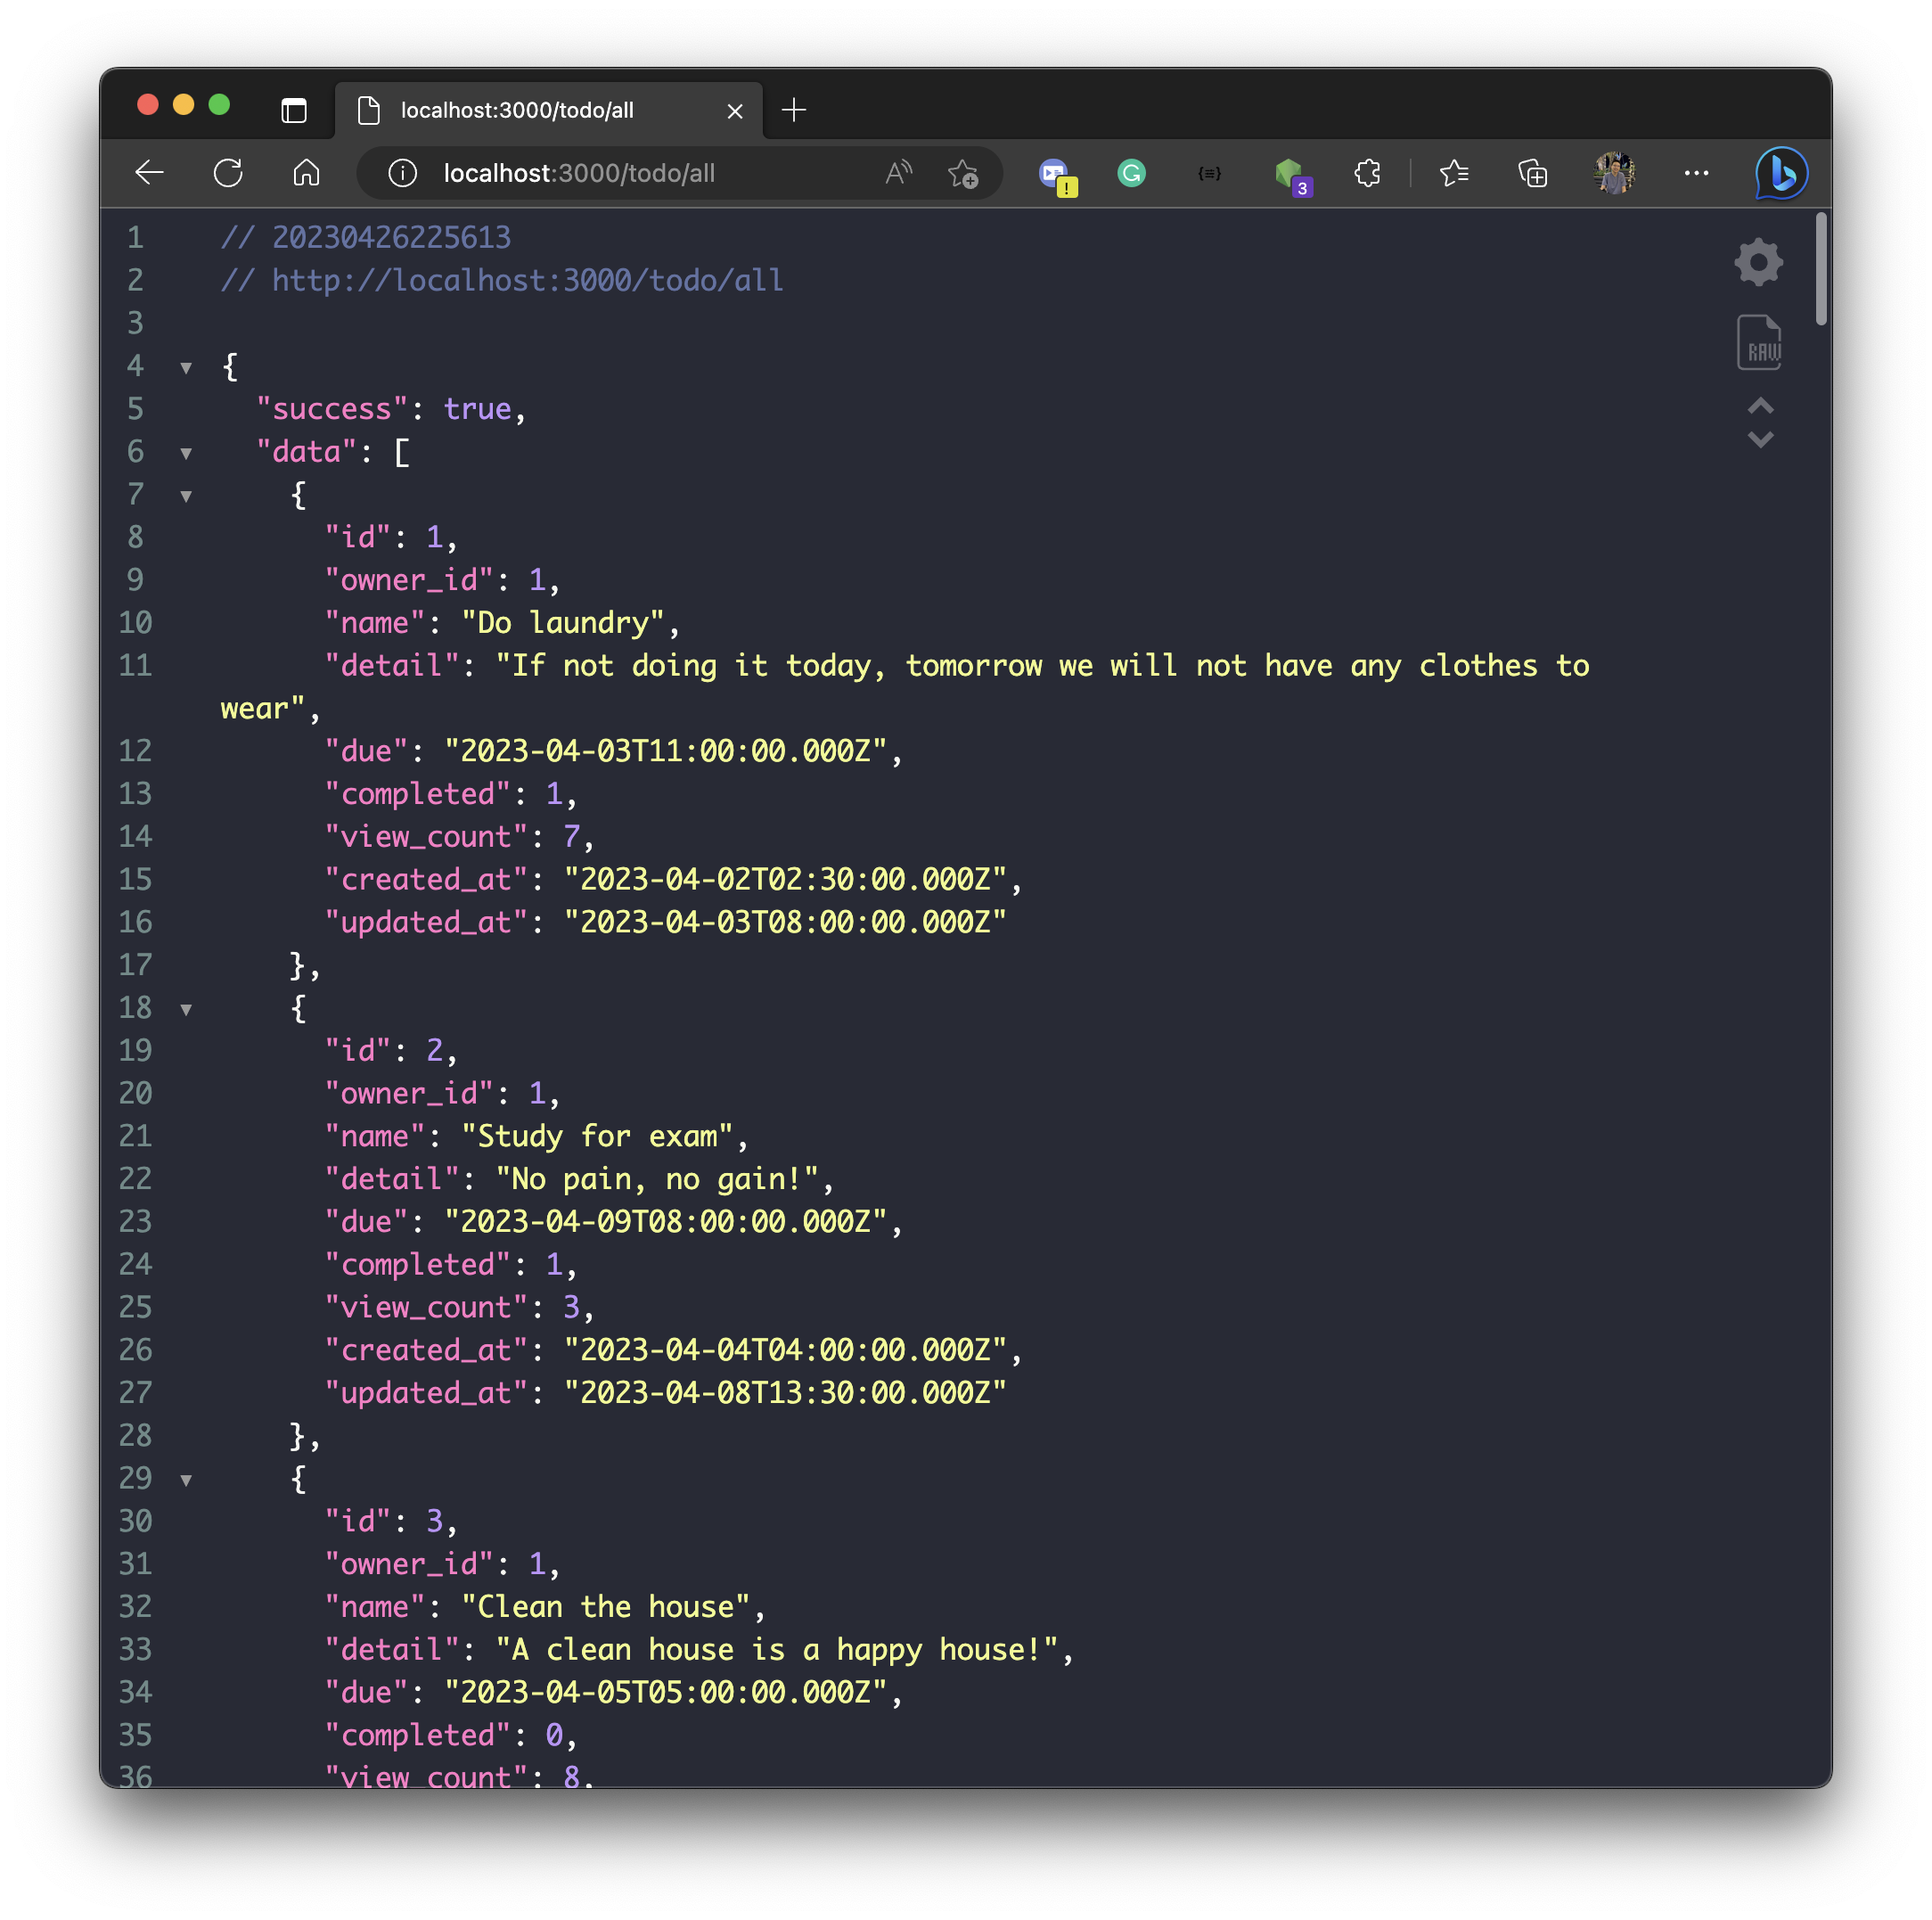
- Let's run your application again, and go to the path
localhost:3000/todo/all
- You will see the data that response to the client.
- Let's install a program that you can test your API easier!
- Go to download and install the Postman via https://www.postman.com/downloads/
Postman is an API platform for building and using APIs. Postman simplifies each step of the API lifecycle and streamlines collaboration so you can create better APIs—faster.
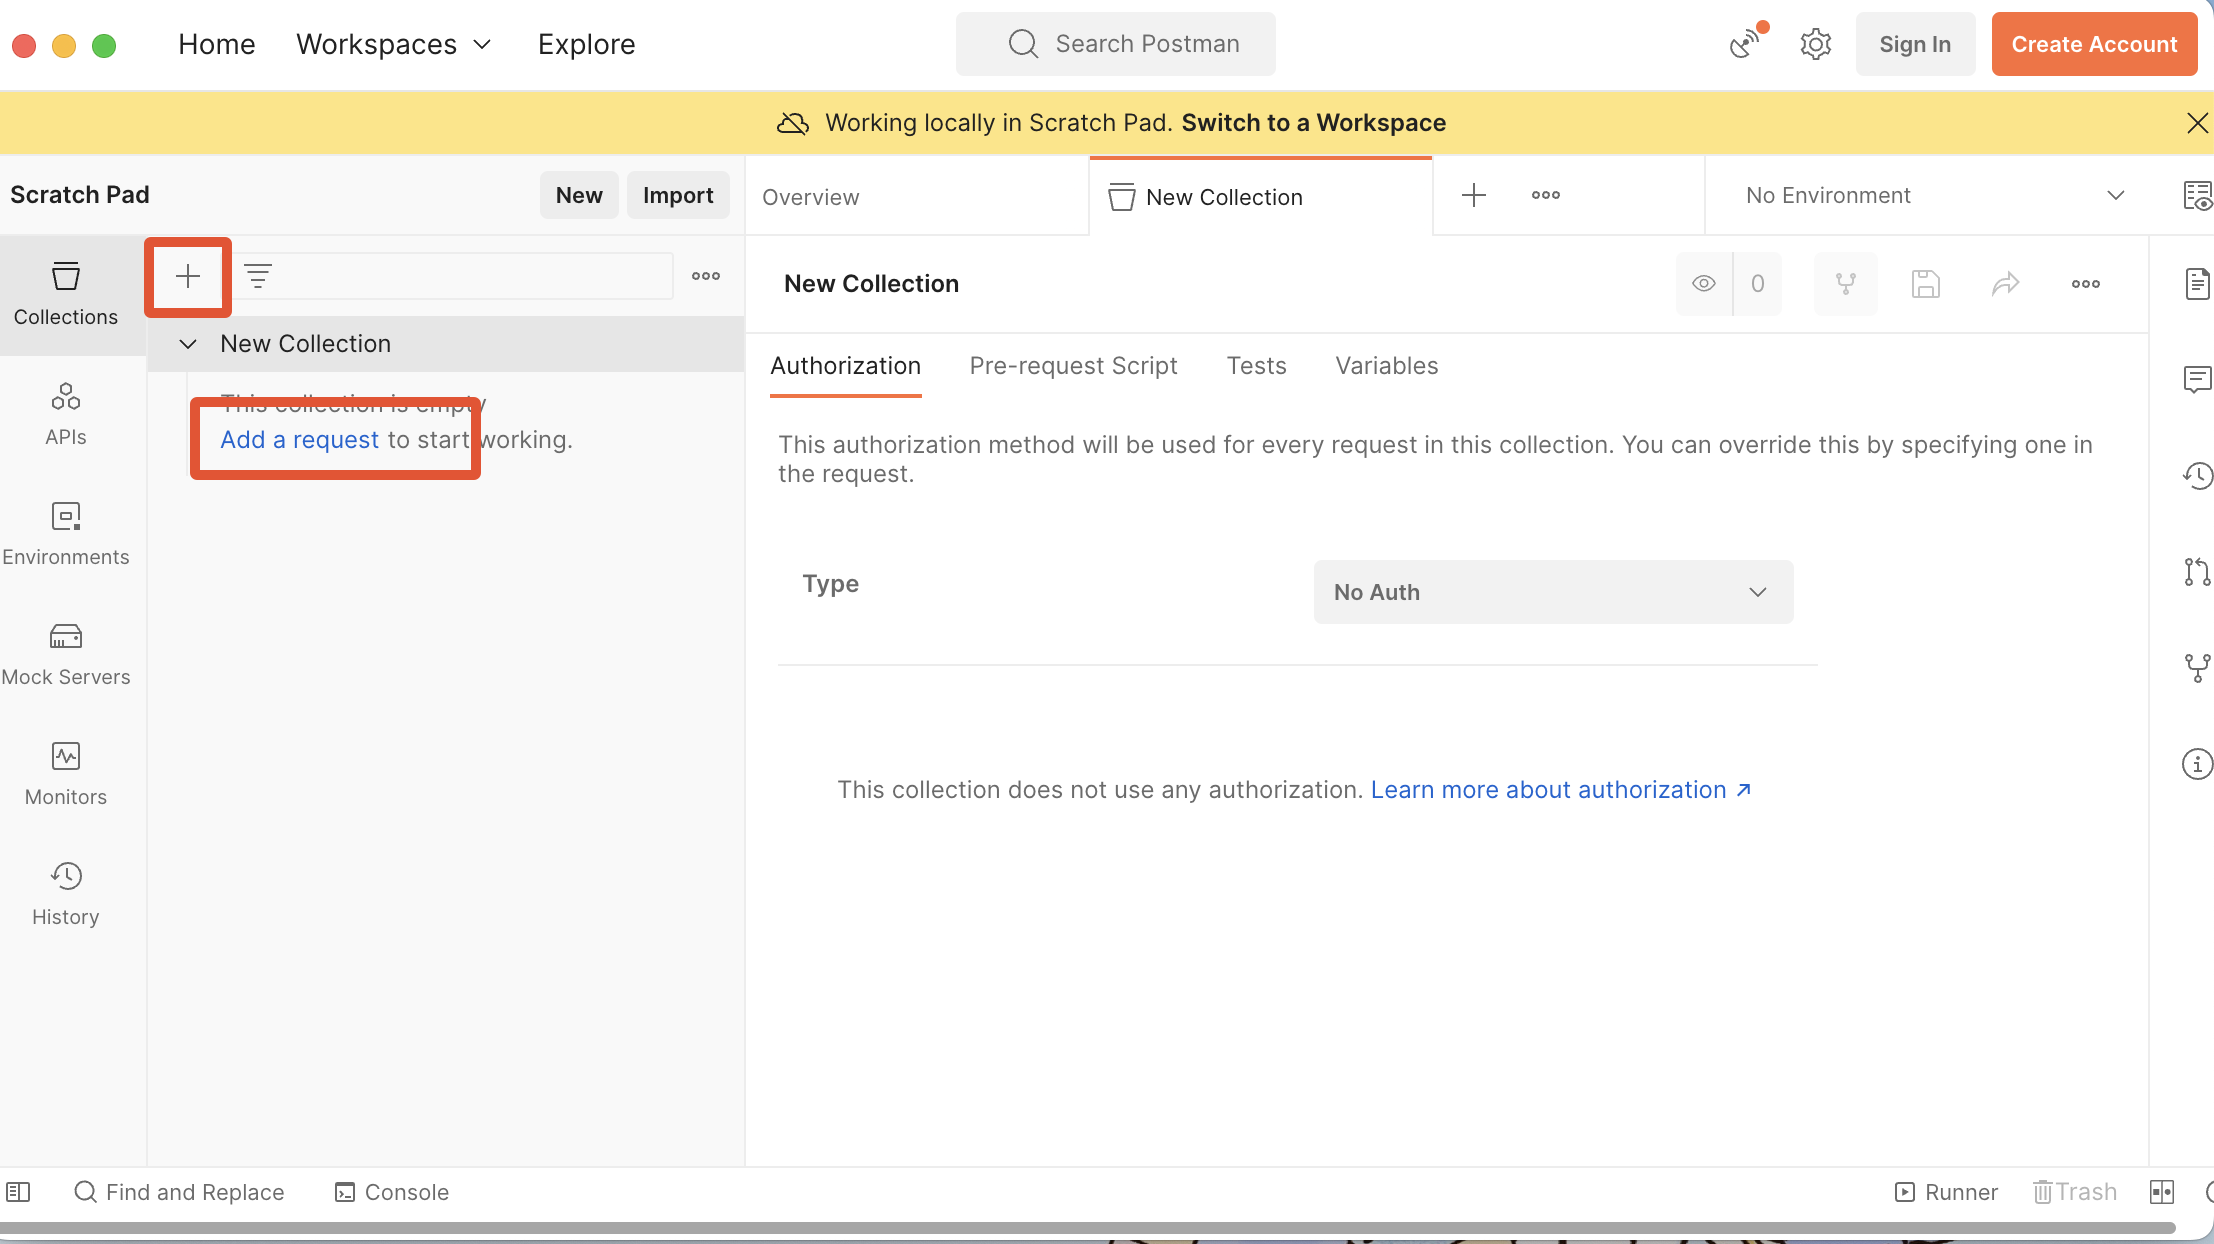
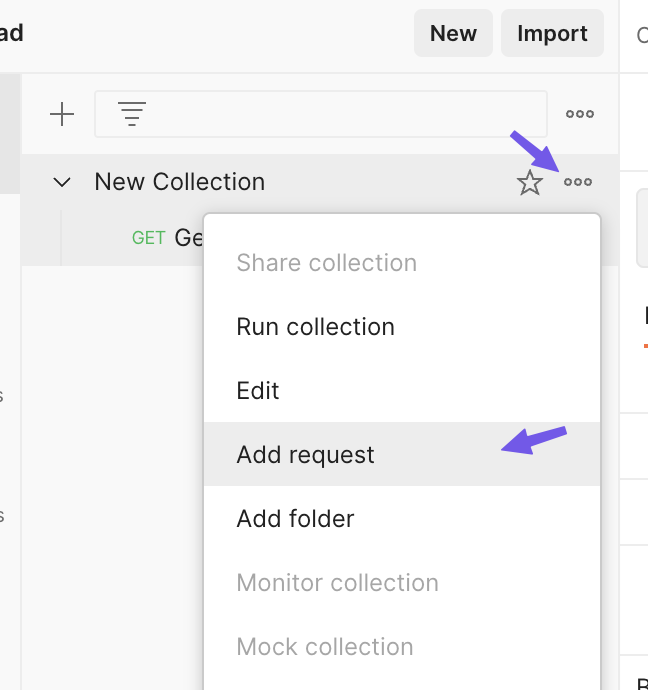
- Open the Postman
- Click
+ - Click
Add a requestto add a request.
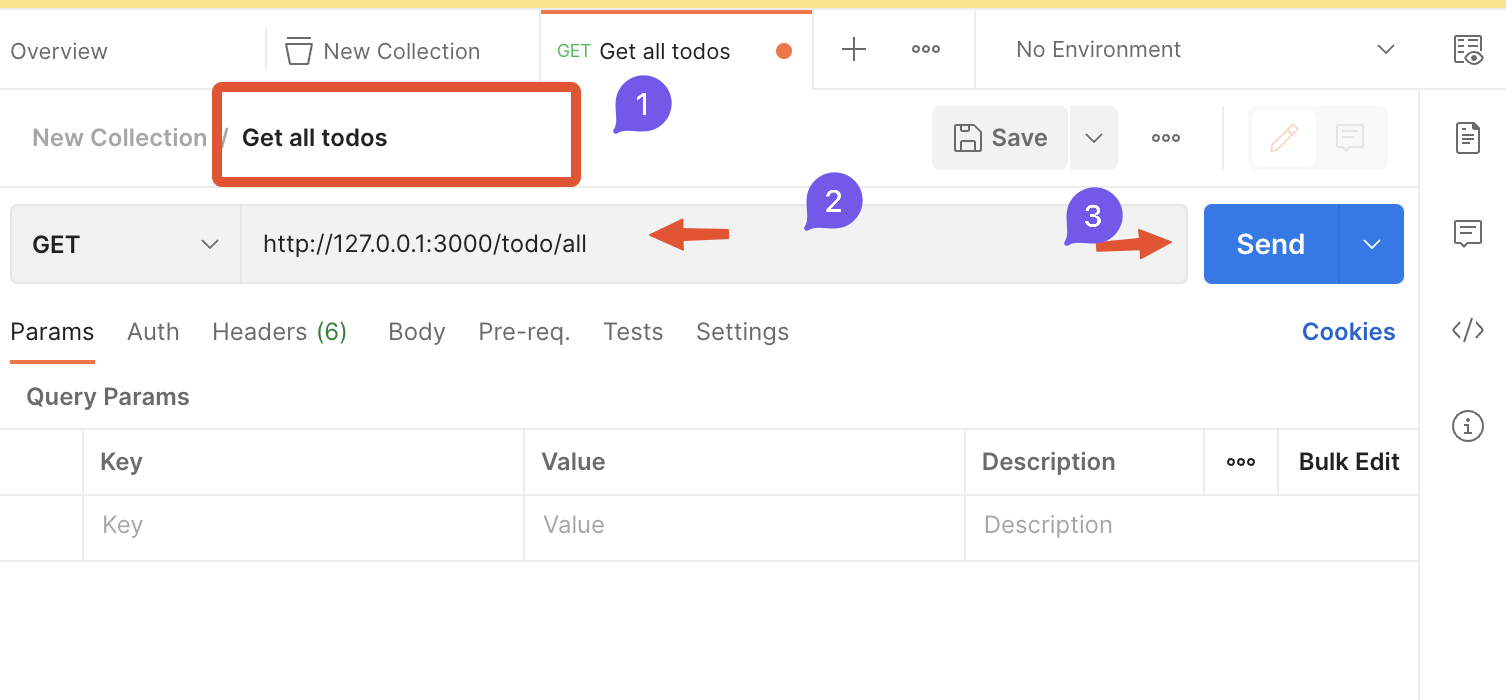
- (1) Name your request
- (2) Enter your request path (localhost == 127.0.0.1)
- (3) Click
Send
- After you clicked send, it will show the response data from your backend application. 👇🏻
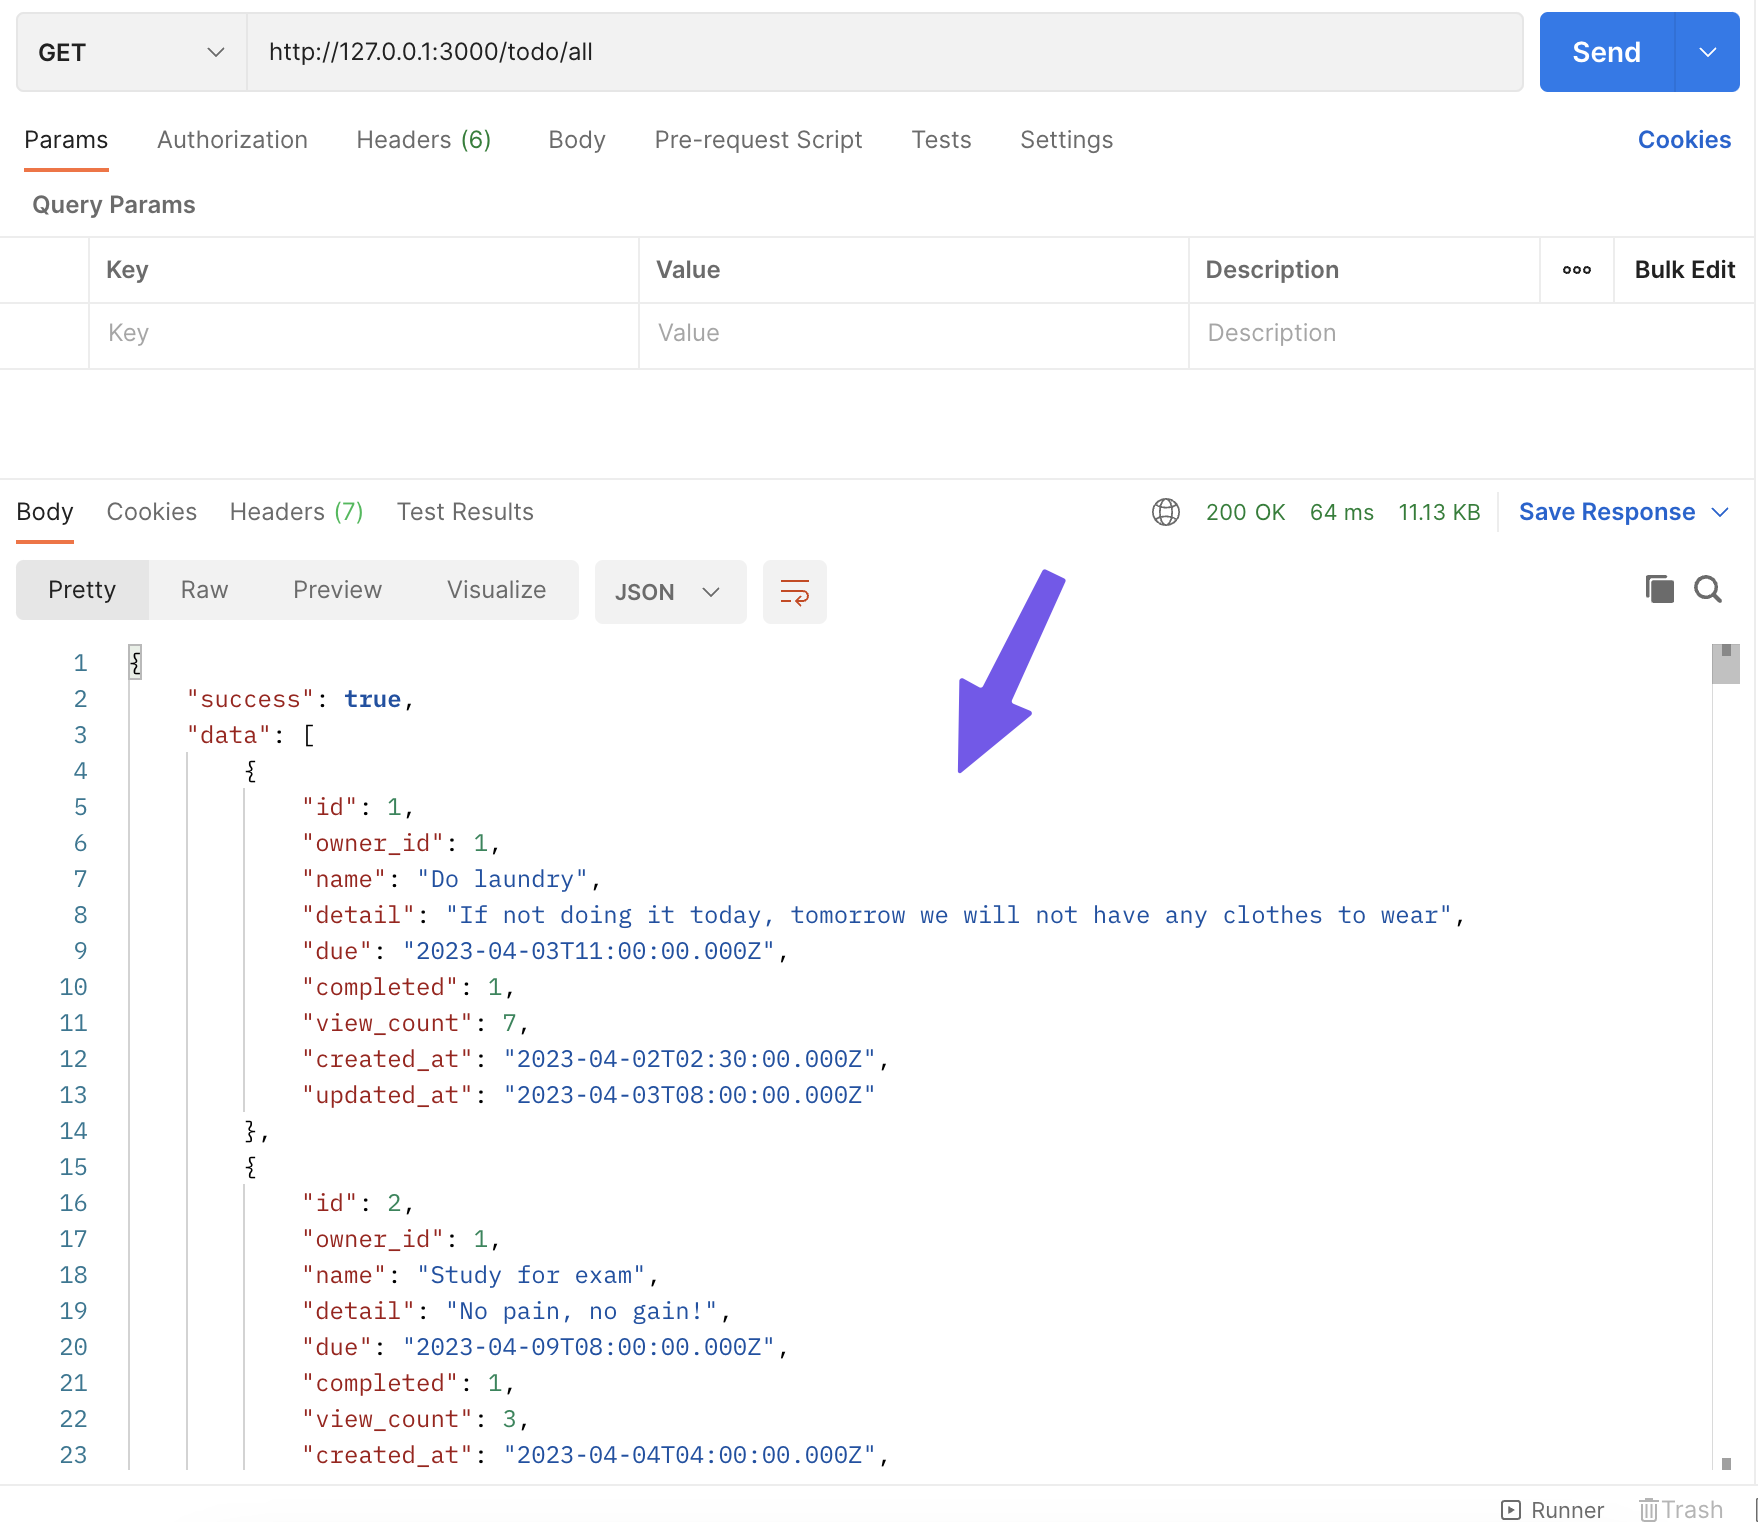
- You can use Postman to test your API from your backend application here. that easier than testing on your website. 😊
Let's back to our backend application.
Example of query parameter URL
- Create a endpoint that query a todo-list by
idusingparametersfrom URL.
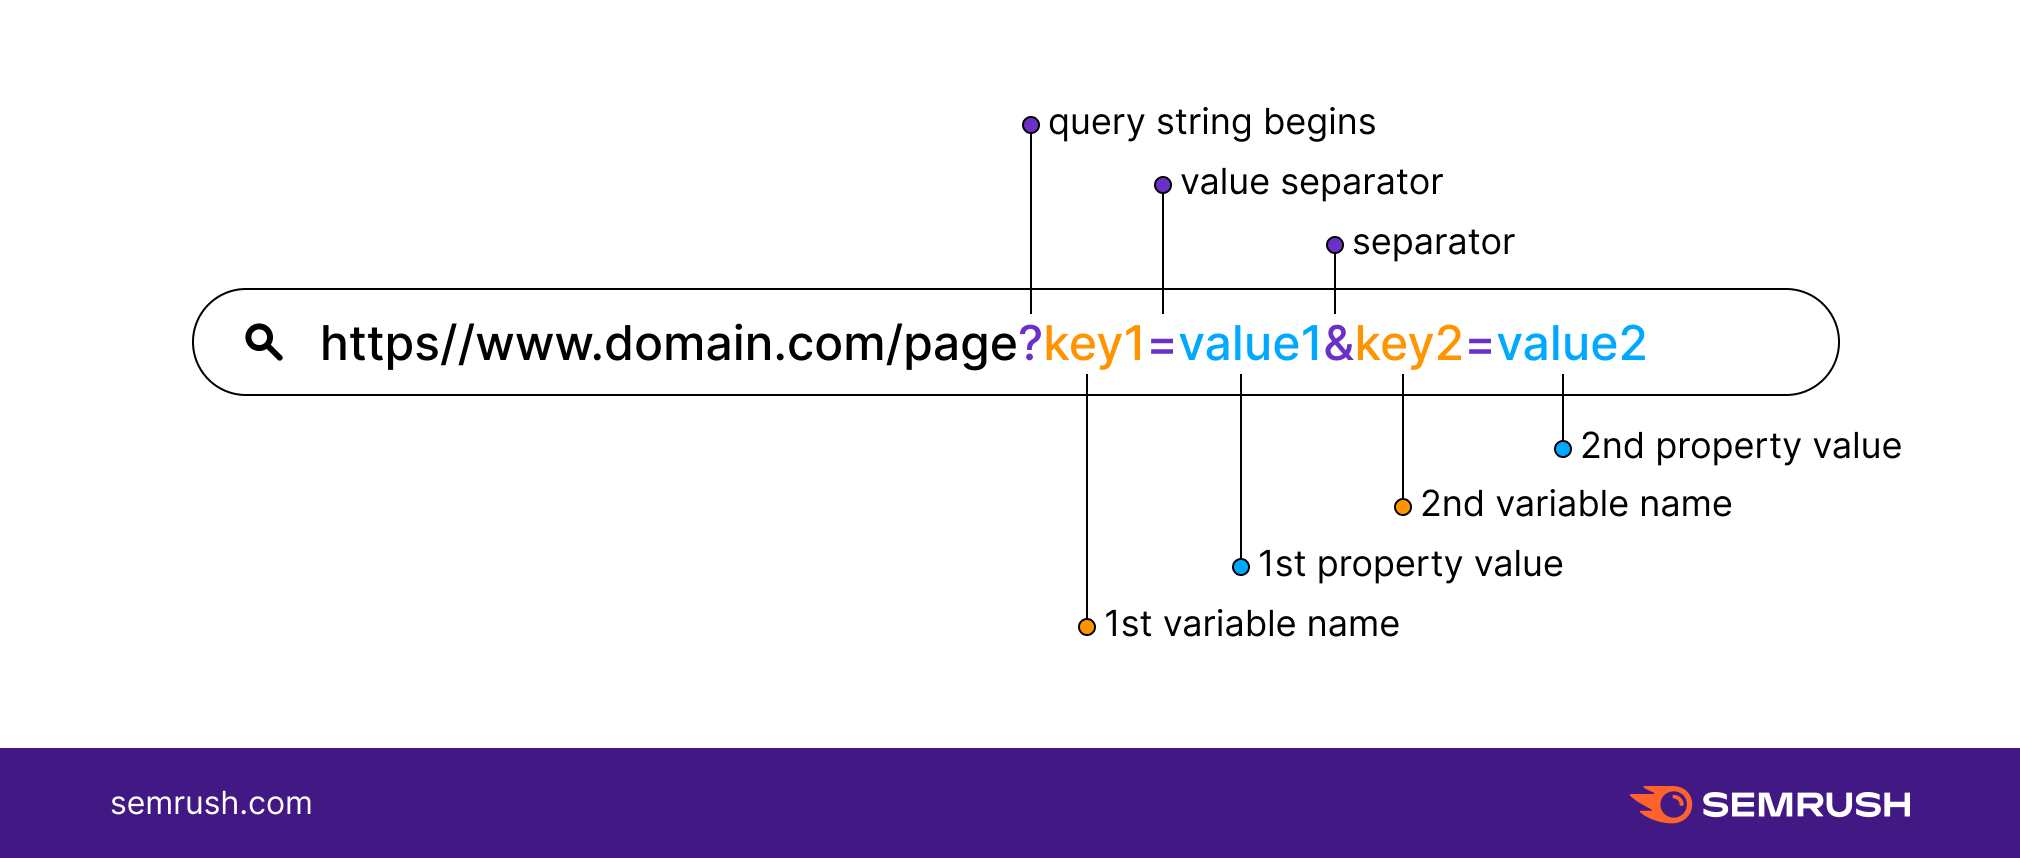
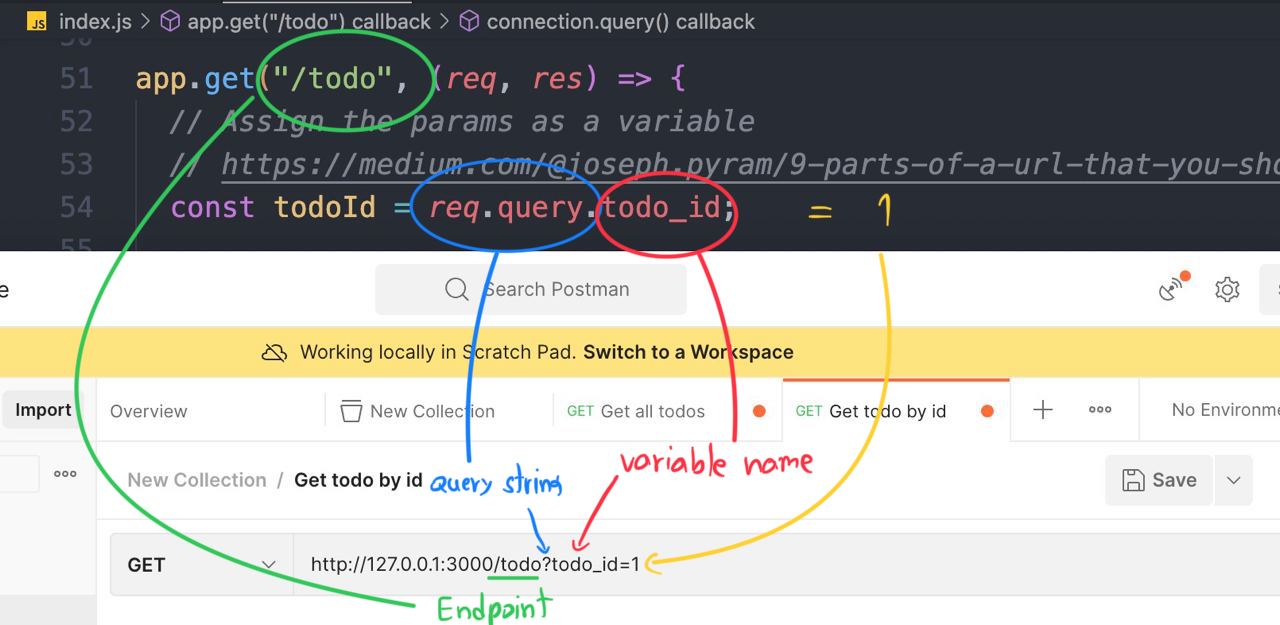
- This is how
query parameterworks in URL 👆🏻 - In this code, we have ...
const todoId = req.query.todo_id;
- that be a
query parameterfor this endpoint.
app.get("/todo", (req, res) => {
  // Assign the params as a variable
  // https://medium.com/@joseph.pyram/9-parts-of-a-url-that-you-should-know-89fea8e11713
  const todoId = req.query.todo_id;

  // Regex to check the todo_is is a number only or not
  const checkTodoId = new RegExp(/^\d+$/).test(todoId); // Boolean

  // Check if the todo_id is not exist or is not a number, return json with an error
  if (!todoId || !checkTodoId) {
    res.json({
      success: false,
      data: null,
      error: "todo_id is invalid",
    });
  }

  connection.query(`SELECT * FROM items WHERE id = ${todoId}`, (err, rows) => {
    // Check if cannot find the data in the database then return the error
    if (err) {
      res.json({
        success: false,
        data: null,
        error: err.message,
      });
    } else {
      // Return data to the client if success
      if (rows[0]) {
        res.json({
          success: true,
          data: rows[0],
          error: null,
        });
      } else {
        res.json({
          success: true,
          data: null,
          error: null,
        });
      }
    }
  });
});
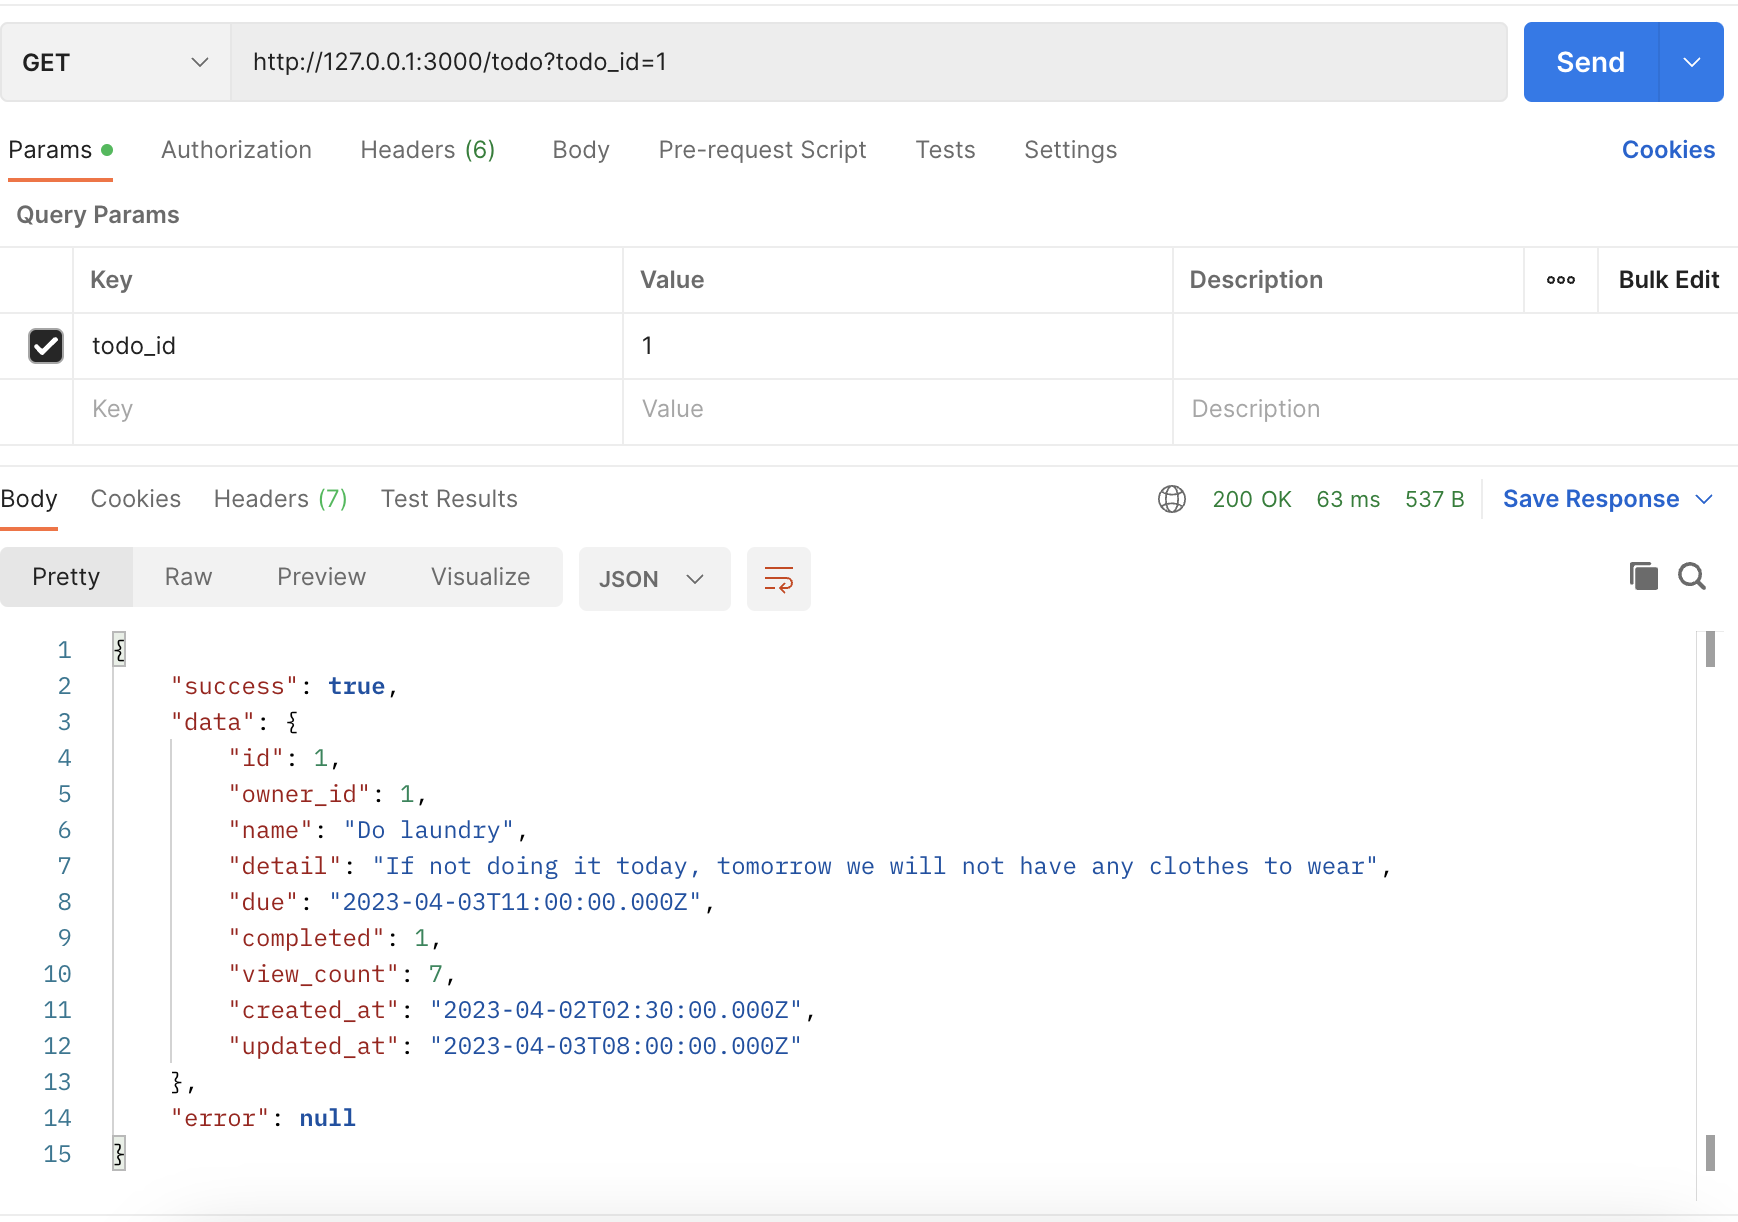
- Let's try sending a request by creating a new request at Postman
- Create a request.
http://127.0.0.1:3000/todo?todo_id=1

- Click
Send - The response from your backend application 👇🏻
Example of the POST method
- Create an endpoint that create a
user
-
Before writing a request, we need to install the library
body-parserfirst. -
npm i body-parser -
Because Express JS cannot read the JSON body request directly, So we need to install
body-parserfirst.
const bodyParser = require("body-parser"); // import the body-parser
// parse various different custom JSON types as JSON
app.use(bodyParser.json({ type: "application/json" }));
Code ...
const express = require("express");
const app = express();
const mysql = require("mysql2");
const bodyParser = require("body-parser"); 👈🏻
const port = 3000;

const connection = mysql.createConnection({
  host: "server2.mixkoap.com",
  port: "6103",
  user: "root",
  password: "root_apisitmaneerat",
  database: "csc105-workshop",
});

// Connect to database
connection.connect();

console.log("Database is connected");

// parse various different custom JSON types as JSON
app.use(bodyParser.json({ type: "application/json" })); 👈🏻

app.get("/", (req, res) => {
  res.send("Hello World!");
});
.
.
.
.
.
.
- Create an endpoint
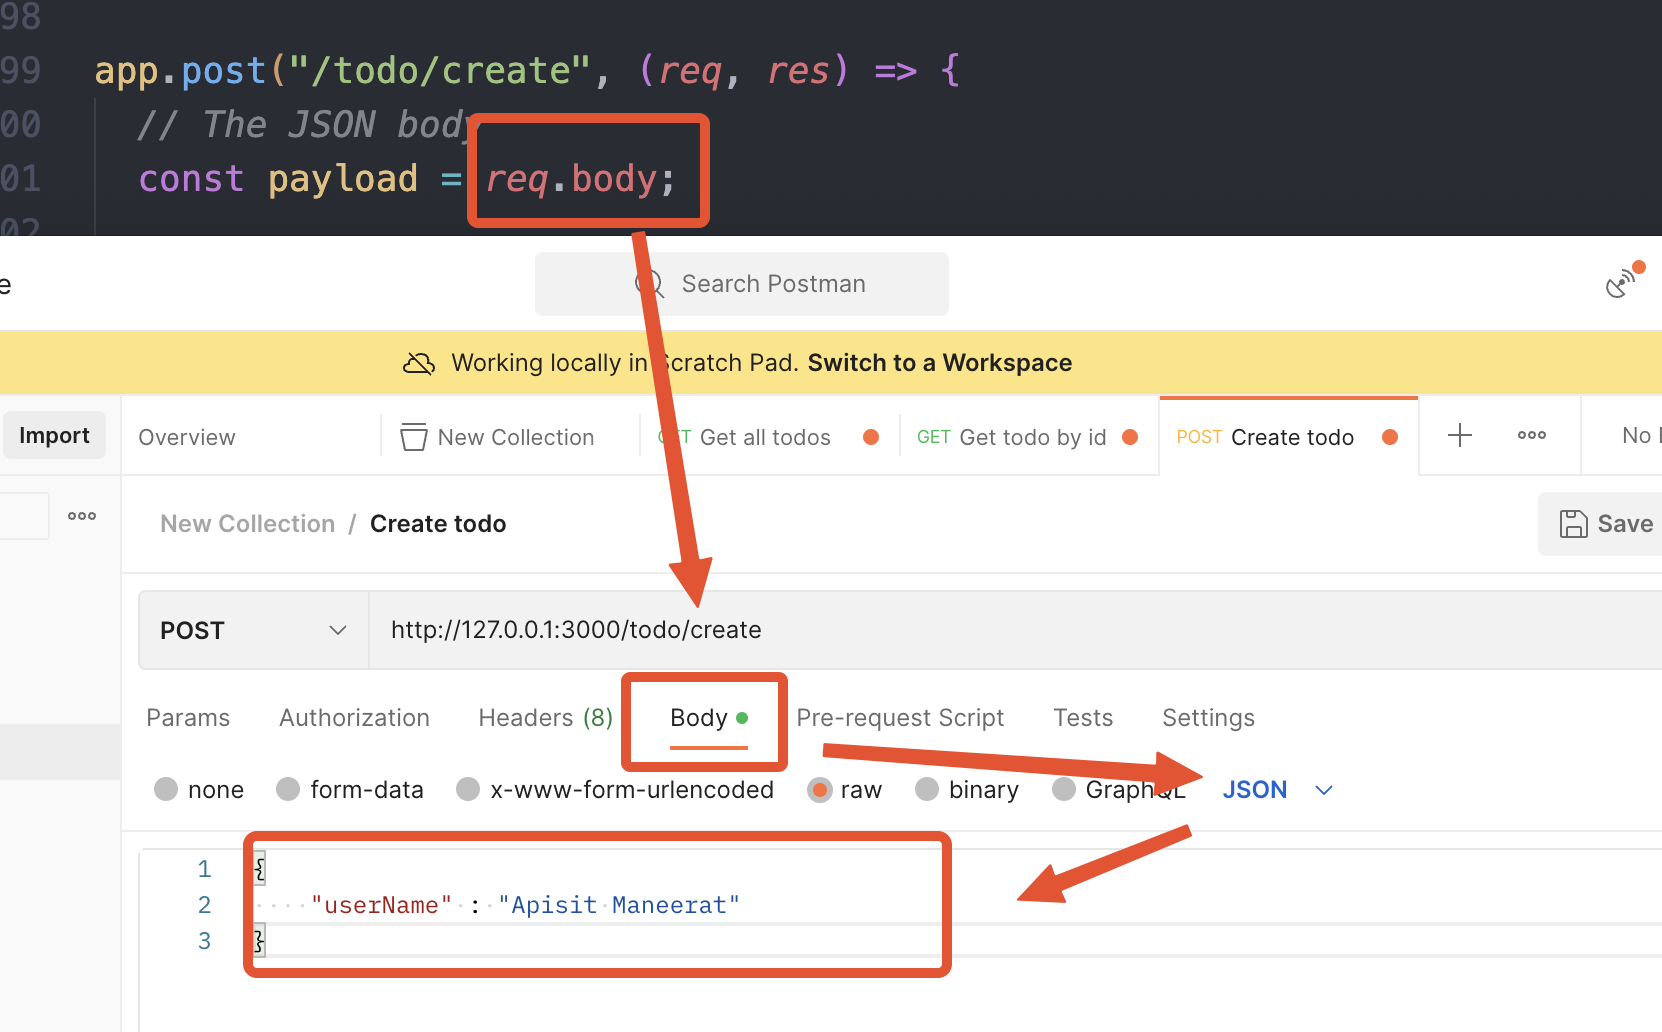
app.post("/todo/create", (req, res) => {
  // The JSON body
  const payload = req.body;

  connection.query(
    `INSERT INTO users (username) VALUES (?)`, [payload.userName], (err, rows) => {
      // Check if cannot find the data in the database then return the error
      if (err) {
        res.json({
          success: false,
          data: null,
          error: err.message,
        });
      } else {
        // Return data to the client if success
        console.log(rows);
        if (rows) {
          res.json({
            success: true,
            data: {
              message: "create success",
            },
          });
        }
      }
    }
  );
});
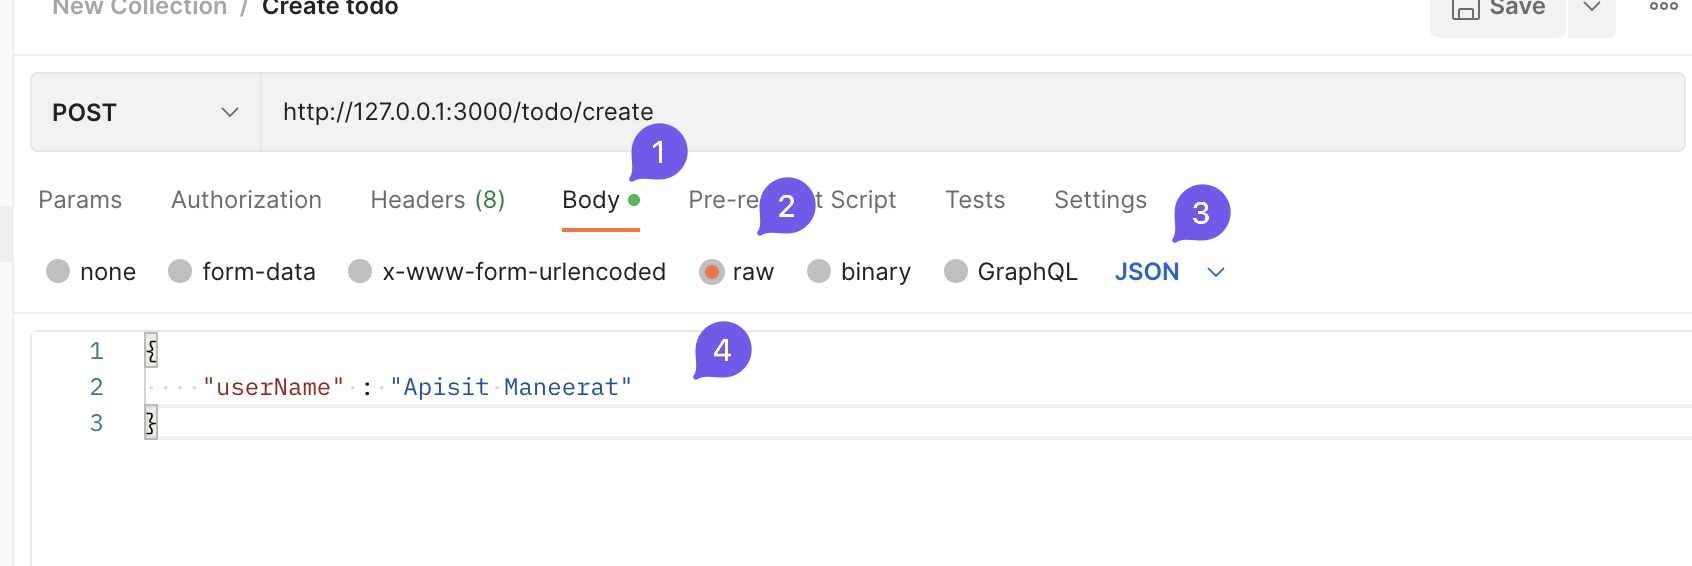
- The request body mostly send in
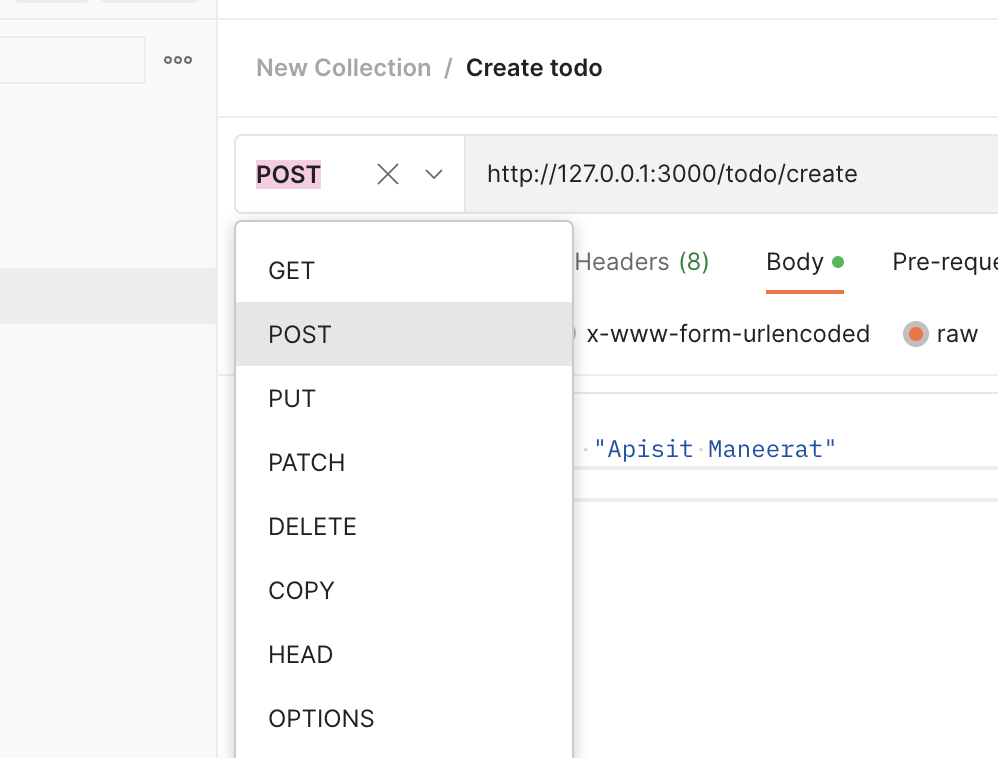
JSONformat 👆🏻 - Create a request in Postman and change the HTTP method to
POST
****Remark - HTTP Methods 👇🏻
- Add the
JSONbody 👇🏻
http://127.0.0.1:3000/todo/create
{
    "userName" : "Apisit Maneerat"
}
- Click
Send
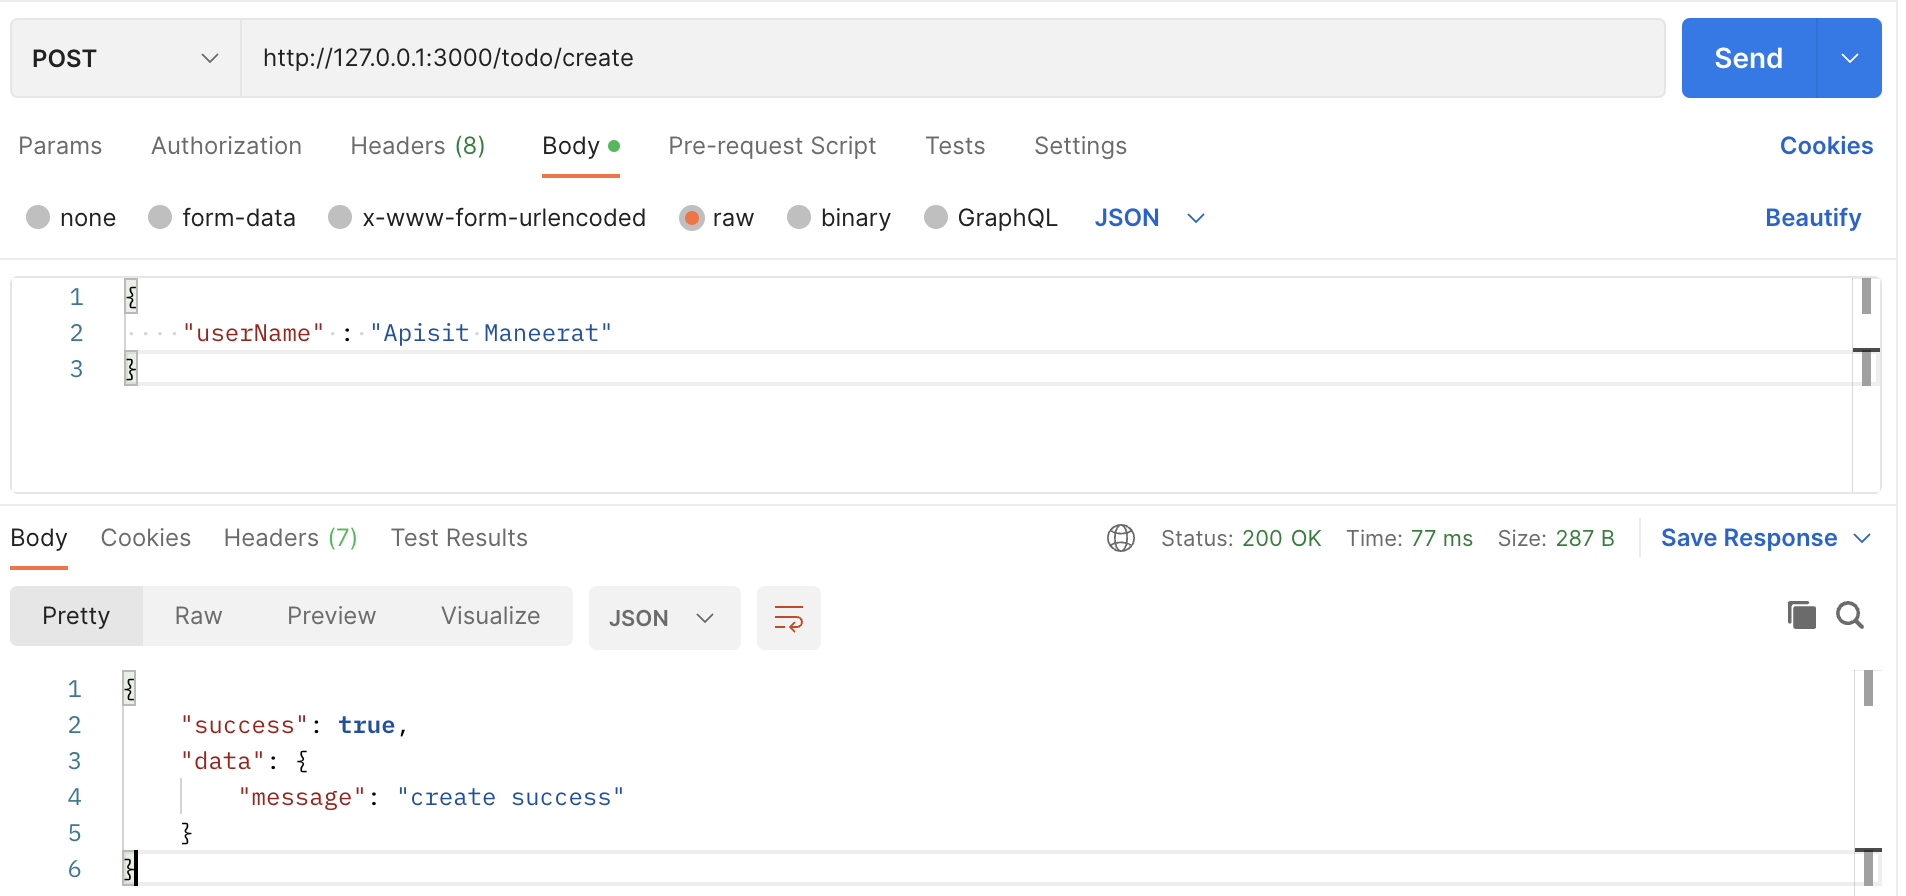
-
The response from your backend application. 👆🏻
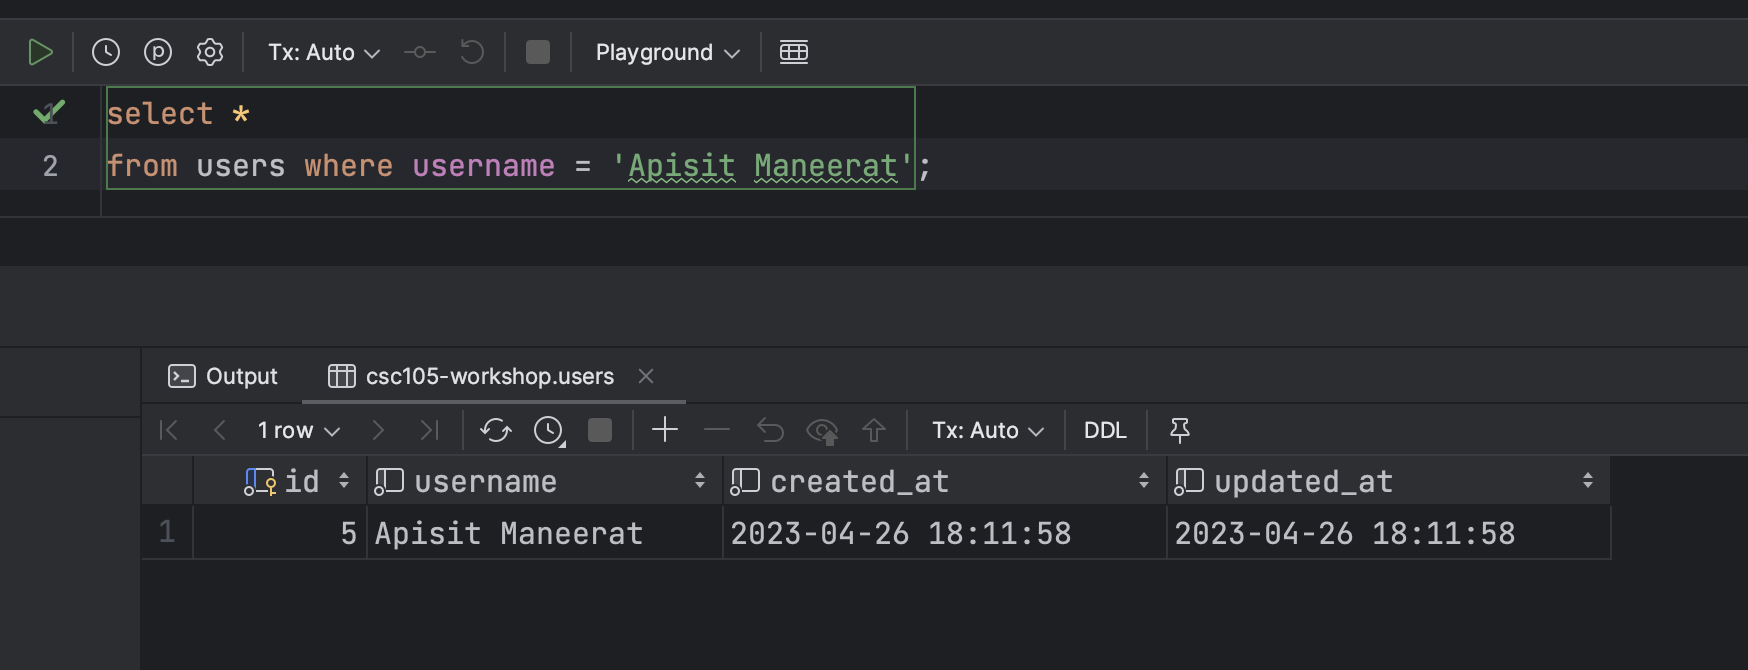
-
In the Database 👇🏻
- For more detail

Example of the PATCH method
- Create an endpoint that edit the data in the Database
- For example we are going to change the
nameanddetailfromid = 1

- Create the endpoint
- For this endpoint we use
.patch()because we are going to edit some fields that you specific in the Database.
app.patch("/todo/edit", (req, res) => {
  // The JSON body
  const payload = req.body;

  console.log(payload);

  connection.query(
    "UPDATE items SET name = ?, detail = ? WHERE id = ?", [payload.name, payload.detail, payload.id],
    (err, rows) => {
      // Check if cannot find the data in the database then return the error
      if (err) {
        res.json({
          success: false,
          data: null,
          error: err.message,
        });
      } else {
        // Return data to the client if success
        if (rows) {
          res.json({
            success: true,
            data: {
              message: "update successfully",
            },
          });
        }
      }
    }
  );
});
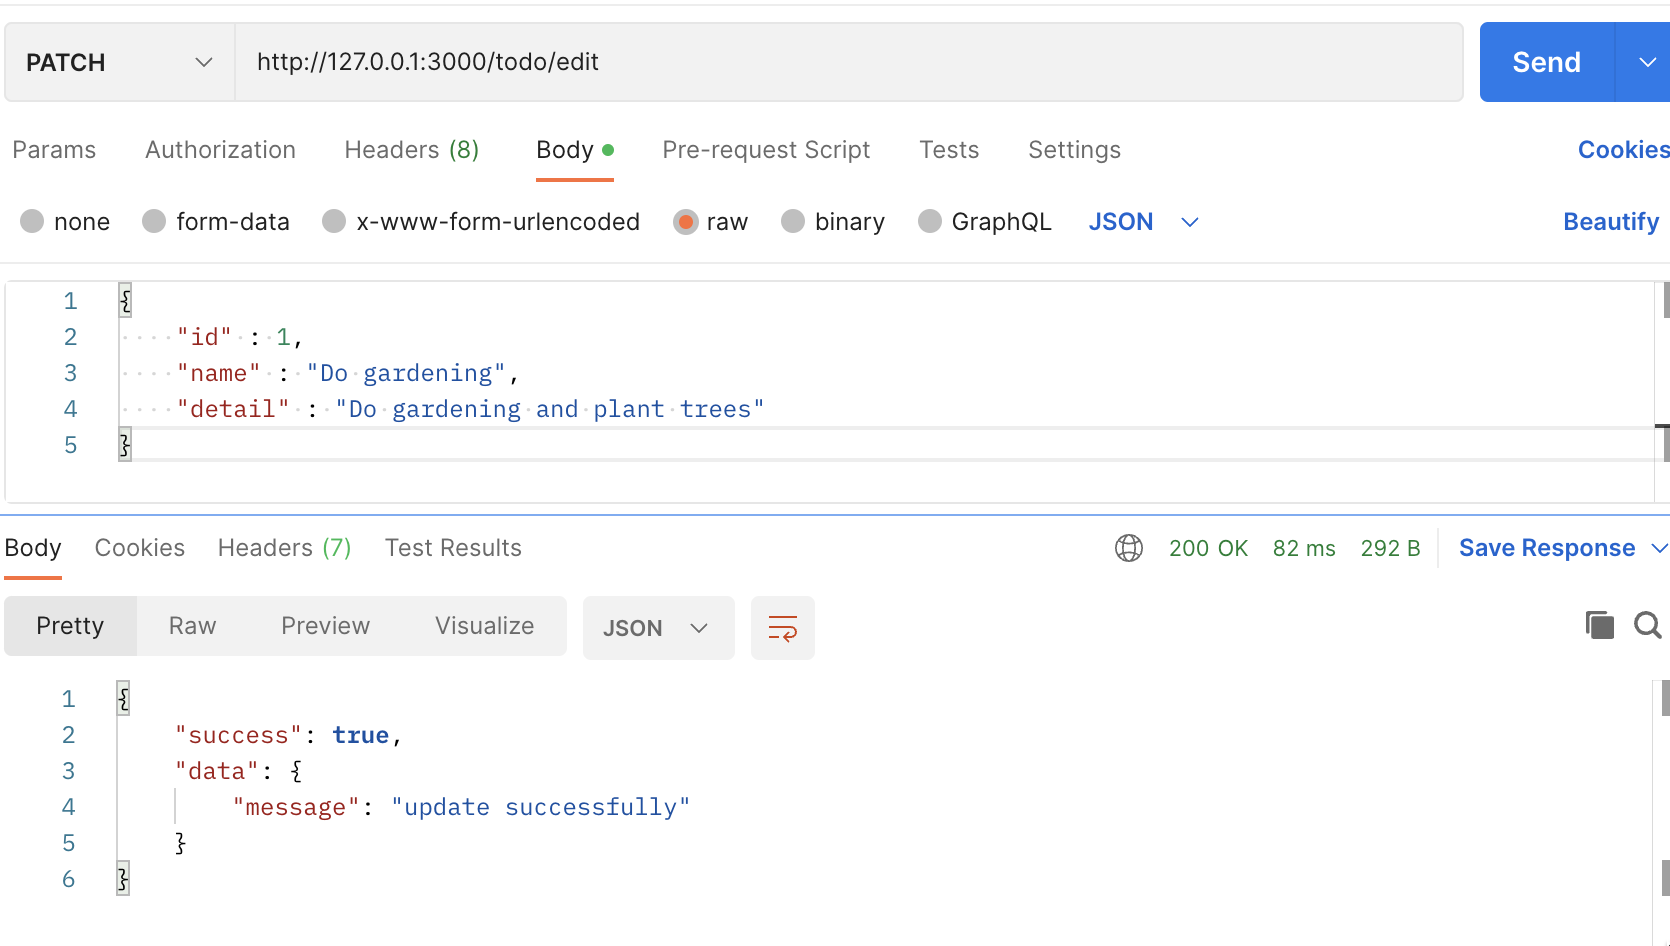
- Create a request in Postman
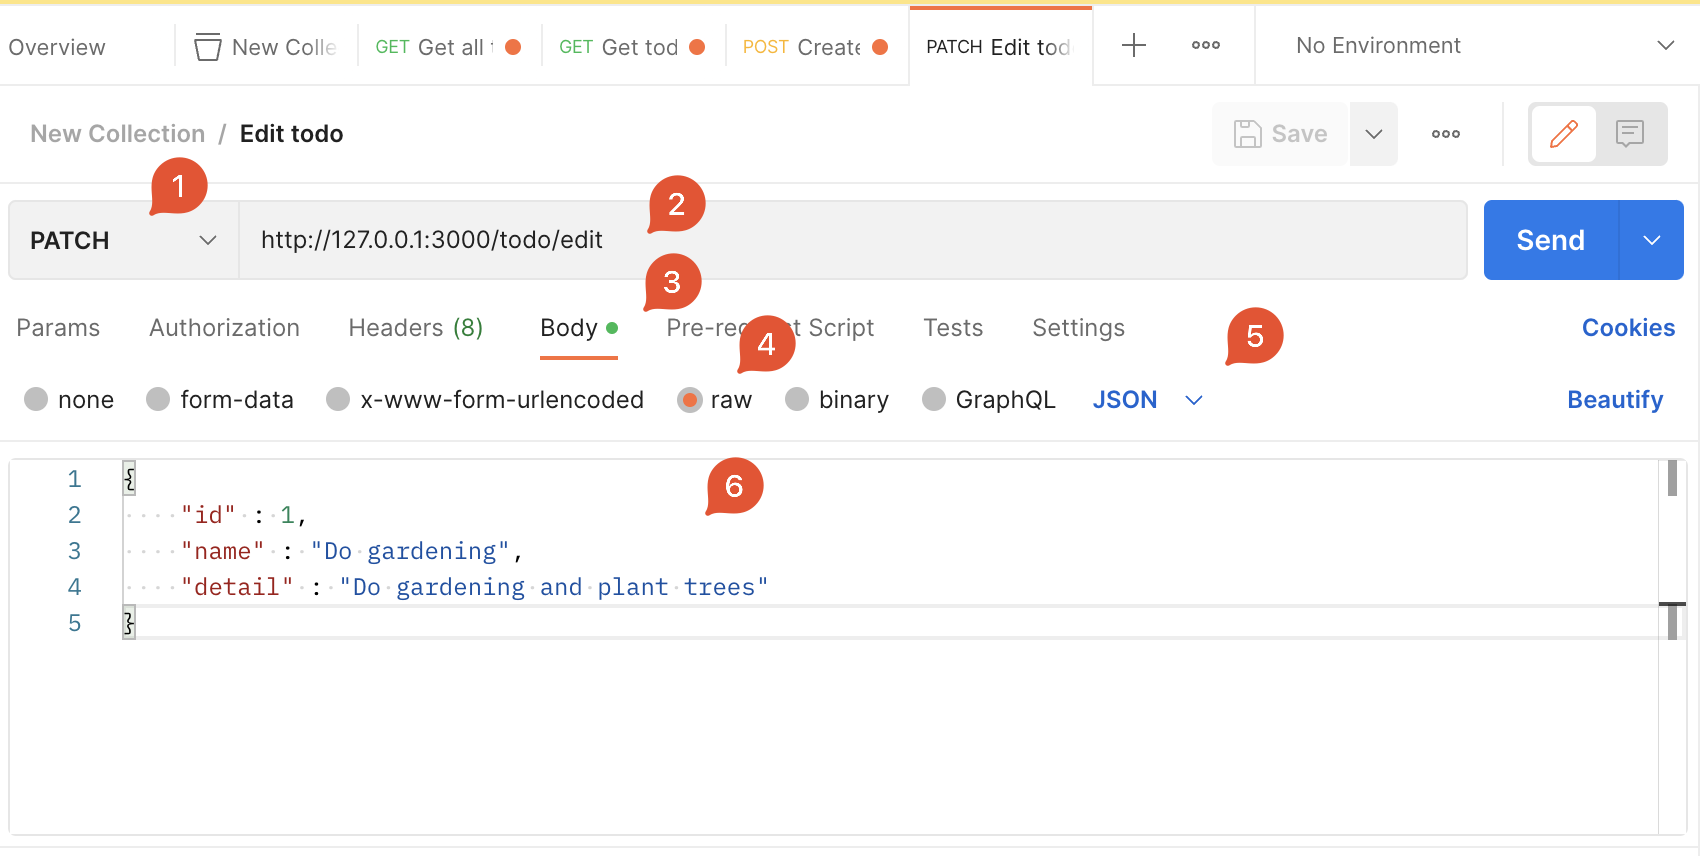
- Click
Send
Example of the DELETE method
- Create an endpoint that delete the data from the
linkstable in the database.
- For this endpoint, we will use
.delete()because we are going to delete data from the database. - We use
query stringto get the data from the client - Create an endpoint 👇🏻
app.delete("/todo/delete", (req, res) => {
  // Assign the params as a variable
  const id = req.query.id;
  const todoId = req.query.todo_id;

  connection.query(
    `DELETE FROM links where id = ? AND todo_id = ?`, [id, todoId],
    (err, rows) => {
      // Check if cannot find the data in the database then return the error
      if (err) {
        res.json({
          success: false,
          data: null,
          error: err.message,
        });
      } else {
        if (rows) {
          res.json({
            success: true,
            data: {
              message: "delete successfully",
            },
          });
        }
      }
    }
  );
});
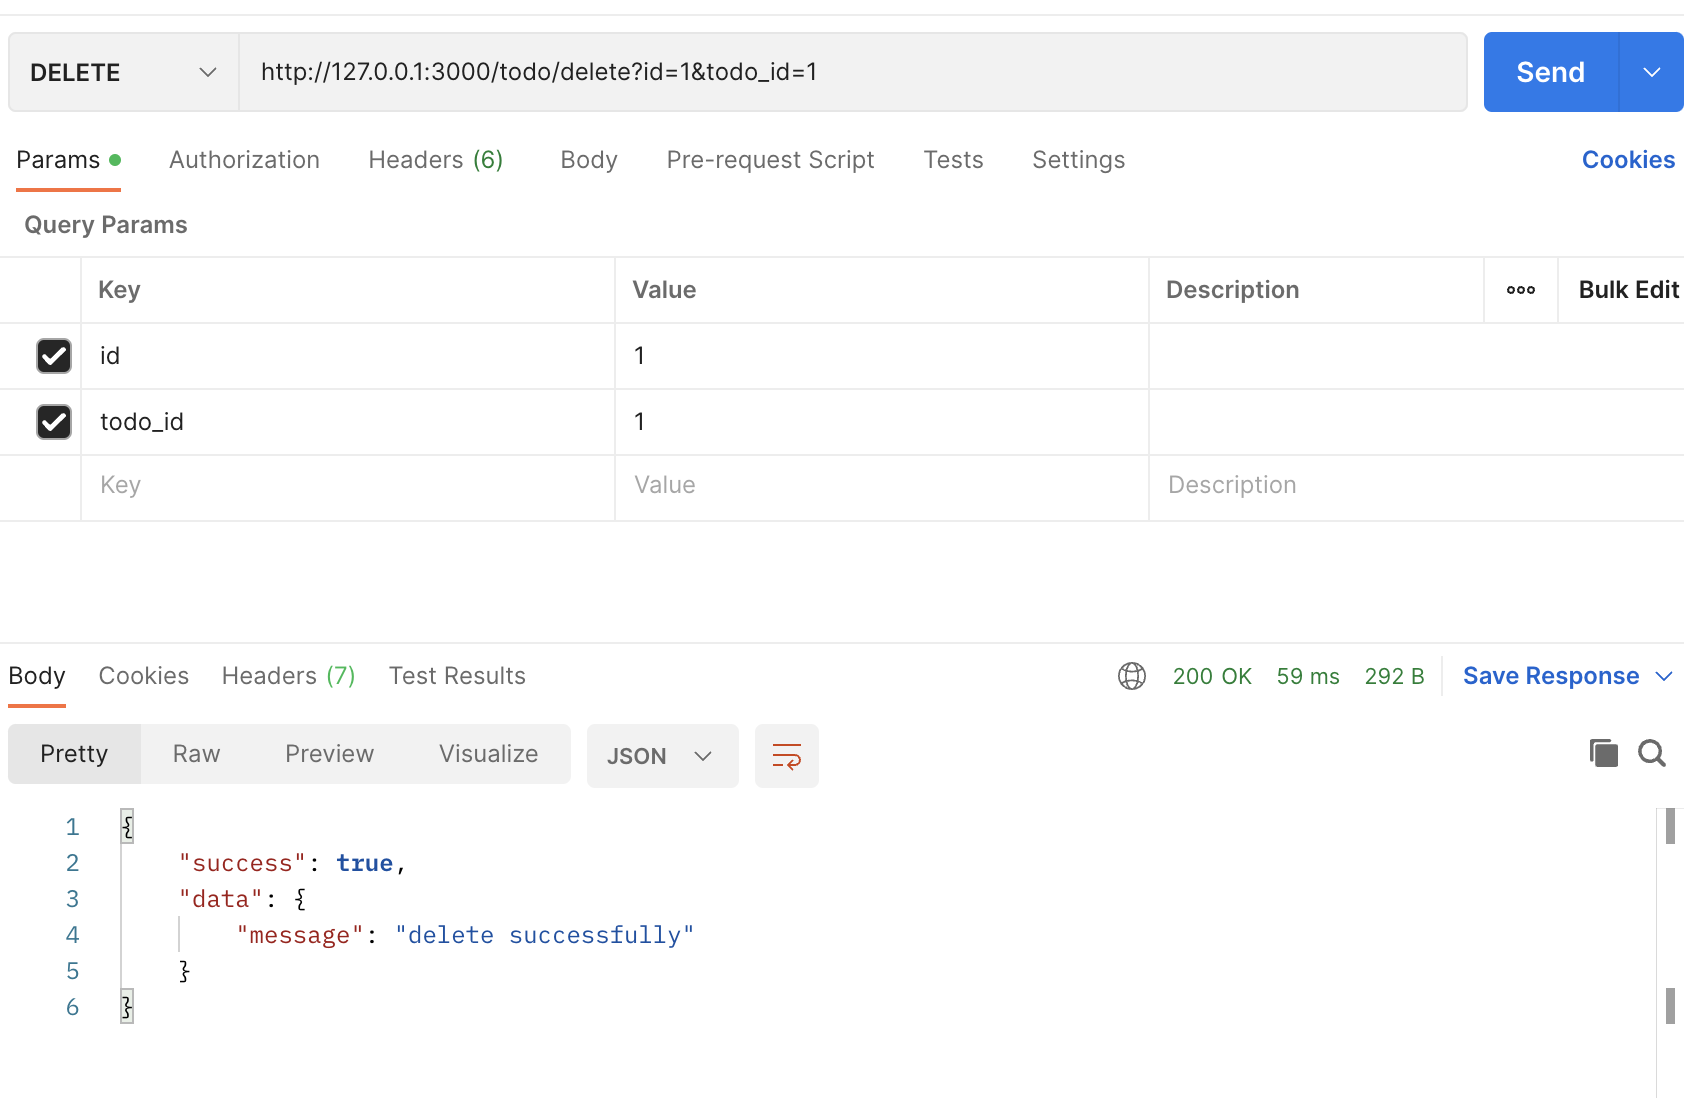
- Create a request in Postman

- Click
Send
--- End of the example ----
** This is the finalized code for this example 👇🏻
const express = require("express");
const app = express();
const mysql = require("mysql2");
const bodyParser = require("body-parser");
const port = 3000;

const connection = mysql.createConnection({
  host: "server2.mixkoap.com",
  port: "6103",
  user: "root",
  password: "root_apisitmaneerat",
  database: "csc105-workshop",
});

// Connect to database
connection.connect();

console.log("Database is connected");

// parse various different custom JSON types as JSON
app.use(bodyParser.json({ type: "application/json" }));

app.get("/", (req, res) => {
  res.send("Hello World!");
});

app.get("/hello", (req, res) => {
  res.json({
    name: "Apisit Maneerat",
    nickName: "Mixko",
    university: "KMUTT",
  });
});

app.get("/todo/all", (req, res) => {
  connection.query("SELECT * FROM items", (err, rows) => {
    // Check if cannot find the data in the database then return the error
    if (err) {
      res.json({
        success: false,
        data: null,
        error: err.message,
      });
    } else {
      // Return data to the client if success
      res.json({
        success: true,
        data: rows,
        error: null,
      });
    }
  });
});

app.get("/todo", (req, res) => {
  // Assign the params as a variable
  // https://medium.com/@joseph.pyram/9-parts-of-a-url-that-you-should-know-89fea8e11713
  const todoId = req.query.todo_id;

  // Regex to check the todo_is is a number only or not
  const checkTodoId = new RegExp(/^\d+$/).test(todoId); // Boolean

  // Check if the todo_id is not exist or is not a number, return json with an error
  if (!todoId || !checkTodoId) {
    res.json({
      success: false,
      data: null,
      error: "todo_id is invalid",
    });
  }

  connection.query(`SELECT * FROM items WHERE id = ${todoId}`, (err, rows) => {
    // Check if cannot find the data in the database then return the error
    if (err) {
      res.json({
        success: false,
        data: null,
        error: `Data not found ${err.message}`,
      });
    } else {
      // Return data to the client if success
      if (rows[0]) {
        res.json({
          success: true,
          data: rows[0],
          error: null,
        });
      } else {
        res.json({
          success: true,
          data: null,
          error: null,
        });
      }
    }
  });
});

app.post("/todo/create", (req, res) => {
  // The JSON body
  const payload = req.body;

  connection.query(
    `INSERT INTO users (username) VALUES (?)`,
    [payload.userName],
    (err, rows) => {
      // Check if cannot find the data in the database then return the error
      if (err) {
        res.json({
          success: false,
          data: null,
          error: err.message,
        });
      } else {
        // Return data to the client if success
        if (rows) {
          res.json({
            success: true,
            data: {
              message: "create successfully",
            },
          });
        }
      }
    }
  );
});

app.patch("/todo/edit", (req, res) => {
  // The JSON body
  const payload = req.body;

  console.log(payload);

  connection.query(
    "UPDATE items SET name = ?, detail = ? WHERE id = ?",
    [payload.name, payload.detail, payload.id],
    (err, rows) => {
      // Check if cannot find the data in the database then return the error
      if (err) {
        res.json({
          success: false,
          data: null,
          error: err.message,
        });
      } else {
        // Return data to the client if success
        if (rows) {
          res.json({
            success: true,
            data: {
              message: "update successfully",
            },
          });
        }
      }
    }
  );
});

app.delete("/todo/delete", (req, res) => {
  // Assign the params as a variable
  const id = req.query.id;
  const todoId = req.query.todo_id;

  connection.query(
    `DELETE FROM links where id = ? AND todo_id = ?`,
    [id, todoId],
    (err, rows) => {
      // Check if cannot find the data in the database then return the error
      if (err) {
        return res.json({
          success: false,
          data: null,
          error: err.message,
        });
      } else {
        if (rows) {
          res.json({
            success: true,
            data: {
              message: "delete successfully",
            },
          });
        }
      }
    }
  );
});

app.listen(port, () => {
  console.log(`Example app listening on port ${port}`);
});
More examples for those who want to create more than one query in one endpoint
app.get("/todo/from", async (req, res) => {
  const userId = req.query.userId;

  // User data
  const userData = await new Promise((resolve, reject) => {
    connection.query(
      `SELECT * FROM users WHERE id = ?`,
      [userId],
      (err, rows) => {
        if (err) {
          res.json({
            suceess: false,
            error: err.message,
          });
        } else {
          resolve(rows[0]);
        }
      }
    );
  });

  // User's todos
  const userTodos = await new Promise((resolve, reject) => {
    connection.query(
      `SELECT * FROM items WHERE owner_id = ?`,
      [userId],
      (err, rows) => {
        if (err) {
          res.json({
            suceess: false,
            error: err.message,
          });
        } else {
          resolve(rows);
        }
      }
    );
  });

  res.json({
    success: true,
    data: {
      user_data: userData,
      todos: userTodos,
    },
    error: null,
  });
});