RPG theme TODO App
Now we're gonna try to do some Lab about what we've learn so far. Please follow the given instruction until the end.
Objective:
- Understand the use of useState and Manage the state
- Understand concept of Component in React
- Understand to import and export concept in React
TodoApp Lab
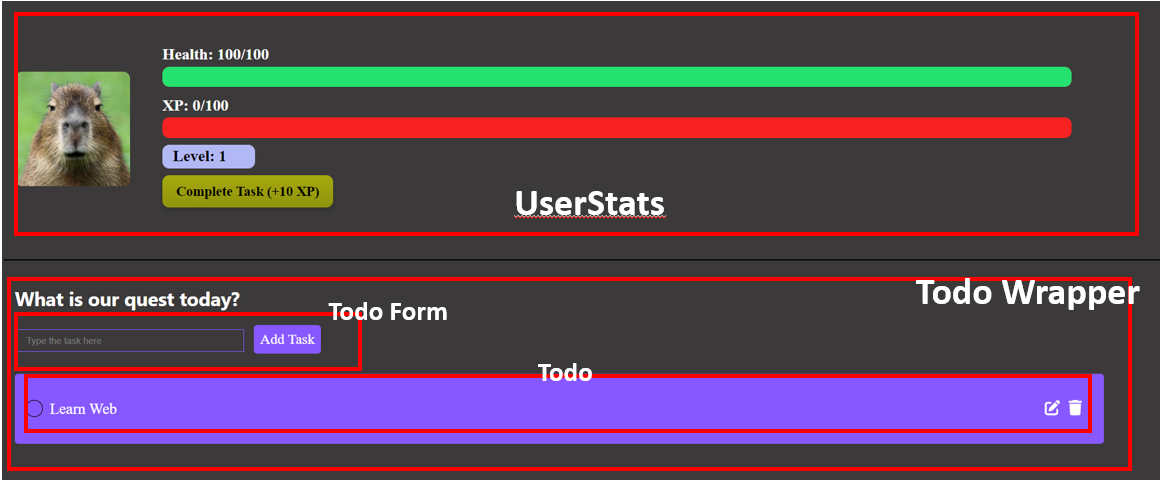
The Final result of the project should be like this
In the finished project is should have 4 different component
- UserStats
- Todo Wrapper
- TodoForm
- Todo
Setup The Project
1. Follow the previous lesson about how to create or start a react project or you can click here to navigate
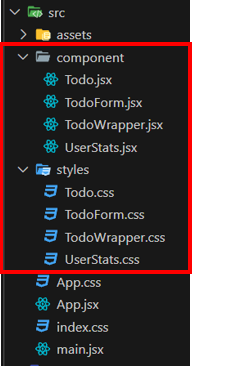
2. Inside the src folder create 2 folder, component and styles
- Component : Storing jsx files of each component
- Styles : storing css files of each component
After that create new files inside each folder, below is the files you need to create
component folder
- Todo.jsx
- TodoForm.jsx
- TodoWrapper.jsx
- UserStats.jsx
styles folder
- Todo.css
- TodoForm.css
- TodoWrapper.css
- UserStats.css
3. Change the code inside index.css with code below
:root {
  font-family: Inter, system-ui, Avenir, Helvetica, Arial, sans-serif;
  line-height: 1.5;
  font-weight: 400;
  background-color: #3B3939;
}
4. Change the code inside App.jsx with code below
import UserStats from "./component/UserStats";
import { TodoWrapper } from "./component/TodoWrapper";
import './App.css';

const App = () => {
  return (
    <div className="Home">
      <div className="Container">
          <UserStats />
          <TodoWrapper />
      </div>
    </div>
    );
}

export default App;
5. Change the code inside App.css with code below
.Container{
  align-items: center;
  background-color: #3B3939;
}

.profile-pic {
  width: 10%;
  height: 50%;
  margin-right: 2%;
  border-radius: 10px;
}

.stats {
display: flex;
align-items: center;
width: 100%;
margin-left: 1%;
}


.column {
display: flex;
flex-direction: column;
color: white;
font-size: 23px ;
width: 80%;
font-family: 'Sanchez', serif;
}

.stat {
margin-bottom: 10px;
position: relative;
margin-left: 1%;
color: #000;
font-weight: 700;
}

.bar {
height: 30px;
background-color: #F92222;
border-radius: 10px;
position: relative;
overflow: hidden;
display: flex;
align-items: center;
}

.health-bar {
height: 100%;
background-color: #24E170;
border-radius: 10px;
position: absolute;
top: 0;
left: 0;
display: flex;
align-items: center;
}

.xp-bar {
height: 100%;
background-color: #F4F90D;
border-radius: 10px;
position: absolute;
top: 0;
left: 0;
display: flex;
align-items: center;
}

.Info{
color: white;
}

.level-bar{
  background-color: #B2B8F4;
    padding-left: 15px;
    width: 120px;
    border-radius: 10px;
}
Currently when you run the project it doesn't show anything since we haven't create the component yet. In the next step we gonna start creating the components
Create UserStats component
Now let's create our UserStats component
1. Copy and paste the code below into UserStats.jsx component
import { useState } from "react";
import "../styles/UserStats.css"; // Import the CSS file for styling

function UserStats() {
  const [level, setLevel] = useState(1);
  const [xp, setXp] = useState(0);
  const [maxXp, setMaxXp] = useState(100);
  const [health] = useState(100);
  const [maxHealth] = useState(100);

  const addXp = (amount) => {
    const newXP = xp + amount;
    if (newXP >= maxXp) {
      // Level up if XP exceeds maximum
      const remainingXP = newXP - maxXp;
      setLevel((prevLevel) => prevLevel + 1);
      setXp(remainingXP); // Set XP with remaining XP after leveling up
      setMaxXp((prevMaxXp) => prevMaxXp * 2); // Double the maximum XP
    } else {
      setXp(newXP);
    }
  };

  return (
    <div className="User-Container">
      <div className="stats">
        <img
          src="https://www.rainforest-alliance.org/wp-content/uploads/2021/06/capybara-square-1.jpg.optimal.jpg"
          alt="Profile"
          className="profile-pic"
        />
        <div className="column">
          <div className="stat">
            <span className="Info">
              Health: {health}/{maxHealth}
            </span>
            <div className="bar">
              <div
                className="health-bar"
                style={{ width: `${(health / maxHealth) * 100}%` }}
              ></div>
            </div>
          </div>
          <div className="stat">
            <span className="Info">XP: {xp}/{maxXp}</span>
            <div className="bar">
              <div
                className="xp-bar"
                style={{ width: `${(xp / maxXp) * 100}%` }}
              ></div>
            </div>
          </div>
          <div className="stat">
            <div className="level-bar">
              Level: <span className="value">{level}</span>
            </div>
            <button className="xp-button" onClick={() => addXp(10)}>
              Complete Task (+10 XP)
            </button>
          </div>
        </div>
      </div>
    </div>
  );
}

export default UserStats;
2. Copy and paste the code below into UserStats.css file
.User-Container{
    display: flex;
    flex-direction: flex-start;
    align-items: center;
    height: 380px;
    background-color: #3B3939;
    border-bottom: 2px solid #000000;
}

.profile-pic {
    width: 20%;
    height: 50%;
    margin-right: 2%;
    border-radius: 10px;
  }

.stats {
  display: flex;
  align-items: center;
  width: 100%;
  margin-left: 1%;
}

.column {
  display: flex;
  flex-direction: column;
  color: white;
  font-size: 2rem ;
  width: 80%;
  font-family: 'Sanchez', serif;
}

.stat {
  margin-bottom: 10px;
  position: relative;
  margin-left: 1%;
  color: #000;
  font-weight: 700;
}

.bar {
  height: 1rem;
  background-color: #F92222;
  border-radius: 10px;
  position: relative;
  overflow: hidden;
  display: flex;
  align-items: center;
}

.health-bar {
  height: 100%;
  background-color: #24E170;
  border-radius: 10px;
  position: absolute;
  top: 0;
  left: 0;
  display: flex;
  align-items: center;
}


.xp-bar {
  height: 100%;
  background-color: #F4F90D;
  border-radius: 10px;
  position: absolute;
  top: 0;
  left: 0;
  display: flex;
  align-items: center;
}

.Info{
  color: white;
}

.level-bar{
    background-color: #B2B8F4;
    padding-left: 15px;
    width: 2rem;
    border-radius: 10px;
}

.xp-button{
  background: linear-gradient(to bottom, #a6a90e 0%, #8f930b 100%);
  color: rgb(0, 0, 0);
  border: none;
  border-radius: 10px;
  padding: 12px 20px;
  font-size: 20px;
  font-weight: bold;
  margin-top: 10px;
  cursor: pointer;
  font-family: 'Sanchez', serif;
  box-shadow: 0px 4px 8px rgba(0, 0, 0, 0.15);
  transition: background-color 0.3s ease;
}

.xp-button:hover{
  background-color: #ffffff;
}
3. If you run the project you will not see the result yet because we don't have the todo wrapper component. In case you want to see your result what you can do is comment on todo wrapper in App.jsx like in this code below
import UserStats from "./component/UserStats";
// import { TodoWrapper } from "./component/TodoWrapper";
import './App.css';

const App = () => {
  return (
    <div className="Home">
      <div className="Container">
          <UserStats />
          {/* <TodoWrapper /> */}
      </div>
    </div>
    );
}

export default App;
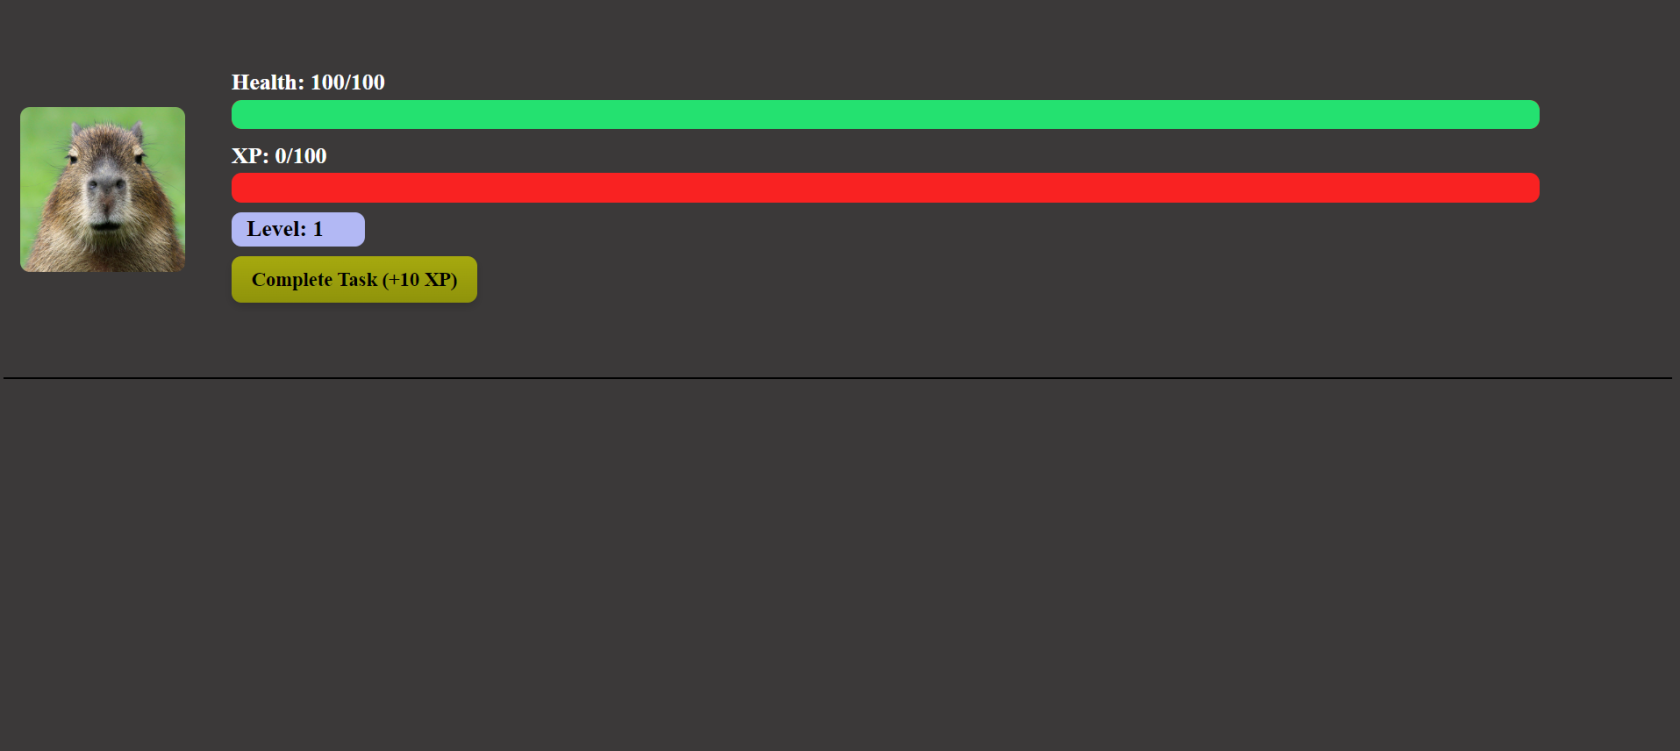
Your result when you run it should appear like this
Creating To Do list
Create To-Do Wrapper Component
Now we're gonna have before that I need you to install some dependencies
1. Type this command inside the project
npm install @fortawesome/react-fontawesome @fortawesome/free-solid-svg-icons uuidSo we installed 3 different dependencies, below is the function of each dependencies
1. `@fortawesome/react-fontawesome`: React wrapper for Font Awesome icons.
2. `@fortawesome/free-solid-svg-icons`: Package containing free solid icons for Font Awesome.
3. `uuid`: Package for generating unique identifiers (UUIDs) in JavaScript.
2. Copy and paste this code below inside TodoWrapper.jsx component
import  { useState } from "react";
import { Todo } from "./Todo"; // Importing Todo component
import { TodoForm } from "./TodoForm"; // Importing TodoForm component
import { v4 as uuidv4 } from "uuid"; // Importing uuid library
import "../styles/TodoWrapper.css"; // Importing CSS file for styling

export const TodoWrapper = () => {
  // State to hold the list of todos
  const [todos, setTodos] = useState([]);

  // Function to add a new todo
  const addTodo = (todo) => {
    setTodos([
      ...todos,
      { id: uuidv4(), task: todo, completed: false }, // Adding new todo with unique id
    ]);
  }

  // Function to delete a todo
  const deleteTodo = (id) => {
    setTodos(todos.filter((todo) => todo.id !== id)); // Filtering out the todo with the specified id
  }

  // Function to toggle the completion status of a todo
  const toggleComplete = (id) => {
    setTodos(
      todos.map((todo) =>
        todo.id === id ? { ...todo, completed: !todo.completed } : todo // Toggling completed status of the todo with the specified id
      )
    );
  }

  return (
    <div className="TodoWrapper">
      <h1 style={{ color: '#fff', marginBottom: '0.5rem', fontSize: '1.75rem'}}>What is our quest today?</h1>
      <TodoForm addTodo={addTodo} /> {/* TodoForm component for adding new todos */}
      {/* Displaying todos */}
      {todos.map((todo) => (
        <Todo
          key={todo.id} // Unique key for each todo
          task={todo}
          deleteTodo={deleteTodo} // Function to delete todo
          toggleComplete={toggleComplete} // Function to toggle completion status
        />
      ))}
    </div>
  );
};
3. Copy and paste this code below inside TodoWrapper.css file
.TodoWrapper {
    background: #3B3939;
    padding: 1rem;
    border-radius: 3px;
    height: 100%;
    width: 93vw;
    margin-left: 0;
  }
Create To-Do Form Component
1. Copy and paste the code below inside TodoForm.jsx component
import  {useState} from 'react'
import '../styles/TodoForm.css'

export const TodoForm = ({addTodo}) => {
    const [value, setValue] = useState('');

    const handleSubmit = (e) => {
        e.preventDefault();
        if (value) {
          // add todo
          addTodo(value);
          // clear form after submission
          setValue('');
        }
      };
  return (
    <form onSubmit={handleSubmit} className="TodoForm">
    <input type="text" value={value} onChange={(e) => setValue(e.target.value)} className="todo-input" placeholder='Type the task here' />
    <button type="submit" className='todo-btn'>Add Task</button>
  </form>
  )
}
2. Copy and paste the code below inside TodoForm.css file
.TodoForm {
    width: 80vw;
  }

  .todo-input {
    outline: none;
    background: none;
    border: 1px solid #8758ff;
    padding: 0.5rem 1rem;
    margin-top: 1rem;
    margin-bottom: 2rem;
    width: 300px;
    color: #fff;
  }

  .todo-input::placeholder {
    color: #ffffff4d;
  }

  .todo-btn {
    background: #8758ff;
    color: #fff;
    border: none;
    padding: 0.55rem;
    cursor: pointer;
    font-size: 1.3rem;
    font-family: 'Sanchez', serif;
    margin-left: 15px;
    border-radius: 5px;
  }
Create To-Do Component
1. Copy and paste the code below inside Todo.jsx component
import { FontAwesomeIcon } from '@fortawesome/react-fontawesome'
import { faPenToSquare } from '@fortawesome/free-solid-svg-icons'
import { faTrash } from '@fortawesome/free-solid-svg-icons'
import '../styles/Todo.css'

export const Todo = ({ task, deleteTodo, editTodo, toggleComplete }) => {
  const buttonStyle = {
    borderRadius: '50%',
    width: '25px',
    height: '25px',
    backgroundColor: task.completed ? 'green' : 'transparent',
    border: '1px solid black',
    cursor: 'pointer',
  }

  return (
    <div className="Todo">
      <div style={{ display: 'flex', alignItems: 'center' }}>
        <button
          style={buttonStyle}
          onClick={() => toggleComplete(task.id)}
        ></button>
        <p
          className={`${task.completed ? 'completed' : ''}`}
          style={{ marginLeft: '10px', flex: 1 }}
        >
          {task.task}
        </p>
      </div>
      <div>
        <FontAwesomeIcon icon={faPenToSquare} onClick={() => editTodo(task.id)} />
        <FontAwesomeIcon icon={faTrash} onClick={() => deleteTodo(task.id)} />
      </div>
    </div>
  )
}
2. Copy and paste the code below inside Todo.css component
.Todo {
    display: flex;
    justify-content: space-between;
    align-items: center;
    background: #8758ff;
    color: #fff;
    padding: 0.75rem 1rem;
    border-radius: 5px;
    margin-bottom: 1rem;
    cursor: pointer;
    font-size: 1.4rem;
    font-family: 'Sanchez', serif;
  }

  .fa-trash {
    margin-left: 0.75rem;
    margin-right: 1rem;
  }

  .completed {
    color: #c5aeff;
    text-decoration: line-through;
  }
Run the project
Since you already create all of the component, you can remove the comment from the App.jsx (if you comment todo wrapper before)
import UserStats from "./component/UserStats";
import { TodoWrapper } from "./component/TodoWrapper";
import './App.css';

const App = () => {
  return (
    <div className="Home">
      <div className="Container">
          <UserStats />
          <TodoWrapper />
      </div>
    </div>
    );
}

export default App;


